You purchased the Electric Cultivator EK-3
We are pleased with the solution you have chosen.
Many years of experience in the production, sale and operation of electric cultivators have shown their high reliability and performance. Some operational inconveniences associated with the presence of a cable are compensated by ease of control, quiet operation, reduced operating costs, and environmental safety.
EK-3 is designed for plowing the land using cutters, including virgin ones, loosening the soil, including row spacing, hilling beds using a hiller with lug wheels (not included in the delivery package) on country and household farms.
The design of EK-3 is made taking into account the necessary electrical safety requirements.
We hope that if you follow the simple rules for operating the EK-3 (operating instructions are included), the equipment you purchase will last a long time.
SAFETY RULES AND WARNINGS
This manual contains all necessary safety rules and warnings. Make sure you understand them correctly and follow them at all times for your safety.
1. Information on safety rules.
Caution - danger!
This symbol indicates important safety instructions.
When you see this symbol, be careful!
Caution - danger!
To avoid possible accidents, follow the safety instructions contained in this manual. Failure to follow instructions may result in serious personal injury, damage to clothing, equipment, and property.
2. Safety and warnings
Caution - danger!
If you use or maintain the cultivator incorrectly, do not wear personal protective equipment; you may be injured.
Protect your eyes, hands and feet.
3. Safety stickers.
An important part of the safety system of the electric cultivator are warning and information stickers located on its different parts.
| You can cut yourself, keep your feet and hands away from rotating cutters. | Read the instructions before using the cultivator and servicing it. |
| Do not work in the rain, in wet weather, or on wet soil. | Make sure that the power cable does not get caught in the rotating cutters. |
| Attention tension! | Caution - danger! |
Caution - danger!
If the power cultivator is used incorrectly or you do not follow safety instructions, there is a risk of serious injury to the user and others.
Please read and understand this manual before you begin.
Homemade electric walk-behind tractor video
Related Posts:
- How to make a homemade walk-behind tractor from a motorcycle engine, photo video instructions
Wheels for a walk-behind tractor, how to choose and how to make it yourself Do-it-yourself
reduction gearbox for a walk-behind tractor
We make an all-terrain vehicle from a walk-behind tractor, choose an engine and wheels
We make a walk-behind tractor with our own hands from a chainsaw description, photo, video
Cultivating a plot of land is hard physical work that requires not only good health, but also considerable time. Therefore, to make it easier to cultivate the land, many summer residents and rural residents use a mechanized method of cultivating their gardens. To do this, you only need to have desire, a clear head and hands that know how to make the necessary adaptations.
Making your own iron assistant for working on the site will not be difficult. After all, almost every owner keeps old spare parts from automobiles or household appliances in the garage, which are just useful for such purposes.
From things that seem unnecessary at first glance, you can easily make a walk-behind tractor or a homemade cultivator. Complex mechanisms made with our own hands are constantly improved and serve for a long time.
The simplest unit to manufacture is a chainsaw cultivator or an electric cultivator. But making a walk-behind tractor with your own hands from the rear axle of a VAZ is much more difficult. This requires some knowledge of the technology and properties of metals, as well as plumbing skills and the use of special tools.
Having an electric cultivator for cultivating soil in your yard saves time and physical effort. Of course, large areas cannot be cultivated with this unit, since its stroke is limited by the length of the power cord. But it is quite possible to loosen the soil in the garden, beds and flower beds. And due to the fact that it runs on electricity and not gasoline, it is used in large greenhouses and greenhouses.
Almost anyone familiar with the laws of electrical engineering and physics from a school course can build a homemade electric cultivator with their own hands.
Necessary materials:
Tools:
- Welding machine.
- Bulgarian.
- Set of keys, pliers, hammer.
WARNING?I
1. Always hold both handles firmly while the cutters are running. Before leaving the cultivator, turn off the electric motor.
2. Always stand firmly on the ground, do not lose your balance, and do not reach for the cultivator. Before starting work, look around to see if there are any obstacles on your site that could trip you up and cause the cultivator to fall out of your hands.
3. Be sure to remove children, animals and spectators from the area of upcoming work.
4. Always dress appropriately. Don't wear loose clothes. Wear strong gloves. They reduce vibrations on your hands. Wear non-slip shoes for greater stability.
5. Always use safety glasses when working.
6. Always maintain a safe distance from other people.
7. Always check the cultivator before operation to make sure that all parts are in place and controls are working properly.
8. Always check the network cable for damage to the insulation. The use of a cable with damaged insulation is unacceptable.
9. Always maintain and inspect your cultivator carefully. Follow the maintenance instructions in this manual.
10. Always store the cultivator in a closed, dry place.
The main advantages of electric cultivators for the garden
There are several advantages of an electric cultivator:
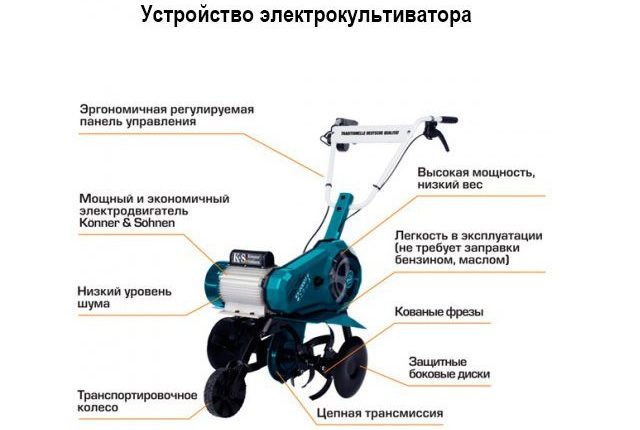
Electric cultivator device
- Such a unit will replace a whole list of garden tools, as it performs a number of operations: creating furrows, beds, loosening the soil, digging.
- Reduces labor costs.
- Unlike gasoline models, an electric cultivator for a garden is more environmentally friendly, as it does not produce emissions.
- It makes no noise when working, which allows you to work both in the morning and late in the evening.
- Does not require refueling during operation.
- Maintenance of such a unit is possible without deep knowledge of mechanics.
- Economical and wear-resistant.
- Easy to use.
MAIN TECHNICAL CHARACTERISTICS of the Electric Cultivator EK-3
1. Area of use – greenhouses and greenhouses. During the dry summer (without rain) period, outdoor operation is permissible.
2. Air and soil temperatures during operation of the electric cultivator from 1 to 40? C, with an upper air humidity value of no more than 80% at 25? C
3. Average productivity, ha/hour: - on virgin soil, no more than - 0.005 - on medium-heavy soil, no more than - 0.01 Depth of processing, mm 200 Width of processing: when processing with 2 cutters/4 cutters, mm 300/600
4. Operating mode: — operating cycle duration, min. no more than 30 - duration of the break between two working cycles, min. no less than – 20 – number of starts during one operating cycle no more than 30
5. Number of simultaneously installed cutters: 2 or 4
6. The longest movement length is determined by the cable length m 23
7. Supply voltage, 187…242
8. Supply frequency, Hz 49…51
9. The supply network must be protected against leakage currents at a level of no more than 30 mA, for example, using a residual current device.
10. Power consumed from the network, kW, no more - motor 1.5 kW/motor 2.2 kW – 2.2/3.0
11. Weight, kg no more than - 55
12. The supply network must have a neutral protective conductor, and the network socket must have a grounding contact.
How to choose a motor cultivator for your garden or home
Components of the cultivator
Criteria influencing the choice of agricultural machinery:
- Area of the treated area. The smaller the area, the more maneuverable and lightweight the cultivator should be.
- Soil type. In dense soil (clay soil), digging requires units with a powerful motor.
- Who will operate the equipment? A motorized cultivator for women and older people is chosen to be lightweight and maneuverable.
- Supported Features. With additional attachments and devices, the motor cultivator will solve more problems. For example, if you have a rotary plow, the tillage time will be reduced by 2.5-3 times.
Engine type and number of gears
Most models of motor cultivators have rotary cutters mounted on a single shaft. When they rotate, they move the entire structure forward. Self-propelled motor cultivators with two shafts for cutters and wheels. They are released forward to cultivate the soil. This technique has several speeds, forward and reverse. The load between the wheels is distributed by differentials or overrunning clutches.
Engine power
The indicator determines the ability of the walk-behind tractor to process different types of soil. On the product card, the parameter is indicated in horsepower. A light garden cultivator will not cope with clay soil; high-power equipment will be required. Engine types by power:
- low-power;
- average;
- high power.
Width and depth of processing area
Criteria for choosing a motor cultivator
The first parameter is the area of soil capture by the cultivator. Depth refers to how far the cutters cut into the ground. These parameters are selected based on the type of soil on the site, its susceptibility to water and wind erosion. Powerful cultivators are purchased for deep loosening.
Starting system
Most motor cultivators are turned on manually. The operator pulls the cable or turns the handle, the shaft makes several revolutions and the equipment starts. With a built-in electric starter, the impulse is created by the motor. Such cultivators have 2 disadvantages:
- large dimensions;
- non-removable starter battery that requires periodic charging.
Clutch type
With a disk system, torque is transmitted through the disk. This clutch has high efficiency. Even under maximum load, components wear out slowly. With a belt drive, torque is transmitted along a belt. This solution is rarely used due to low performance and rapid wear when connecting a powerful motor.
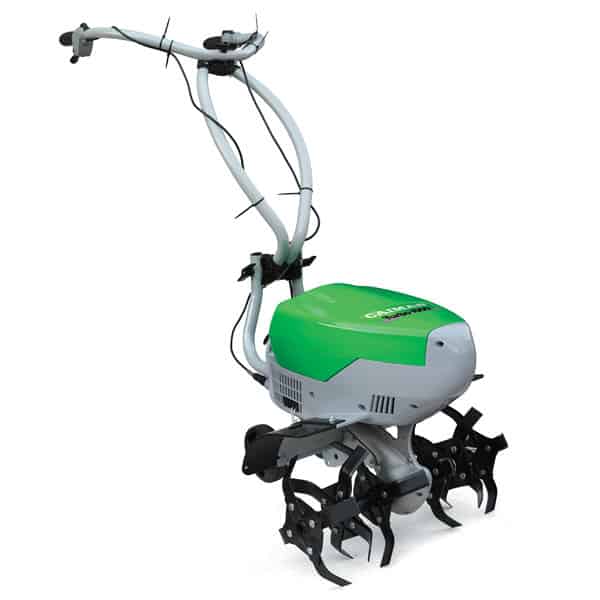
DESCRIPTION OF ELECTRIC DRIVE EK – 3
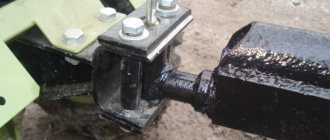
Electric drive EK - 3 (Fig. 1) consists of a metal plate (2) fixed to the base base (1), onto which an electric motor (3) with a pulley on the shaft is attached with screws, which in turn is connected to the gearbox pulley (22) by means of a belt. .
The drive belt is covered with a casing (16).
On the base base (1) an electrical equipment unit (12) is also installed on a special bracket (13), ensuring the operation of the electric motor (3).
The electrical equipment unit is electrically connected to the engine (3), as well as to the single-phase supply network through a power cable (6) ending with a plug. The electric motor is turned on by pressing the black button “1”, and turned off by pressing the red “O”. Turning on the rotation of the working bodies - milling cutters - is ensured by pressing the clutch lever (10). In addition, pressing the red button ensures that operation is restored after the overload protection has tripped.
How to make an electric walk-behind tractor with your own hands
Electric motor units are used in enclosed spaces or areas with limited area. Possibility of access to the electrical network is the only condition for their use. If the model is battery-powered, then the lack of an electrical outlet will not be a problem. When using an electric walk-behind tractor, try not to overheat the engine, let it cool down.
It is also not recommended to use it on unplowed and heavy soils, due to which you will achieve an extended service life. Electric walk-behind tractors are equipped with additional functions that greatly facilitate the operator’s work.
For example, the service life will be extended by the automatic shutdown function when the engine overheats. The adjustable handle allows it to be adjusted to suit the operator.
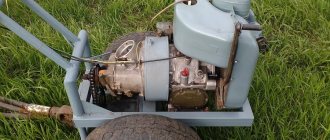
Let's look at the design of the electric motoblock "Electrokrot", made with our own hands from its gasoline predecessor. First, let's look at the advantages of the resulting electric walk-behind tractor - simpler and easier to repair and operate, no need for gasoline. This model is also assembled by hand, using common parts and materials that are easy to find.
Homemade electric walk-behind tractor
To make an electric walk-behind tractor with your own hands, we start working with the frame using two pieces of channel No. 10 and a 32x32 corner. We prepare two pieces of pipe by installing a bronze insert with a hole. The axle will pass through these holes. We weld the pipes on both sides of the frame. Next, an insert is secured through the walls of the pipe with screws. It can also serve as a sliding bearing.
Although ball bearings matched to the diameter of the pipe are better suited for this. To attach the handles to the top tube, brackets are welded. And the bracket for attaching the cultivator or plow holder is welded in the middle of the pipe. Using screws on the frame, a platform is installed in the slots of the side ribs. The electric motor will be mounted on the holes that are available at the site.
The electric motor pulley is connected by a belt drive to a pulley on an axis, which is installed in the frame tube. An asterisk is superimposed on the other side of the axis. Using a chain transmission, it supplies movement to the sprocket, which is located below. A motorcycle or bicycle chain is used for chain transmission.
The movement of a homemade electric walk-behind tractor occurs thanks to a device for cultivating the soil. The curved knives are mounted on a square plate and are held in place by a key on the bottom axis. When they rotate, they loosen the earth and move forward due to bending. Chain drive and belt drive make it possible to reduce the engine speed. Using the ratio of sprockets and pulleys, 200 or 1000 rpm can be achieved.
To control the movement, handles are attached to the bracket, on one of which there is a switch button. To connect the engine to the electrical network, a coil with a wound wire is placed on the axis between the handles. To form and cultivate a bed, you need to attach a holder to the frame on which soil-cultivating tools will be installed.
The only drawback of a homemade electric walk-behind tractor is that it is connected to a wire and, accordingly, to a power source. After all, he will not be able to move more than 50 meters from the network. Although this is quite enough for cultivating a personal plot.
PREPARING THE Electric Cultivator FOR WORK
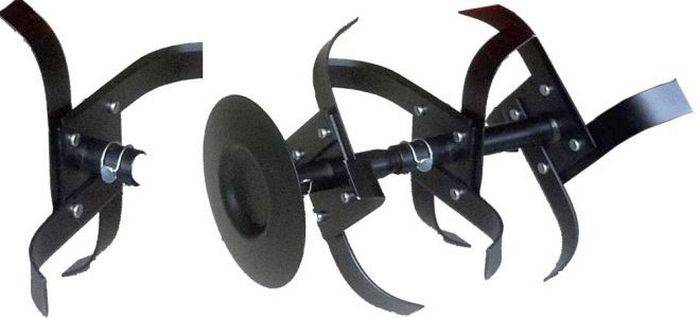
1. Assemble the rotor. Assemble the rotors and install them on the gearbox shaft according to Fig. 2. When installing, pay attention to the following: the rotors consist of two different pairs - right and left, and they should be installed so that the cutting edges of the knives enter the ground when the EK-3 electric cultivator moves forward.
2. Check the oil level in the gearbox by unscrewing the oil level screw. If necessary, add TAD-17I or MS-20 oil through the filling hole. Fill the oil to the level corresponding to the lower point of the inspection hole. A full fill is approximately 0.5 liters.
3. Unwind the cable and inspect it. There should be no damage to the insulation on the cable.
4. Connect the electric cultivator to the network. To do this, insert the power cable plug into a socket with a voltage of 220V, 50Hz. The socket must have a grounding contact (Euro socket). The supply network is single-phase three-wire with zero working (“neutral”) and zero protective separating wires. In addition, the supply network must be protected against leakage currents at a level of 30 MA, for example, using a residual current device. It is allowed to use an RCD connected between the mains supply and a long cable of the electric cultivator.
Caution - danger!
Make sure that at the moment of switching on there are no unauthorized persons near the electric cultivator (from the cutters side).
1. Perform a test run of the Electric Cultivator EK-3 by pressing the handles as follows, slightly lift the cutters and press the black button of the block.
2. Transfer movement to the rotors with cutters by pressing the clutch lever (10) with the fingers of your right hand.
3. If the electric cultivator is equipped with a gearbox that provides reverse gear, then you should try switching the direction of rotation of the cutters by pressing the reverse lever, which is located on the left handle of the electric cultivator (not shown in Fig. 1). It is recommended to press this lever while the electric motor is running.
Features of working with an electric cultivator
No. 2 – Caiman Turbo 1000
Price: 23,000 rubles
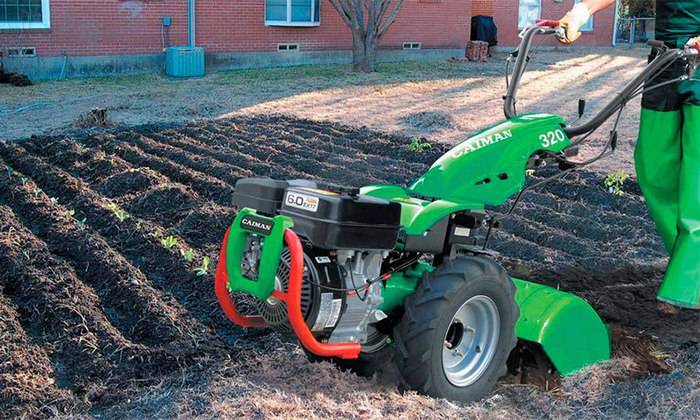
What rating of cultivators can do without the legendary Caiman brand? A premium model that has, among other things, a reverse function, which is extremely useful in difficult areas. The highest quality of assembly and materials from which the device body itself is made guarantee the highest durability and reliability of the entire structure. The engine is also incomparable with its Chinese or Russian counterparts; it can only be brought to the point of overload with a lot of effort.
The relatively considerable weight of 32 kilograms surprisingly does not cause problems when handling - operator comfort is paramount and Caiman engineers know this. Even the noise produced during operation is practically not annoying, so this is perhaps the best device when it comes to operator comfort. Performance didn't disappoint either.
PROHIBITED:
— work without a drive belt cover;
— carry out maintenance with the electric cultivator connected to the network;
— work on an electric cultivator with a damaged cable;
- work on the electric cultivator during rain or immediately after it, until the puddles dry up;
— allow children to use the electric cultivator;
— work on the electric cultivator barefoot or in wet shoes;
- be in close proximity to the cutters;
- use a network to power the electric cultivator in which the voltage exceeds the limits of 187...242V and is not protected from leakage currents by an RCD, and there is also no neutral protective conductor (grounding).
- start the engine with the clutch lever pressed.
When working with an electric cultivator, you must remember the following:
— when working, you must strictly ensure that the power cable does not get under the rotating cutters;
— when starting the electric cultivator, you should slightly raise the cutters;
— transport wheels (17) (see Fig. 1) of the electric cultivator during operation are, as a rule, fixed in the upper position, and the coulter should be lowered enough to restrain the EK-3 electric cultivator from excessive forward movement during operation;
— if the motor overload protection is triggered, after 3...5 minutes the operation of the electric cultivator should be restored by pressing the red “O” button;
— if the user uses an additional extension cord, it should not be less than 1.5 square meters. mm for motor using 2200W and 2.5 sq. mm for a motor with a power consumption of 3000 W, and the extension cord and the contact connection between it and the power cable must be suitable for outdoor use (the use of homemade extension cords is unacceptable).
MAINTENANCE OF Electric cultivator EK-3
1. Maintenance boils down to checking the oil level in the gearbox twice a year. This check should be carried out through the oil level screw located on the bottom of the gearbox.
2. The electric drive of the electric cultivator EK – 3. During operation, it may be necessary to make the following adjustments:
2.1. Tightening the drive belt Tightening is carried out with the drive belt cover removed, by loosening the nuts securing the base to the metal plate on which the engine is installed and shifting the latter towards the cutters. After tensioning is completed, the loose screws are tightened. The tension value should ensure that the EK-3 electric cultivator operates under load without the belt slipping on the pulleys when the clutch lever is pressed. It should be remembered that the belt casing should not touch either the housing or the motor shaft.
Adjusting reverse gear. (if the electric cultivator gearbox is equipped with a reverse gear mechanism)
During operation, the adjustment of the electric cultivator's reverse gear may be disrupted. In this case, you should loosen the locknut of the bolt through the axial hole of which the reverse gear cable passes. Adjustment is made by rotating this bolt. The adjustment is considered complete when, at the final stage of pressing the reverse lever, no significant effort is felt and at the same time the reverse gear is reliably engaged. After making the adjustment, the locknut is tightened. It is recommended to adjust the reverse gear when the electric motor is turned on.
ATTENTION!
When you press the electric motor start button “1” on a new EK electric cultivator, rotation of the cutters may be observed when the clutch is disengaged. This is due to the fact that the new belt does not slip on the pulleys.
This effect is not a malfunction and disappears after 1…1.5 hours of operation, after the belt has run in.
It is recommended to turn on the EK electric cultivator during this period of time, slightly raising the cutters from the ground.
ATTENTION!
The remaining elements of the electric drive of the electric cultivator EK-3 (engine, electrical equipment unit) do not require adjustments and do not fail; they are repaired at the manufacturer.
During the period of validity of the manufacturer's warranty
PROHIBITED:
1. Change the installation of electrical equipment of the electric cultivator EK-3.
2. Open and repair the electrical equipment unit yourself.
The most reliable electric cultivators
The most common classification of electric ripper is by weight and power.
Classification by weight
Depending on the weight, electric cultivators are divided into the following groups:
- ultra-light (their weight is less than 15 kg, the width of the cultivated area is 30 cm;
- light - with a weight of less than 40 kg, with a width of the cultivated area - up to 50 cm and with a processing depth - up to 15 cm;
- medium - with a weight of less than 70 kg, with a treated area up to 90 cm wide and a treatment depth of up to 20 cm;
- heavy - weighing over 100 kg. They are professional units that can handle large areas.
On a note. Among electric cultivators, light and ultra-light units predominate.
Heavy electric cultivator
Classification by technical characteristics
All electric cultivators have similar characteristics:
- mass;
- power;
- number of cutters;
- processing depth;
- tillage width.
Power is the main parameter of these machines. All other indicators and characteristics of the electric cultivator depend on it.
Influence of the number of cutters
Electric cultivators have different numbers of cutters. They either come as a kit or are a necessary part of the machine. Sometimes cultivators with a small number of tines are the most preferable: they help to perform different tasks in small areas.
Important! Some models have an additional number of cutters. This allows you to expand the list of tasks performed
Some models can adjust the speed of rotation of the cutters. This has a positive effect on the quality of soil treatment. Electric rotary cultivators have improved technical characteristics. The best is an electric cultivator with reverse gear.
Electric cultivator cutter
BASIC RULES FOR CARE OF ELECTRIC CULTIVATOR EK – 3.
1. Keep the EK-3 electric cultivator clean.
2. After finishing work with the EK-3 electric cultivator, it is necessary to clean it of dirt and wipe it.
ATTENTION!
It is prohibited to clean the EK-3 electric cultivator with a stream of water or abundant watering.
3. If necessary, to clean the electric drive elements, it is necessary to remove the drive belt casing and remove dirt with a brush or a slightly damp cloth.
4. After completing seasonal work, it is recommended to lubricate the unpainted parts of the EK-3 electric cultivator with thick lubricant.
5. Store the EK-3 electric cultivator in a dry place.
6. Maintenance work should be carried out with the electric cultivator EK-3 disconnected from the network.
POSSIBLE MALFUNCTIONS AND METHODS OF THEIR ELIMINATION
| When you press the black button on the electric unit, the electric motor does not turn on and/or the shaft does not rotate | |
| Insufficient voltage in the network or its absence. | Check the voltage in the network both when the electric cultivator is turned off and when it is turned on. The voltage must not exceed the permissible limits specified in the “Basic Specifications” section. If the network voltage is abnormal, you should use appropriate technical means to stabilize this voltage (not included in the delivery package). |
| The motor thermal protection has tripped. | Press the red “O” button on the electrical unit. |
| The electrical equipment unit has failed. | Repair or replace the unit. |
| Engine malfunction. | Repair or replace the electric motor. |
| The electric motor turns on, but the rotation of the cutters under moderate load does not occur when the clutch lever is pressed. | |
| The belt tension has weakened. | Tension the belt according to the instructions in paragraph 2.1 of the “Maintenance” section |
| The belt is broken. | Replace the belt. |
CONTENTS OF DELIVERY.
1. Electric cultivator EK – 3 assembled.
2. Working bodies (cutters):
— left knife 8 pieces;
— right knife 8 pieces;
— rotor shafts 4 pieces;
— fastening elements of cutters.
Complete set of components and parts for the “Constructor” EK – 3 for the frame of the Motor Cultivator – 1
| Name of units and parts | Unit change | Quantity |
| 1. Single-phase electric motor mod. AIRE80S4UZ 2. Electrical unit mod. PM12 – 025 3. Plate for attaching the electric motor to the base frame 4. Bracket for fastening the electrical unit 5. Electric motor pulley 6. Communication cable between the electric motor and the electrical unit PVS 3*1 7. Power extension cord with cable PVS 3*1 (25m), Euro plug + Euro socket 8. Short network cable (PVS 3*1) with Euro plug 9. Cable fastening clamps 10. Network cable fastening clamp 11. Motor mounting screw M8-6g*30.55.01 according to GOST 17475–80 12. Motor plate mounting bolt M8–6g* 20.55.01 according to GOST 7605-70 13. Nut M8 6N.01 according to GOST 5927 - 70 14. Washer 8.05.01 according to GOST 11371 - 70 15. Spring washer 8.65G.01 according to GOST 6402 - 70 16. Electrical unit fastening screw M5-6g* 16.56.01 according to GOST 1491 – 80 17. Washer 5.05.01 according to GOST 11371 – 70 18. Spring washer 5.65G.01 according to GOST 6402 – 70 19. Nut M5 6N.01 according to GOST 5927 – 70 20. Rubber seal Ф20* Ф8.5*5 | PC. PC. PC. PC. PC. M Set M Pieces PC. PC. PC. PC. PC. PC. PC. PC. PC. PC. PC. | 1 1 1 1 1 1,2 1 1 4 1 4 2 8 8 8 3 4 4 4 2 |
TRANSPORTATION AND STORAGE.
1. Category of transportation conditions - only in closed transport.
2. Category of storage conditions - 3 (ZhZ) (according to GOST 15150 - 69) - unheated storage - closed premises with natural ventilation without artificially controlled conditions, where fluctuations in temperature and air humidity are less than in the open air (for example, stone, concrete, metal with thermal insulation storage). Moisture condensation on the walls of the room and on the product should not be observed.
WARRANTY.
The manufacturer guarantees the operability of the electric cultivator EK - 3 and its compliance with the technical specifications TU 4737-003-27979868-96, provided that the consumer complies with the conditions and operating rules of EK - 3.01.000 TO.
Transport services for the delivery of the electric cultivator EK-3 are not provided by the manufacturer.
The warranty period is set at 1 year from the date of shipment of the product to the consumer from the manufacturer or from the date of sale through the retail chain (the presence of a retail chain stamp is required).
The warranty is void if the electric cultivator has undergone modifications not specified by the manufacturer, or has been damaged due to mechanical impact (including aggressive environmental influences) or improper operation.
We sell: electric cultivators
See also other articles about motor cultivators and walk-behind tractors:
Motoblocks of the Salyut-5 family Single-row mounted potato planter passport (operating manual). Applicable to walk-behind tractors “Favorit”, “Salyut”, “Oka”, “Cascade” SNOW Blower walk-behind tractor SM - 0.6 for walk-behind tractor Favorit (Salyut). Operating manual Operating manual (instructions) for the motor-cultivator "Dachnik" Operating manual (instructions) for the rotary mower for walk-behind tractors "FAVORIT", "SALUT" Operating manual for walk-behind tractors Favorit Mounted front mower for the motor-cultivator "KROT" Operating instructions (manual) for motor-cultivators mole models: MK-3-04, MK-3-06, MK-4-01, MK-5-01, MK-6-01, MK-7-01, MK-8-01″ Pumping unit UN – 1 for the motor-cultivator "KROT" Operating manual for the motor-cultivator Mole (models MK-5-01, MK-9-01) Hiller for motor-cultivators and walk-behind tractors Instructions for converting the motor-cultivator Mole into an electric cultivator EK-3 Video • Operating and repair instructions for the motor-cultivator Mole
Types of cultivators
Garden cultivators are represented by a wide variety of models, which differ from each other in a number of ways.
- By weight . Lightweight models have a mass of 9 kg-10 kg. The heaviest models can weigh up to 50 kg.
- By power . This parameter ranges from 1−2 liters. With. up to 7−12 l. With. It must be taken into account that more powerful units are able to cope with heavier soil.
- By purpose. According to this characteristic, there are cultivators:
- steam (their task is continuous processing);
- universal (they can handle continuous and inter-row processing);
- row crops (their job is cultivating the soil and exterminating weeds in the rows).
models include attachments for cultivating soft soils, caring for grass lawns, and plowing soil.
in price . The cost of electric cultivators ranges from 3,650 rubles , for example: Prorab ET 754 MY13 PRC cultivator, invented in Russia, to 22,900 rubles , for example: Mantis (Mantis) MY13 USA, invented and manufactured in the USA.
Moreover, both models mentioned above have approximately the same weight (9 kg and 9.5 kg), equal power (750 W), processing width (30 cm), 4 cutters in a set. The American version is distinguished by a special (serpentine) shape of the cutters and their rotation speed (240 rpm). Such a device not only plows the ground, but also loosens it, gets rid of weeds, and works at a depth of 25 cm (when plowing) or 3 cm - 10 cm (when cultivating). The warranty period is 2 years, but with reasonable use it will last much longer.
The Russian invention has a cutter diameter (providing plowing depth) of 22 cm. It has a particularly favorable price-quality ratio. Warranty period - 1 year.
If we consider a more powerful version from the South Korean company Hyundai (Hyundai) T 2000-E, it differs from previous models in weight (30 kg), engine power (2000 W) and soil cultivation width (55 cm). The unit costs 13,000 rubles . Individual parts are reinforced with metal protection and have a manufacturer's warranty of up to 100 years. The forged cutters used in this model also help to increase service life.