Features and Benefits
If you have purchased a new passenger car or a used trailer with a torsion bar suspension, you may want to change the design to a spring one. I won’t name the reasons and motives; everyone has their own.
Spring devices have objective advantages. They appear as:

- ease of maintenance and operation;
- affordable cost;
- reliable design;
- increased resistance to heavy loads;
- maintainability.
Even if one sheet fails on the road, there is nothing terrible about it. This type of suspension allows you to get to a service station or a spare parts store, take an additional sheet and change it yourself.
Many people consider RP to be the prerogative of a truck and its trailer. There is some truth here, since it is actively used on:
But no one forbids you to put the RP on a regular single-axle or two-axle passenger car trailer, but only with fewer sheets. By the way, I have already compared single-axle and two-axle trailers.
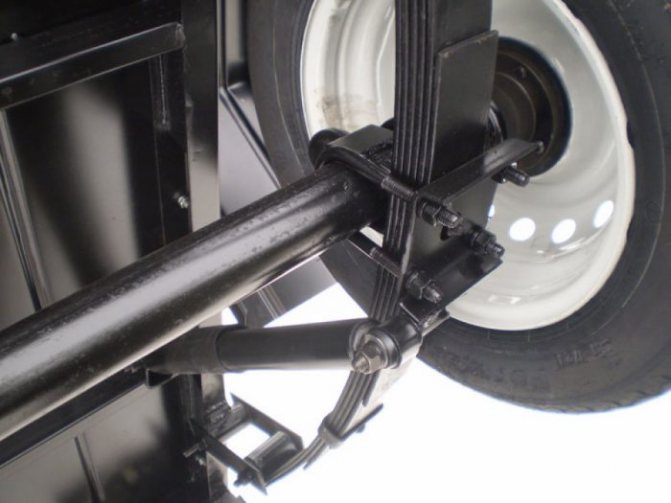
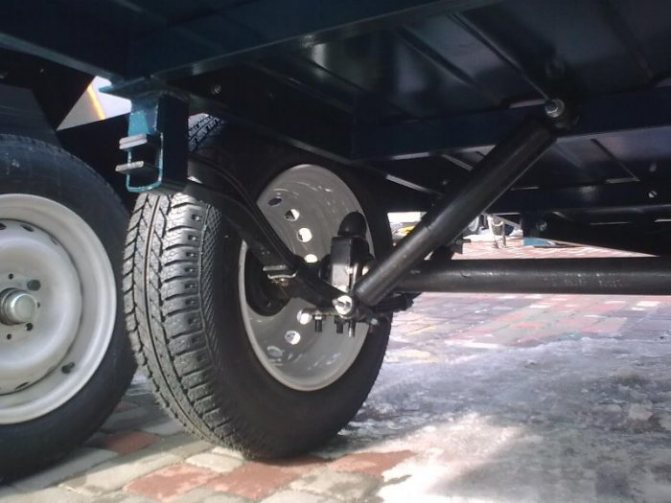
On trailers, the suspended equipment is located above the bridge. He takes on the main load. The springs serve as a load-bearing damper unit. This allows you to take lateral, vertical and longitudinal loads. The bridge in trailers is a conventional pipe-shaped structure, and there are no additional mechanisms.
DIY making
In order to make a caravan yourself, you need to take care of purchasing some materials and tools. In order not to look for the necessary devices during work, they are purchased in advance. List of tools and materials:
Beginning of work
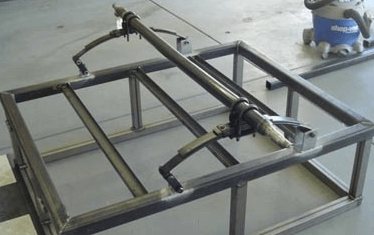
Assembly begins with the trailer frame, which is the supporting structure. It bears the bulk of the weight of the cargo. It is subject to increased requirements for reliability and strength. The prepared channel or square pipe is cut to size according to the drawing, two long and two short blanks are made.
They are used to make a rectangular or square base in the form of a frame, to which sides from a metal sheet will subsequently be attached. Pay attention to the quality of welding, since this is a sore spot for homemade trailers. The hitch is attached in front of the manufactured frame. To install shock absorbers, special eyes are placed in the middle of the frame.
Now it's time to make the side frame. To attach the side railing, vertical posts are strengthened; their length depends on the height of the side. The vertical elements are connected to each other by additional stiffening ribs, since during movement it is the racks that experience the load from the displacement of the load. Additional strengthening connections are made horizontal, vertical or placed obliquely.
Working with the chassis of a trailer is associated with a large number of difficulties and has different features. One of them is that the axle should be located closer to the rear of the trailer. All design features arise depending on which vehicle chassis is used for the trailer. Shock-absorbing lugs and mounts for reaction rods are welded to the frame. Installation and use of the latter are mandatory, since they play the role of elements supporting the bridge.
Final phase
Sheathing the sides with metal and making the bottom of the trailer from plywood is done at the final stage of assembly. A jigsaw is used to cut plywood to fit the internal space, and sheet steel is cut with a grinder. The bottom elements can be made from a single sheet or connected from pieces with an overlap of at least 5 cm. All pieces must be attached around the perimeter to the frame and base elements using bolted connections.
The sides are cut to dimensions that are measured on site. At this stage, it is not relevant to use the dimensions from the drawings, since during the manufacturing process the dimensions of the body frame, as a rule, differ slightly from those provided in the diagrams. Welding or rivets are used as fastening, which also hold the material well. The sides are attached to all racks and strengthening connections.
Electrical equipment
Elements of electrical equipment are installed on the rear wall of the trailer. These include red triangular reflectors, a reversing light, license plate lights, turn signals, brake lights, and side lights. On the wall in the front there are white dimensions and the same reflectors.
The side walls are designed for orange reflectors. To ensure that the wires maintain their integrity, a protective corrugation is put on them. Wire connections must be secure and well secured. It is convenient to attach the corrugation with wiring inside to the frame frame using plastic clamps.
Making a trailer requires skill and experience with power tools, but it will save money compared to buying a ready-made vehicle from a store.
What to choose
A logical question when choosing springs will be which ones to install on your passenger trailer. This depends on a number of factors. There are also good Volgov springs available on the market, as well as products from Al-Ko and other domestic or foreign manufacturers.
Here I want to make a few clarifications.
- Domestic springs are quite long. To prevent shaking, it is better to supplement them with shock absorbers. This will significantly increase the overall cost of the rework;
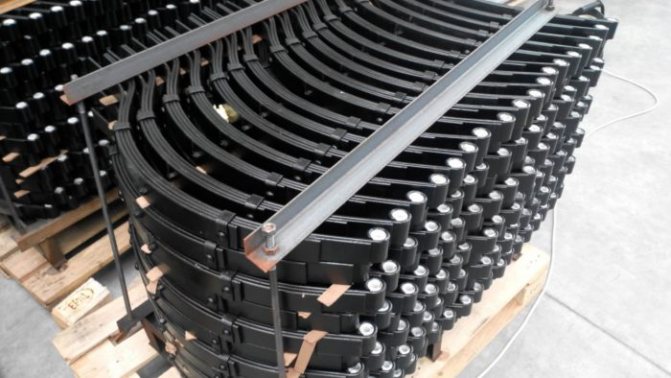
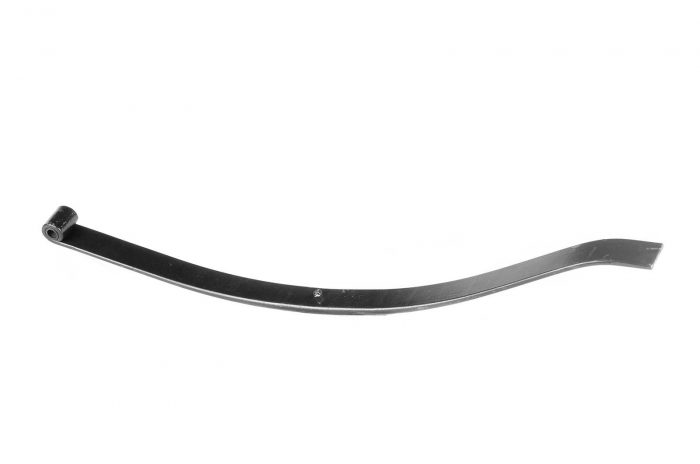
Designs may differ in the number of sheets. Reinforced models are made from a larger number of spring leaves, but they are stiffer and designed to work under heavy loads. For passenger cars, usually from 3 to 9 units are chosen.
Which one to choose from, decide for yourself.
DIY installation
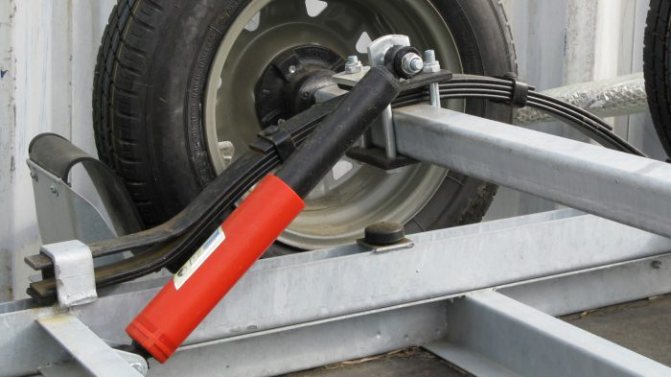
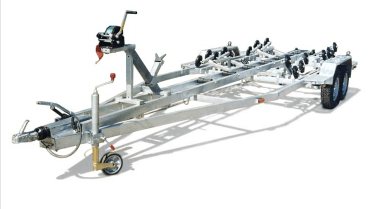
I suggest you find out how you can install an Al-Ko spring with your own hands. As an example, I use a boat trailer and a floating type of spring design.
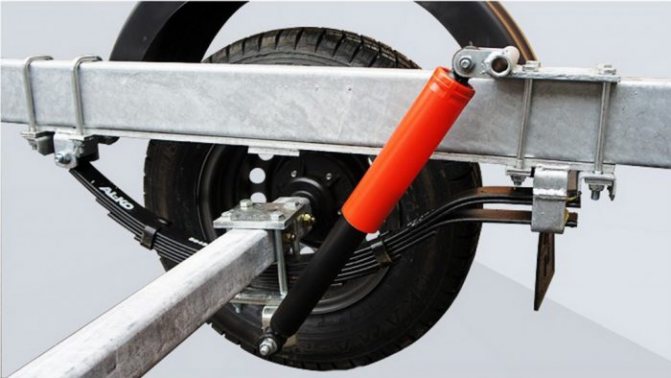
Although you can put it on any other trailer:
- MZSA;
- Flint;
- Sturdy;
- KMZ;
- Kurgan trailer;
- Moskvichevskie trailers;
- Bee;
- any homemade trailer, etc.
Now about the installation itself. These are approximate instructions, since the assembly differs depending on the type of selected RP, the trailer itself, the goals of the car owner, etc.
- At the front, the spring is fixed with an eyelet. The thickness of its metal is 5 mm. Fastening is carried out with an M12 bolt;
- The front eye will contain a fluoroplastic spring bushing, which will have to be changed every 50 thousand kilometers;
- When ordering or making lugs, make sure that the distance between the metal of the lug and the spring is 0.25-1 millimeter;
- The tightening torque is not regulated;
- The spring at the rear will be floating, with a metal thickness for the fixation point (a kind of closed eye) of 5 mm. Be sure to periodically apply lubricant, otherwise strong friction will occur and the spring will quickly wear out;
- The spring and beam are connected by two metal plates (top and bottom) each 1 cm thick;

- Connecting the spring and frame of your trailer will require some fiddling with the shackle. This is a simple and affordable element that you can buy for literally 30-50 rubles. But the earring plays an important role when installing the structure;
It is equally important to competently operate a vehicle modified with your own hands.
Service
During operation, you need to adhere to some rules for servicing a modernized trailer.
- The frequency of replacement of fluoroplastic bushings is 50 thousand kilometers. But this is a conditional figure. If the trailer is actively used and driven under heavy loads, replacement may be required earlier. Monitor its condition and change it promptly;
- To prevent the spring from failing at the most crucial moment and breaking, do not forget to check the level of tightening of the bolts at the point of its connection with the beam. They gradually weaken, which leads to accelerated wear and deformation. This should be done at least once every 10 thousand kilometers. Avoid the formation of backlash. The connection should always be tight;
Read more: Toyota Corolla 100 body

- Lubricant is placed in the eye with the floating part of the spring. Many people use grease, although it is more practical to use graphite lubricant. To do this, use a pry bar to bend the spring plate and add lubricant. Just don't do it with your fingers, otherwise you risk simply losing them. Use a cotton swab or brush;
- The frequency of adding graphite lubricant or grease is not regulated. Check the status of the node. It must always be wet, that is, be in this material. Otherwise, the plates will begin to wear out and break.
Some argue that a floating part for trailer springs is a bad thing. It's better to put a silent block there. But this design has clear advantages. It’s not for nothing that they put it on cargo trailers and cars.
The main argument is the creaking and grinding of the spring element. In fact, grinding begins after at least 100 thousand kilometers. And the creaking is due to a banal lack of lubrication.
Thank you all for your attention! Don't forget to subscribe to our website, leave comments and share links with your friends!
( 6 ratings, average: 4.67 out of 5)
Did you like the article?
Subscribe to updates and receive articles by email!
We guarantee: no spam, only new articles once a week!
The guys made a trailer, tested it today, loaded it full of wood, and the back sank a lot, and where the drawbar turns out to be raised, the springs just straightened out, tell me a couple of options, the springs were from a Muscovite - I bought them used, maybe they already sagged on their own, or was it necessary to move the axle more towards the feet along with the springs, or are there options to throw more springs in there? there is no photo of how it sank, only part of the assembly
DIY assembly
We build a homemade trailer according to the drawing, using prepared tools and components, in several stages.
- Frame assembly. The frame is the load-bearing part of the trailer, so the durability of the product depends on its strength and reliability. To make it, you can use a steel channel (25x50) or a pipe (40x40). We cut the profile according to the dimensions, after which we weld the parts together. We measure the resulting rectangle for evenness and welding accuracy. It is necessary to provide a stiffening rib, since the rectangular or square shape of the frame is quite unstable under heavy loads.
- Connection point to the car. It must be remembered that the shorter the connecting part, the faster and more sharply the trailer will react to the movements of the tractor. Depending on the size, it is recommended to make the connecting part 1.5 - 2 meters long. Since this unit bears a considerable load, for welding we use the same profiles that were used to create the frame. Before welding, we take measurements to ensure that the coupling of the connecting part with the trailer is exactly in the middle of the axle. To prevent ruptures of the connecting part, we install safety cables. We weld them at the bottom of the entire structure.
- Coupling. The coupling allows you to attach the connecting part of the trailer to the vehicle. It can be mounted either with bolts or by welding. In the first case, the design will be less reliable, but if dismantling is necessary, the coupling will be easier to remove. In the second, the assembly will become very strong, but you will need a gas burner for dismantling. If the choice fell on a connection with bolts, we recommend choosing samples with the eighth strength class. Otherwise, the bolts may not withstand the force.
- Axle assembly. As a general rule, the axle is mounted at a distance of 40% of the length from the rear wall of the trailer. In other words, it should be off-centered a little towards the back. The axle is installed using bolts. Next, we install the frame on the axle and fasten it again with bolts.
- It is not an urgent need, but it is advisable to install stabilizing jacks that will ensure the horizontal position of the trailer while driving. The best option is to place jacks on the corners of the frame.
- Flooring and side walls. Wood, tin, metal, polycarbonate, plastic or other materials can be used as the starting material - it all directly depends on what exactly will be transported on the trailer and how often transportation will be carried out. We install the flooring on the frame (you can use the simplest one, made of ordinary plywood) and fix it with bolts. After this, we mount the sides on the frame. We reinforce the corners of the trailer with metal corners.
- The final stage is finishing. If necessary, we paint parts and assemblies that require such treatment. We draw routes to connect power from the car. Since all trailers must be equipped with mandatory light signaling devices, we install the necessary lights, headlights and reflectors. All this is mounted into a single network and connected through the towbar socket.
The following video shows the process of assembling and finishing a homemade trailer of an original design.
A homemade trailer, especially if it is well assembled, will significantly increase the capabilities of an ordinary passenger car. Although there are many varieties, a universal option will be suitable for any vehicle and type of cargo transportation. In addition to all the above actions, the trailer can be equipped with a separate braking system, lighting devices, etc., but it is still better to trust these issues to professionals. Before you start using the trailer, you must.
Sometimes the trunk capacity of a passenger car is not roomy enough for many motorists, especially if transportation of large cargo is required. A trailer is best suited to solve this problem.
see also
Comments 43
I added more risors one sheet at a time.
This kind of welding is stressful.
Throw in springs and weights.
When loaded, does the earring (turns off) rest against the frame?
weld additional fasteners (rings)
I also made a very used trailer from Moskvich springs. loaded the ground, squatted completely. solving the problem of the earrings shifting to the rear by a couple of centimeters and the same springs began to hold the same weight!
It seems to me that putting springs in parallel with leaf springs is quite a budget option! The Zhigulev ones are quite suitable, but if you want to transport tanks :)), then install the Nivov ones. Many people do this here, I’ve seen them on trailers. Another plus: there are 3 weight distribution points on the trailer bed.
Thanks, will I need to saw the spring?
So it needs to be measured locally
the axle should be approximately 40% of the length of the body on the rear side, look at the factory ones - all of them have an axle shifted slightly back!
What are the hubs from?
The displacement of the trailer axle back is within 5-7 cm. You can add at least a dozen sheets to the spring package. Optimally 3-4. You can also add springs, then you will get a jumper. It’s better not to install bump stops; on bumps you’ll either bend the axle or break the ass of your car. And so you will load within reasonable limits. Hang spare tires on the sides. You can load at least two tons, but if the wheel goes bad it will be bad. Select tires according to load carrying capacity.
IMHO the Muscovites are simply weak. There are the same ones from the factory, it’s too early to go to the stops. Abstractly, how were the hubs welded smoothly? Technology? what to level with* After welding, no adjustment was required?
Cooked evenly, the trim is square, it doesn’t eat sideways
Well, that is. the usual method. Clear.
Add another root leaf to the springs. Here is the weight distribution of a two-meter trailer frame with Moskvich springs and everything will be fine. Yes, the spring is placed with the long end back - where the earring is.
I'll tell you how to assemble it for me. I saw this idea from Fiat Ducato, Peugeot Boxer... There is only one leaf of spring, and when the loads are large! Then the beam is placed on the bump stop and everything is clear. The main thing is to make the platform for the bumper larger and even, and I used the bumper itself from a truck trailer (so as not to damage the trailer on the walls). I also have springs from 412 Muscovite. The snowmobile carries 250 kg by itself, I carry a ton on bump stops and by the way it goes smoothly!
I'll tell you how to assemble it for me. I saw this idea from Fiat Ducato, Peugeot Boxer... There is only one leaf of spring, and when the loads are large! Then the beam is placed on the bump stop and everything is clear. The main thing is to make the platform for the bumper larger and even, and I used the bumper itself from a truck trailer (so as not to damage the trailer on the walls). I also have springs from 412 Muscovite. The snowmobile carries 250 kg by itself, I carry a ton on bump stops and by the way it goes smoothly!
Read more: Voltage stabilizers 12 volt 5 ampere
My Peugeot Boxer has 2 sheets.
Now I see that the springs are not positioned correctly! One with the long end going there, the other in the opposite direction. Hello garage, how can you assemble this?
yes, I already corrected this))))) when I was assembling it I got confused and screwed it up wrong and turned it over right away)
Clearly, I was in a hurry. Now you have to turn again...
Two more sheets need to be placed from the Moskvich spring. One with rings, you cut these rings in half (horizontally), this sheet fits exactly under the spring with rings and you take a long second sheet, but we didn’t install the rest and in the end it turned out to be happiness)) Tested on myself. My trailer is strong, there are springs there, two sheets and a ton of them, either for improved springs or for factory strong ones. But what they write about displacement is not true. The springs themselves are weak, and even used, they are tired, modernize the springs and you will be happy.
Travelers need a caravan on a long journey; it allows them to take with them all the necessary things, and there may be a lot of them. Industrial trailers are presented in a wide range, but they have one significant drawback - a fairly high price.
Sale of trailers, motorhomes
The OLX.ua service presents a wide variety of options for purchasing trailers and semi-trailers, for passenger cars or transportation of large cargo. Here you will find models that can be mounted on a walk-behind tractor or motorcycle. Lightweight drop-side and tipper trailers.
In addition, there is a wide range of motorhomes, they are also called campers, which will allow you to travel comfortably and for a long time in Ukraine and abroad! Favorable prices and convenient search on the site will definitely not leave you without a profitable purchase!
We recommend reading: How to set consumption standards for office supplies of budget organizations
Trailer material
Often, in the garages of car owners, various rubbish lies as unnecessary cargo, which is a pity to throw out, but it has not found any use. You need to dig into these things and see if maybe something will be suitable for making homemade goods. What may be useful:
- wheels and springs from an old car, disassembled for parts;
- pieces of sheet iron;
- channel or corner;
- various fasteners (nuts, bolts);
- pieces of automotive electrical wiring.
You need to decide for yourself what the load capacity of a car trailer (AT) should be - the car’s passport details indicate what the maximum weight of the trailer is designed for. If some material is missing, you will have to purchase it in addition; you will also need a plug to connect the car's electrical wiring to the AP.
Do-it-yourself trailer for a car: drawing up a drawing
When all the necessary material has been collected, you can begin drawing up the drawing. It is not very easy to draw a sketch of a future product on paper yourself, so to make the task easier, you can take a ready-made drawing from the Internet as a basis, and make your own adjustments to it as you create the design. The car owner should also remember that the homemade product will have to be registered with the traffic police, and it is important to note that the coupling device can only be used here as a factory-made one.
For example, a drawing of the Zhiguli AP can serve as a model for a future trailer, if the vehicle itself is similar in size and carrying capacity to this car model. Any car trailer consists of the following main parts:
In any case, the frame must be rigid, so it is made of durable steel. As a rule, the body is also made of ferrous metal, but it can also be aluminum or wood.
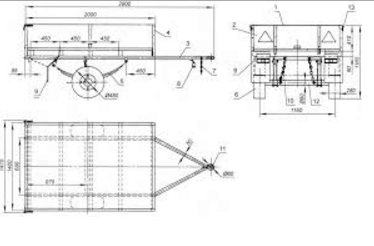
Trailer for a passenger car, drawings, dimensions
The spars are made of rectangular pipes 60×30 mm. All the other frame and body frame parts listed above (traverses, cross members, racks, trim) are made of square steel pipe with a cross-section of 25x25 mm.
The front and rear sides of the body are the same. They are made folding (this allows you to transport long loads on a trailer), and therefore their frames, although all made from the same 25x25 mm square pipe, are made separately from the general body frame. The platform grille on top is covered with a 2-mm duralumin sheet, forming the floor of the body, and the outside sides are sheathed with thick tin - 0.8-mm steel sheet. The floor is attached to the grille with M5 bolts with countersunk heads, and the side trim is carefully (dotted) welded to the frames and posts.
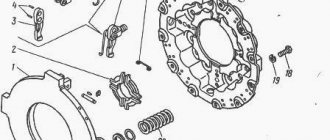
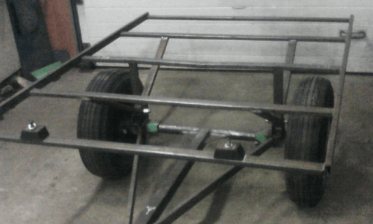
The bridge beam also has a tubular rectangular cross-section: it is welded from two identical sections of channels No. 5, inserted into one another. Two wheel axles are pre-welded at the ends of one of them. The gaps between them and the beam channels at the ends were closed with plates made of steel sheet.
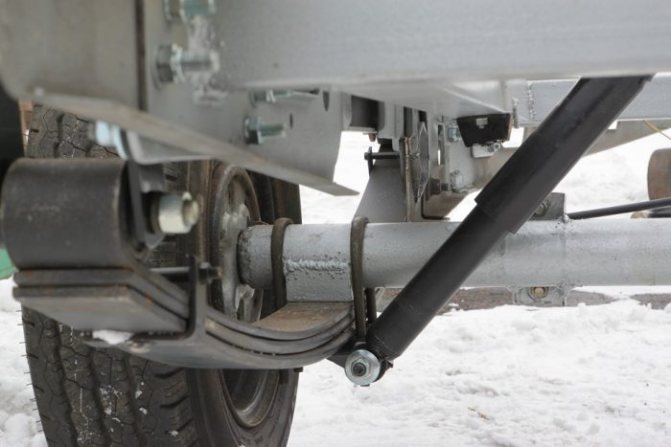
The beam is connected to the frame side members by means of two springs used from the old Moskvich-412 car; 13-inch wheels are also taken from the same car. The middles of the springs are pulled to the beam by stepladders, and their ends are attached to the side members: one is put on the axis of the bracket, and the other is put on the axis of the shackle. I considered shock absorbers in the design of a simplified cargo trailer for a passenger car to be unnecessary.
With such a suspension, the distance from the ground to the platform was about 600 mm, which, as operation has shown, is quite acceptable.
The drawbar of the homemade trailer is double-beam. Made from the same rectangular pipe with a cross section of 60×30 mm as the side members. The rear ends of the drawbar beams are docked and welded to the front ends of the side members with a 200 mm overlap. The front ends of the beams converge on the body of the towbar and are also welded to it. I have it homemade, but I never go on public roads with my trailer (and there is no need for this). Technical requirements simply prohibit the use of homemade towing devices.
The home-made trailer does not have brakes; I use the tractor’s brakes to stop or slow down the speed of movement. But I installed alarm devices—tail lights with turn signals and brake lights—so that my actions would always be clear to those driving on the road.
Types of DIY trailers
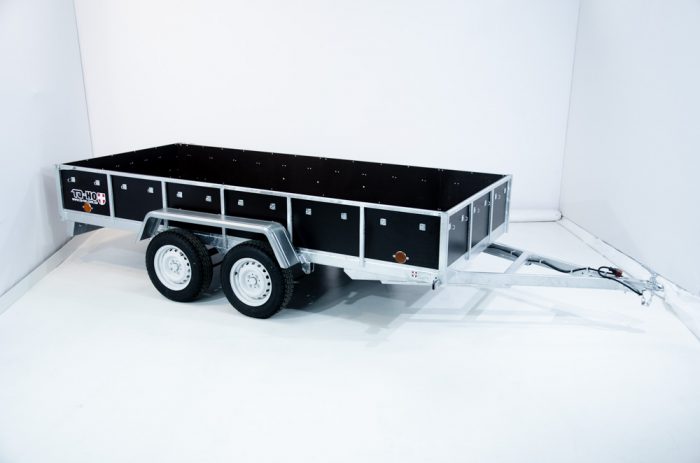
A homemade trailer for a passenger car usually has one axle, but it can also be biaxial. The main advantages of a two-axle trailer are:
- road stability;
- large load capacity.
But the two-axle design has its drawbacks, such a trailer:
- more difficult to control, especially during manual maneuvering;
- weighs quite a lot;
- less mobile.
When making a homemade product, it should be taken into account that a single-axle AP should be designed for transported cargo weighing no more than 750 kg. The rules for operating vehicles with trailers also state that the load on one wheel cannot exceed 700 kg.
Caravans vary according to type of use:
- general purpose, for transportation of goods;
- tourist (motorhomes);
- commercial;
- for transportation of boats and yachts;
- special purpose
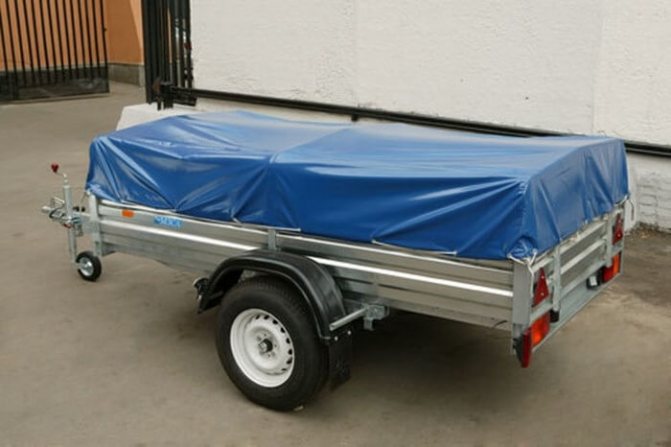
Trailers are often equipped with an awning; motorhomes, which are very convenient for long journeys, are also popular among motor tourists. True, to transport such a design, a passenger car must have sufficient carrying capacity; crossovers and SUVs are well suited for towing.
The cost of an industrial car trailer for a passenger car
Industrial trailers have different prices, the price depends on:
- on the complexity of manufacturing;
- dimensions;
- quality of materials used;
- type (purpose);
- configurations
The simplest general purpose trailer will be the cheapest in terms of cost, for example, you can buy a trailer of the LAV-81011 model from on average for 40 thousand rubles. The characteristics of this design are as follows:
- own weight – 175 kg;
- weight of transported cargo – 525 kg;
- The maximum weight of a loaded aircraft is 700 kg.
The trailer has dimensions of 2.9/1.6/1.28 m (length/width/height) and has a very good ground clearance of 167 mm. LAV-81011 is equipped with an awning, its height is 0.45 m. The sides of the body of this model can be folded down or completely removed; there are two modifications.
There are trailers that are much more expensive, for example, a trailer for transporting boats costs on average from 200 to 350 thousand rubles.
Read more: Freetex cylinder head gasket reviews
DIY trailer assembly
Having drawn up a drawing, the DIYers first begin to manufacture the frame. To assemble it, a steel channel is very often used, so that the metal can withstand loads well; its cross-section must be at least 25x50 mm. Also, the frame is often made of a metal pipe, but it is more convenient to work with a channel.
The rolled metal is first cut to the dimensions specified in the drawing, then the sections of the channel profile are welded together. After welding the main body, the frame should be reinforced with additional stiffeners, otherwise the structure will be unreliable.
If you plan to create a trailer on springs, brackets should be welded to the frame. The springs will be attached to the frame base with bolts and nuts, and the axle and springs will be connected using stepladders. The brackets are welded with a slight offset to the rear of the structure, this ensures the greatest stability of the homemade trailer.
Next, a drawbar should be welded to the frame, and a towbar should be mounted at its end. If the connection point between the trailer and the car is made too long, driving the trailer will not be very convenient, and it will be especially difficult to maneuver in reverse. The drawbar must be welded strictly in the center, otherwise the trailer will pull to the side. Even for a single-axle design, it is necessary to distribute the weight so that the main load of the empty AP falls approximately on the bogies; the heavier the carts, the force on the coupling device will increase, and it will be under constant tension.
A part of the coupling device is installed at the end of the connecting unit; the tow bar can be rigidly attached to the drawbar by welding, or with bolts and nuts.
Next you should work on the body; the easiest way is to make it from plywood or wood. The plywood floor is screwed to the base with bolts and nuts; the sides are better made of a more durable material - wood or sheet iron. It would also be a good idea to cover the floor with sheets of iron; plywood can quickly become scratched and become unusable.
But the assembly of the trailer does not end there; it is still necessary to install the rear lights and connect the wiring. Two-axle trailers are often equipped with brakes; the braking system makes driving the vehicle easier. It is especially important to install brakes on a trailer for transporting heavy loads weighing more than 1400 kg.
How to convert a hitch on a trailer
- make the lining of the body and bottom of the trailer using ordinary plywood;
- replace standard optics with LED ones, which last longer and place less load on the car’s electrical system;
- apply anti-corrosion agent to the body;
- treat the body with high-quality paint;
- put up an awning (we talked about it separately in this article).
We recommend reading: Purchase of a land plot under an unfinished construction project
The body part is made of steel by welding. The bottom and sides are made by stamping from sheet steel (0.7 mm). Wheel niches are located inside the body near the side walls. The floor is covered with a rubber corrugated cape. The upper frames of the sides are equipped with sockets for mounting awning arches, which are pipes of a certain diameter. The awning itself is made of tarpaulin, fixed to the arches using a special cord, which is threaded through eyelets located along the edges of the canvas.
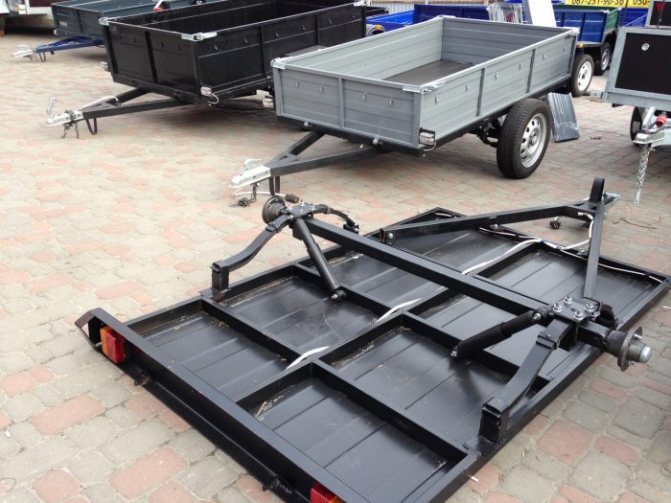
Do-it-yourself dump-type passenger trailer
An AP is often necessary for transporting bulk cargo - river sand, gravel or crushed stone. Unloading construction materials from a regular body is inconvenient - unloading takes a lot of time. You can make the task easier by installing a dump-type body on the trailer, with a reverse tipping mechanism.
The frame and axle in this design have a movable connection, and a manual body lifting mechanism is installed in front.
You don’t have to install the mechanism, but then you need to weld a support in front. In this option, the body will tip backwards under its own weight when the locking device is removed.
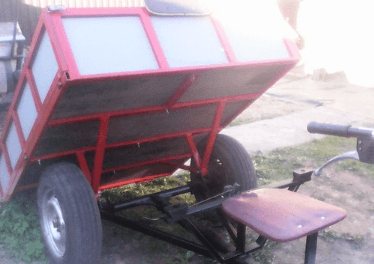
For a homemade dump truck trailer, it is important that its sides tip over.
DIY trailer
The frame is the basis of the trailer; it is its strength and rigidity that determines the durability of the trailer as a whole. For greater reliability, it is recommended to use a welded connection of elements. You should start by determining the dimensions of the frame - length and width. The size is determined by the outer edges of the frame elements. To determine the full width of the future frame, it is necessary to add 2 wall thicknesses to the distance between the inner edges of the side walls. If the frame is located directly between the wheels, and not above them, then you also need to take into account the gaps between the tire and the bead.
In the case of welded fastening of the coupling, high strength of the connection is ensured, but if it is damaged, a gas burner will be required for dismantling. The strength of a bolted connection is somewhat less. It is recommended to use bolts of the eighth strength class; less durable ones may not withstand shear forces. Two bolts are enough to connect, more of them will weaken the frame element and coupling due to the holes for the bolts.
Towbars for cars
To connect the trailer to the car body, you need to install a tow bar on the car. A towbar for a car consists of parts:
- hinge with hook;
- power beam;
- sockets for connecting wires.
The industry produces towbars of various designs; there are trailer hitches in which the hook is welded to the beam, and together with the hinge it represents a single, monolithic structure. But more often hinges are produced with a removable hook, and this version of the device has the advantage that in case of damage to the coupling joint or wear of the ball, the coupling can always be replaced.
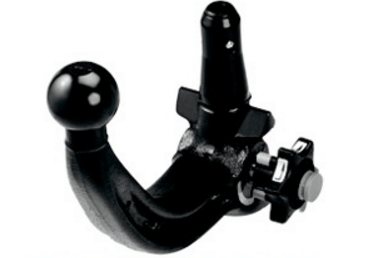
There are also trailer hitch systems where the ball can be removed from the hook and replaced separately. Many towbars are equipped with a safety device that prevents complete loss of connection between the car and the trailer; it is necessary for safety.
Registration of a homemade trailer in the traffic police
Any homemade car trailer must be registered with the traffic police; for this you need to provide:
- sales and cash receipts for components and parts purchased for assembling a home-made structure;
- four photos 10 by 15, photos must be from all sides of the trailer;
- personal passport;
- application for registration;
- receipts for payment of state fees.
After registration, license plates are issued for the trailer; technical inspection for trailers with a carrying capacity of up to 3.5 tons is not required if the trailer belongs to a private person.
Choosing a support wheel for a trailer
Purchasing a support wheel for a trailer involves tracking some of its technical characteristics:
- Device type.
- Principle of operation.
- Payload.
- Material for making tires and wheels.
Removable or foldable:
Automatic or manual?
Diagram of an automatically folding support wheel on a trailer
The design of the support wheel is a telescopic system, that is, two tubes: a rod and a housing. The automatic system implies the presence of a bracket, when pressed, the wheel automatically lowers down. And the mechanical one is a conventional jacking device.
Load capacity of support wheel. Varies from 0.15 to 0.5 tons for passenger cars:
- 0.15 – for a trailer with a gross weight of up to 0.75 tons.
- 0.3 – with a mass of 1 to 2.5 tons.
- 0.5 – up to 3.5 tons.
Support wheel made of solid rubber trailer KMZ 8284 51
For trucks the value is higher than 0.8-1.5 tons.
Rubber and rims for the road wheel are an important component. The trailer support wheel is equipped with a pneumatic tire or solid rubber. Pneumatic tires have better grip on the road surface and do not slip on sand, but require timely inflation.
Regarding disks, they are made of plastic or steel. Although plastic can withstand significant loads, steel wheels have a greater safety margin.