Mechanization of cleaning: how to make a snow blower from a trimmer
Receive one of the most read articles by email once a day. Join us on Facebook and VKontakte.
What you will need:
pipe d20, two bolts and two nuts M8, sheet steel with a cross-section of 2-3 mm, brush cutter.
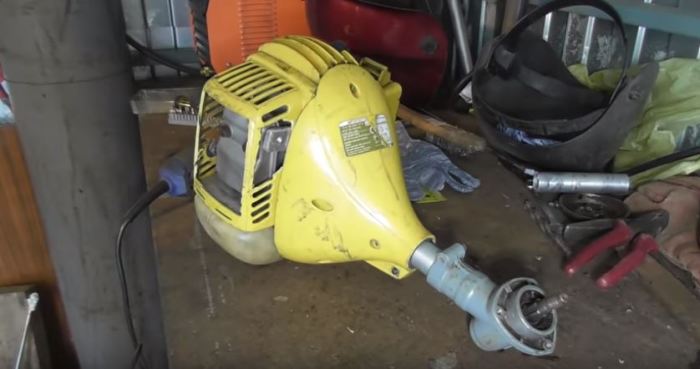
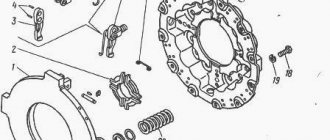
In order to turn the trimmer into an amazing snow blower, you first need to remove the bar with the upper gearbox from the motor of the brush cutter. In addition, the fuel tank and starter must be disconnected. Mounting ears are then welded on the clutch side; they are necessary for fixing to the snow blower bunker using M8 bolts. Accordingly, suitable holes are drilled. When the first stage of modernization is completed, all previously removed elements are returned to the spit.
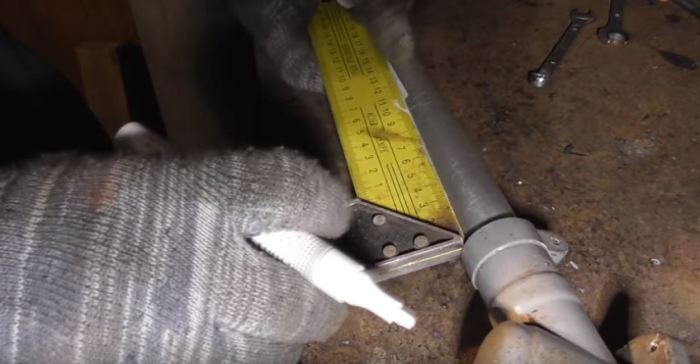
At the same time, the rod must be shortened in such a way that there is a gap of 5-7 cm between the upper and lower gearboxes. First, the tube is cut, and then the shaft is cut off. To ensure that the shaft fits freely into the gearbox, it is ground square.
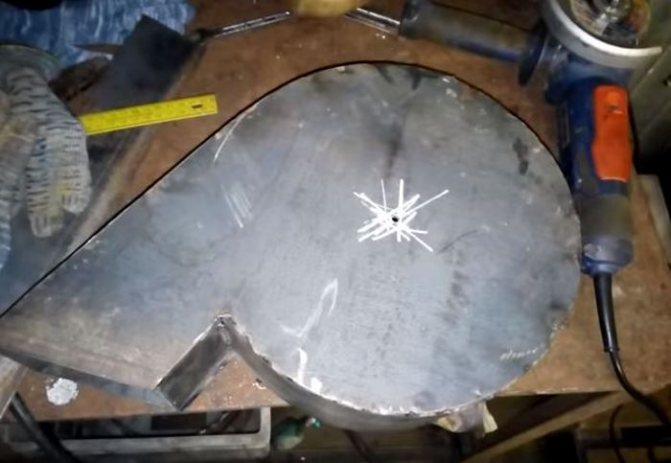
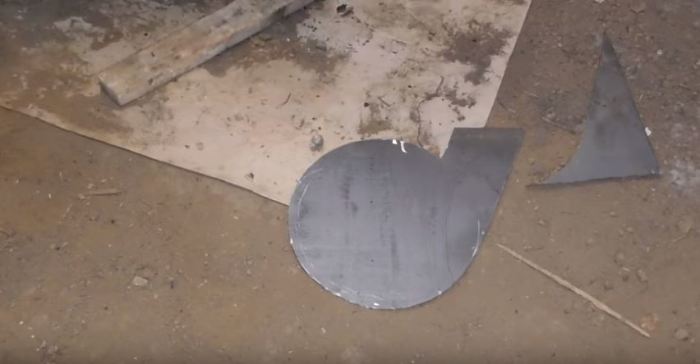
Now you need to make the “snail” of the snow blower. The shape for it is cut out from pre-prepared sheet steel using a stencil. It is important to extend the knife by a few centimeters. The walls for the “snail” are made of the same steel. The entire structure is assembled and welded. The height of the sidewall will be about 10 cm. The higher, the better, the greater the grip of the snow being removed. However, a significant increase makes sense only with a truly powerful scythe. The work on the “snail” is completed by cutting out holes for the gearboxes, and inserting a mounting shaft into them, which is secured with bolts.
Two suspensions in the form of curved strips are made of steel. They are welded to the snail. In this case, the fixation angle is determined experimentally, individually for each specific brush cutter. It is also recommended to weld two “clamps” to the “snail” to guide the snow. They are also made from sheet steel.
To increase the efficiency of the installation, it is recommended to make a steering wheel to control it, as well as weld the skids so that our snow blower glides better. All that remains is to modify the knife. Its blades are shortened, after which small clamps made of sheet steel are welded to them, one for each beam. And now the snow blower is ready to go.
“Snow blower” from a trimmer and brush cutter - the principle of its operation
There are many options for making a snow blower from a brush cutter. Let's stick to the simplest method. Let's replace the cutting knife with a rotor. This snow blower will work like a regular shovel. You just don’t have to lift it, you just need to carry it along the ground. She will scoop up the snow and throw it aside.
Materials and tools
We have a task before us: a do-it-yourself snowblower using a trimmer. One condition: the scythe must have a straight rod and a gearbox at the end. It is advisable to include a multi-tooth disc in the kit for mowing thick grass. Next, we buy beer, “Baltika” in a large tin barrel.
Let's have a drink. We get the main material - metal. Tools that will be useful are a drill, an angle grinder, and a welding machine.
Non-drinkers can replace the bottom of the barrel with sheet metal, 1.5 mm. Using welding, make the necessary parts.
Step-by-step production of parts and assembly
Let's start creating spare parts. We cut the barrel in a circle, at a height of 150 mm from the bottom. We make a hole at the bottom into which the protruding part of the trimmer gearbox will fit. Drill 3 more small holes. They should be positioned so as to coincide with the holes for mounting the shield on the gearbox.
We make a square slot on the side, measuring 100 by 100 mm, to throw out snow.
We close the upper open part of the workpiece by a third with a piece of tin. After first making sure that the ejection slot is in the center of the closed part.
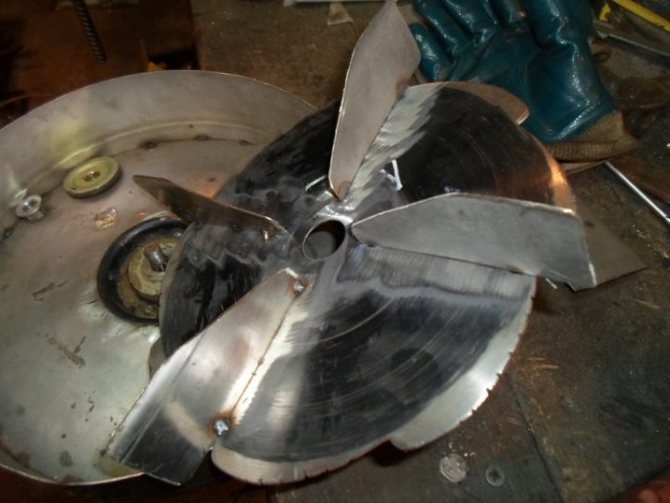
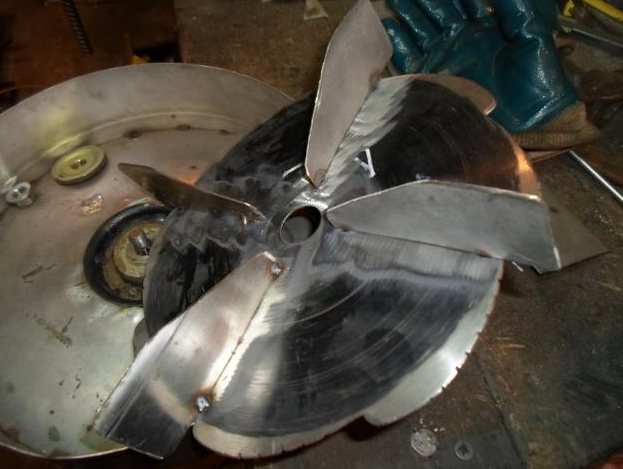
Let's make a rotor. We cut out 4 rectangular blanks, 250 by 100 mm. We give each blank the appearance of a blade by cutting off one of the corners on the long side. We weld them to the trimmer disc in a cross pattern. The rotor is ready.
Bicycle cultivator
The design of this manual cultivator is more complex. It is made from bicycle parts: frame and wheels.
- A cultivator head, made by hand from sharp metal rods, is mounted on a bicycle frame. As a head, you can take a part from an old cultivator. The frame of the device is created from a small plow.
- A handle is made from a metal or aluminum pipe with a diameter of 2 to 2.5 cm.
- All connections are rigidly fixed with bolts. Structural elements should not dangle.
- A medium-sized wheel is mounted on the frame. Wing nuts or simple locknuts are used as fasteners. Wheels that are too large or small are not suitable here.
We invite you to familiarize yourself with Pie without milk and eggs: recipes
The cultivator is designed to remove weeds. Works well between rows.
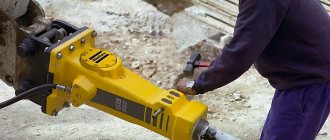
Grinding machine - snow blower from an angle grinder
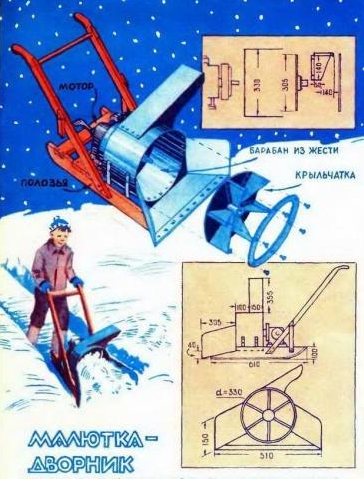
A snow blower from an angle grinder is made on the basis of a wooden sled, to which the rest of the mechanism is attached. The design contains: a deflector, a rotor and its casing. A sheet of steel in the shape of a shovel is attached to the front. The grinder plays the role of a drive and is responsible for the rotation of the blades.
How does this miracle of technology work? The operator pushes the sled, shoveling snow in front of him. The snowball, falling on the shovel, enters the rotor blades and is thrown to the side.
The operating principle of this device is very similar to a mechanical snow blower, which we will talk about here.
What to do and from what
For assembly you will need plywood, 20 mm thick, from which the sled and handle will be made. Sheet metal, 1–1.5 mm, is useful for the manufacture of the main parts of the apparatus and the raking shovel. Metal tube of small thickness. Semi-automatic welding machine. Drill, jigsaw and some hand tools.
Spare parts and assembly
Let's start by making the base. Using a jigsaw, we cut out two blanks measuring 610 by 100 mm, cutting one of the edges at 45 degrees. You will need two pieces of plywood, measuring 370 by 50 mm, to connect them.
Another detail, 370 by 100, in which a semicircle is cut to fit the dimensions of the body. The runners are ready, let's start creating the handle
From the same sheet of plywood we make two bars 50 mm wide and long enough for the operator’s height.
Please note that the handle will be at an angle relative to the runners. Its length can be measured experimentally.
Strong fastening of the handle will be provided by two more bars - struts, of a similar width. Their length depends on the angle of the handle.
Stiga electric lawn mowers will give your yard a well-groomed look in a matter of minutes.
This article contains useful tips on which chainsaw to choose.
Before purchasing a Buhler tractor, you should carefully read its technical characteristics, which are located here //machinspec.com/selskoxozyajstvennaya/traktor/buhler.html.
Let's make a scraper. Iron sheet 570 mm long and 150 mm wide. We bend it so that we get a shovel with a base size of 370 mm, an initial side height of 100 mm and an opposite side of 570 mm.
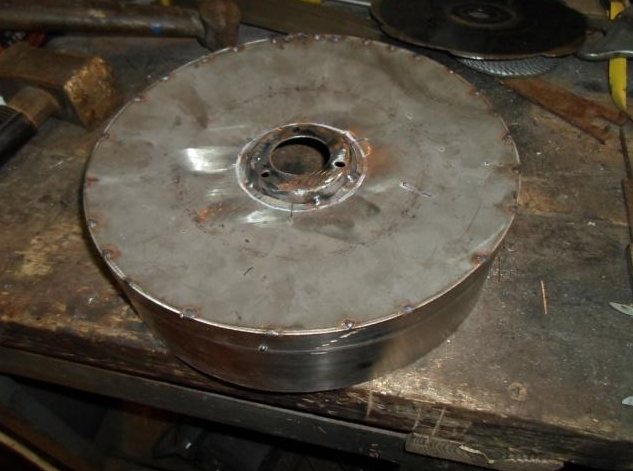
Let's start making the main parts. We cut out a strip of metal 330 mm long and 250 mm wide. We roll the resulting workpiece into a ring. We fix it using spot welding. We make a bottom for the pipe we learned and weld it in place.
Now you need to make 2 holes. One will be in the center of the bottom. Its diameter should be equal to the protruding part of the grinder gearbox cover. The other hole is located on the side. Its dimensions are 150 by 200 mm.
We make a deflector, which is responsible for the direction of the ejection. It consists of a rectangular plate 420 by 150 mm and two triangular lateral supports. The long side of the triangle is 420 mm, height is 150 mm. At its base you will have to cut out a semicircle for a tight fit to the body.
The rotor will look like a disk with welded blades. Its diameter is 300 mm. You will also need to cut 4 blades in the form of a right triangle, with a height of 100 mm and a base size of 277 mm. Drill a 23 mm hole in the center of the disk.
It is better to order a rotor from a turning workshop. If there are the slightest errors in the calculations, increased vibration will quickly damage the gearbox.
There is no need to disassemble the grinder. The only thing you need to do is find 4 bolts. Their diameter and thread must match the holes in the grinder gearbox. Only the length should be at least twice as long.
- Assembling the base. We fasten the runners together using prepared bars. We fasten it with self-tapping screws, one in the middle, the second at the end with the saw cut. We use the same fasteners to attach handles and struts. We attach a metal pipe on top, connecting both handles.
- We attach a spatula to the even ends of the runners. To increase strength we use bolts and nuts.
- We attach the deflector by spot welding above the side hole of the housing.
- We attach the angle grinder to the body using extended gearbox bolts. Additional fastening would be appropriate. It is made from thin strips of metal. We bend it into a half ring, put it on the tool, and weld it to the bottom of the body.
- We put the rotor on the landing washer of the angle grinder and tighten the clamping nut.
- We weld two corners on each side to the body. We, in turn, screw them to the runners so that the body fits tightly onto the front bar.
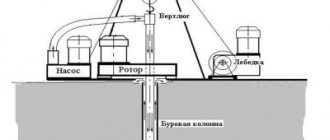
Making a snow blower - algorithm of actions
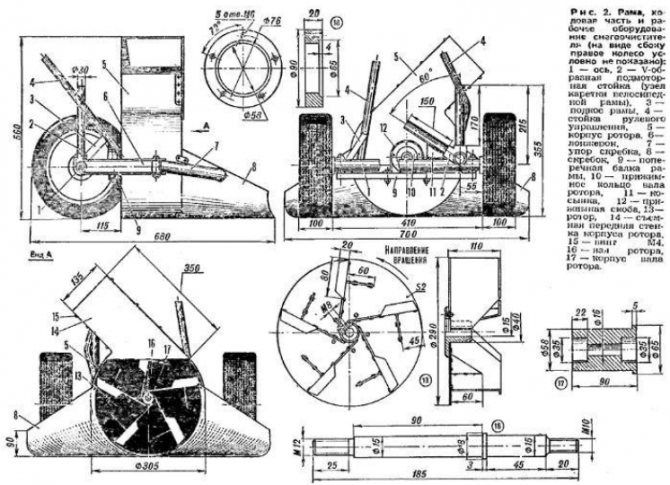
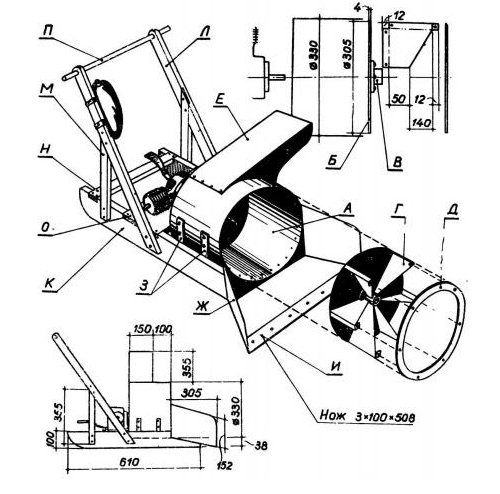
The manufacture of the unit should begin by creating or studying existing drawings. This will allow you to prevent possible errors in advance and complete the work as quickly as possible.
The correct procedure is as follows:
- First of all, you need to prepare the frame. The reliability of the machine depends on its quality, so you should choose reliable materials for its manufacture. First you need to take several identical pipes and weld them to each other. In this case, pay special attention to two longitudinal pipes, which not only serve as part of the frame, but also act as skids of the unit;
- The front parts of the pipes must be cut at an angle, and then the resulting holes must be welded to prevent snow from getting into them. If this is not done, melted snow inside the pipes will lead to corrosion. At the same time, you won’t even notice it;
- Weld two transverse pipes to two longitudinal pipes. In this case, the latter should be located in the rear part of the structure, since the unit’s motor will be supported on them. The distance between the transverse pipes should be about 20 cm;
- Next, you need to remove the engine from the chainsaw. Instead of the standard motor drive sprocket, which serves to tension the chain, you need to install an ordinary small sprocket. It can be taken from an old Voskhod or Minsk motorcycle. The sprocket must be fixed motionless by welding it. However, before this the part will need to be centered;
- After manufacturing the frame, you need to move on to creating a working element - the auger of the unit. To do this, take a small diameter pipe or shaft, 80–85 cm long. These dimensions are needed for mounting the drive in front of the main part of the structure. Particular care should be taken in selecting suitable bearings;
- Next, take a metal sheet 2 mm thick and cut out 4 identical circles with a diameter of 30 cm in it. You need to cut holes in each circle with a diameter of 22–23 cm. Then each of the circles will need to be trimmed to make turns out of them;
- Then you need to determine the central part of the shaft and weld 2 metal plates, 13 cm long and 15 cm wide, to it. Place the sheets strictly parallel to each other. They will serve to throw snow to the sides when operating the snow blower;
- Weld screw strips to one side of the blades. Next, install the spacers on the shaft and weld the other ends of the screw bands to them. In this case, all 4 screw plates should be directed towards the center of the auger. The entire manufactured structure must fit into a 70-centimeter section of the shaft, since the drive will be installed on the rest of it;
- The next step is to move on to manufacturing the body. To do this, you need to take 2 round sides, the size of which should be 7 cm larger than the auger. After this, you will need to weld a metal sheet no more than 1 mm thick to the circumference of the sidewalls. As a result, you should end up with a semicircle of metal plates. Make holes in the central parts of the sidewalls and install the auger in them;
- Before attaching the auger, you need to install bearings on the shaft and press them securely. Remember that the auger must be centered. Use cages to secure the bearings;
- Next you need to assemble a snow disposal. For this you will need an aluminum pipe with a diameter of 15 and a length of 10 cm. You will also need a metal sheet from which you need to form a box. To install the snow drain, you need to make a hole in the back of the auger blades. A pipe is inserted into it and secured with ordinary bolts. Place and secure the box on top of the pipe;
- Then put a sprocket from a domestic motorcycle on the drive section of the shaft;
- At the last stage of manufacturing, you need to assemble the entire existing structure. To do this, the housing and auger must be installed and welded to the longitudinal pipes of the frames. Install the chainsaw engine on the transverse pipes so that the drive and driven sprockets are located strictly in the same plane;
- Install a chain on the drive and make a handle from leftover metal pipes. Don't forget to move the throttle control lever to the handle.
We invite you to familiarize yourself with Gas from a septic tank
Upon completion of assembly, you need to test the unit. To do this, walk around the yard with him, removing freshly fallen snow, and then move on to removing the accumulated snow masses.
Snow mower
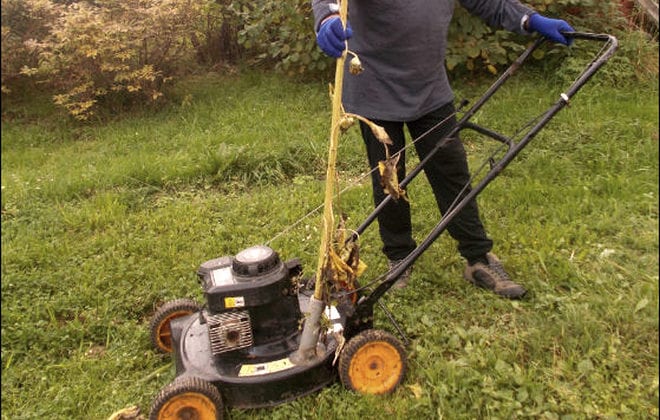
By installing a blade, it's easy to make a snow blower out of a lawn mower. But it must be self-propelled. In this case, the mechanism moves due to the motor drive, and the snowball is raked by a shovel attached in front. A convenient solution for those who do not want to disfigure their instrument. There will be no major changes to the mower design.
The worst mechanism for converting into a snow blower is a gasoline lawn mower. Its engine shaft is directed downwards, which significantly reduces the design options for the future device. It will not be possible to place such an engine on its side; the oil will leak and the engine will jam.
The shaft is equipped with a special part that breaks when the load is exceeded, protecting the engine. Another thing is the snow blower from the Mole cultivator, which you can assemble with your own hands only by reading the instructions on this site.
Necessary materials and tools to make a snowblower with your own hands
We will make a blade from a 20 by 20 mm metal profile and a sheet of smooth roofing iron. The tools you will need are: an angle grinder, a welding machine, a drill, a riveter and other hand tools.
Step-by-step manufacturing of parts and assembly of a homemade snow blower
Let's start cutting the profile. We make 2 pieces 100 cm long and 4 pieces 50 cm long. Parts of shorter length should be bent, giving the shape of the future dump. We weld the resulting parts. Long pieces are located vertically at the top and bottom. A pair of short parts are located at the edges, remaining at an equal distance from the middle.
We take a sheet of metal and cut out a blank with a width of 100 cm and a height of 50 cm.
Drill holes along the contour, at a distance of 1 cm from the edge. We attach the workpiece to the frame, drill the profile along the holes already obtained. Now let's rivet the parts together.
Fastening elements are made from profiles. We cut two blanks 20 cm long and another pair, 30 cm long. Different sizes are needed so that the raked snow goes to the side. We fasten them in the form of a corner using spot welding. At a distance of 3 cm from the seam, we drill each part.
Remove the blade before starting the mower.
How to make a chopper
You can turn a lawn mower into a motorized cultivator that will chop up grass, leaves and even branches. To do this, simply place the lawn mower on its side.
- To securely fasten the device, its front part is pressed against a stable base, and a brick is placed under the wheels.
- A tray for the ground mass is equipped at the bottom. It is made from flexible iron sheet. You can use plywood with a length of 1 to 1.5 m.
- After starting the lawn mower, the start handle is secured with wire.
- The green mass is thrown onto the tray and lightly pushed towards the knives. Then the tray itself with the vegetation is moved.
Results
These mechanisms have positive and negative qualities. We get a snow removal machine from existing tools, at minimal cost. The device becomes multifunctional. But there is also a minus. The equipment is not designed to work in winter, which means its parts will wear out faster.
These devices are easy to remove only loose dry snow. And as you may have noticed, you will have to tinker before assembling the working unit, and some refuse the idea of assembling it with their own hands, but still plan to save money, and it is for these purposes that an article was written in which we will talk about the Husqvarna 227 snow blower, because unlike our This product costs much less than its counterparts.
For the same reasons to save money, the grass cutter from a washing machine is quite simple in design and easy to assemble with your own hands.
Preparation of materials
Not every trimmer model is suitable for conversion. An electric or brush cutter with a curved bar will not make a snowblower due to the low power of the device. The finished snow blower will be too weak with a constantly overheating motor.
A powerful trimmer with a straight shaft is the best option. In such a unit, torque is transmitted to the cutting knife through a rigid shaft and gearbox.
To re-equip the trimmer, you do not need complex drawings; a simple diagram is enough for a general idea of the sequence of actions, and which can be used as a guide in your work.
Tools you need to get:
Necessary materials for work:
- Steel sheet 1.5 millimeters thick;
- A pipe section of 30 centimeters;
- Beer barrel without bottom;
- Multi-toothed disc (often included with a brush cutter).
Tools and materials
The set of tools needed to make a snow blower may vary depending on the chosen path to achieve the goal. Some homemade modifications do not imply reusable use, while others are intended for constant use.
Minimum set of tools:
- Bulgarian;
- drill and drill bits;
- welding machine;
- hammer, pliers, wrenches and others.
An angle grinder is necessary for cutting out the necessary parts from metal and their subsequent processing: grinding, cleaning, sharpening. Drill – for drilling holes for fasteners: bolts, rivets, clamps. An inverter will be needed to weld all structural elements together.
List of materials:
- sheet metal (thickness varies depending on the chosen design);
- pipe sections: metal, plastic;
- bolts, nuts, washers;
- metal clamps.
The drum body, blades and cleaner bucket are formed from sheets of metal. The pipe is necessary for arranging directional snow removal. A jet is ejected through it. Threaded fastening components are needed to fasten parts of a prefabricated structure. Clamps can be used to attach the harvesting attachment to the trimmer rod.
How to make a snow blower from a trimmer with your own hands?
A previously studied and reviewed scheme allows you to avoid possible problems and speed up the process of creating a homemade product.
Step-by-step algorithm for creating a snowblower from a trimmer:
- The beer barrel is cut in a circle with an indentation of about 15 centimeters from the bottom;
- A hole is made at the bottom of the barrel for the protruding part of the gearbox;
- On the same side, three more holes are needed, which will coincide with the holes for fixing the shield on the gearbox;
- A square hole of 10*10 centimeters is made on the side, through which snow will be thrown out;
- The top of the workpiece is covered with a steel sheet by a third. Snow masses should be thrown out in the center of the blocked part;
- A rotor is created. Four rectangular sheets of steel (25*10 centimeters) are cut out. The pieces should be shaped like a shovel, with one corner cut off. The finished blades are welded to the lawn mower disc;
- The remains of a beer barrel are used to create a baffle. A strip of metal is cut out, the width of which is up to 15 and the length of up to 30 centimeters. The workpiece is bent and the sides are welded to it to prevent snow from being thrown out with a height of about 10 centimeters;
- The blade is made of steel sheet. A rectangular piece is cut out, the size of which is 30*40 centimeters. The edges of the workpiece are folded to obtain sides about two centimeters high;
- The deflector is welded to the body;
- The blade is fixed from below;
- The gearbox is inserted into the hole and secured;
- The rotor will act as a knife attachment.
How to convert a snow blower into a cultivator
It is very common to find a two-in-one cultivator together with a lawn mower or other equipment. If this is a factory option, for example, a unit was assembled based on a walk-behind tractor, then this will require changing the main parts for securing the attachment and installing the required parts.
Important! Not all walk-behind tractors allow the use of various snow removal equipment as additional attachments. The same applies to mowers. But most domestic walk-behind tractors are easy to move and allow you to install a universal adapter.
In fact, to convert a factory or semi-factory version of a snow blower into a cultivator, it is enough to remove all additional elements, the equipment itself and adapters. After this, the cultivation equipment is installed. This is suitable even for low-power units.
If the snow was removed using homemade equipment, then you will need to remove some of the spare parts that were installed according to the drawings. After this, the drive switches to the newly installed equipment, but of a cultivation nature.
In this video we will look at how to make a snow blower from a trimmer:
Important! For factory models, there is a different conversion scheme, since it already takes into account various nuances regarding the characteristics and features of each specific manufacturer.
In this case, you must act according to the instructions:
- a proposed drawing of the cultivator is created;
- the nature of connecting attachments of another type is schematically drawn;
- Next, it is necessary to draw up a plan for phased collection, since it may be necessary to use adapters and lengthen the frame of the equipment;
- the unit is disassembled;
- the engine is left on the frame, which is extended or expanded if necessary;
- a connection is formed with new parts of the cultivator, in particular with cutters or other elements;
- a universal hitch is installed;
- an adapter is used if necessary;
- The cultivator is assembled on the basis of the base;
- Along the way, all systems are being connected;
- After assembly, the equipment is checked for quality during running-in.
This plan is standard for converting equipment into a cultivator. It is worth considering that most snow-removing walk-behind tractors do not need this, since in their case it is enough to change and reconnect the attachments.
Tips for operating and caring for a homemade snow blower
The snow blower will last a long time without the need for frequent repairs if you follow simple recommendations.
Specifics of equipment operation:
- The gas must be squeezed to full;
- It is better not to press the gas too often to extend the life of the engine and clutch;
- You should avoid hard obstacles that can cause deformation of the shovel;
- Before using the unit, the motor must be warmed up;
- You can only fill your car with motor oil according to the season. It is drained before the summer downtime and a new mixture is poured immediately before the snowmobile operating season.
The unit can only be stored in a dry room where it will not be exposed to moisture. Dampness will cause corrosion and damage to metal parts. Upon completion of the work, the blades are cleared of snow and debris.
Correct operation - tips
In order for a homemade snow remover to last a long time, you should not use it at its maximum. If you feel that the unit cannot cope, you need to roll it back and try to remove snow from this area again.
Other tips for clearing snow with a homemade machine:
- In the fall, remove all unnecessary objects and debris from the site so that the snow removal unit does not subsequently trip over them and break.
- Clean the device from snow and ice after use. As the engine heats up, a crust of ice may form.
- Before and after work, the gasoline engine must be warmed up. In the first case, this is necessary to restore thermal gaps, in the second, for drying after cleaning.
The unit must be lubricated regularly. It is better to use winter synthetic compounds for this.
Do-it-yourself snow blower from a trimmer: step-by-step homemade instructions
A snow blower is an important assistant on the site. You can do it yourself using a trimmer. Let's look at the simplest scheme for making a snow blower from a brush cutter.
Not every braid is suitable for homemade hair. Low-power electric tools with a curved shaft will not be up to the task of clearing snow. It is better to use productive models with a flat bar for these purposes.
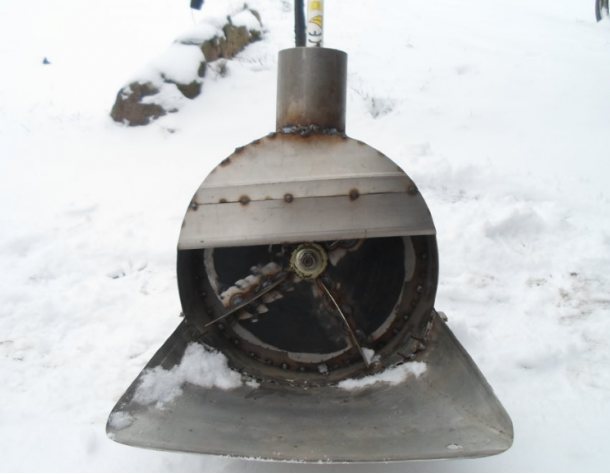
The design of the snow blower itself is simple. It works with a special attachment (an impeller with blades), which is installed instead of a knife. The impeller can be made independently and it is better to place it in a metal casing, which is made from a large pipe or a beer barrel.
A snowplow from a trimmer is created using drawings and following all diagrams.
Snow blower attachment for trimmer
You can buy a snow removal attachment for a brush cutter. It is important to choose the right one for performance. The nozzle must be suitable in its parameters for a specific trimmer model. If the performance of the snow blower is high and the brush cutter is weak, the motor will quickly overheat.
Advice! The most popular attachments for brush cutters have a productivity of approximately 160 kg/min. The width of the snow grip varies within 30 cm, and the height – 15 cm.
How to make a snow blower from a trimmer with your own hands
To work you will need the following tools:
- grinder and drill;
- metal sheets;
- steel barrel or pipe;
- welding machine;
- self-tapping screws, bolts.
The procedure for creating a homemade snow blower
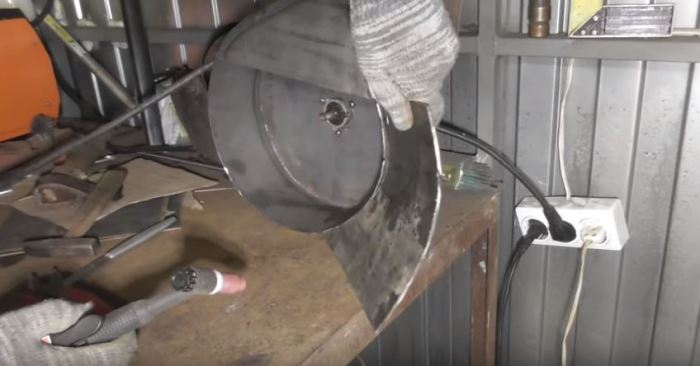
- Start by creating the body. It is best to make it from a metal beer barrel, but if you don’t have one, you can use a large diameter pipe. Cut a piece 15 cm long, leave the bottom. The gearbox will be attached to it.
- You need to make a hole in the very center of the bottom of the pipe or barrel so that the trimmer's operating shaft can pass through there. Place markings in the form of three points for fastening the gearbox and drill holes for the bolts in their place.
- Make an exit (deflector). It is needed so that snow is thrown out of the snow blower. A hole with a diameter of 10 cm is cut out in the homemade body. Later you will need to weld the pipe. But before that, cut a semicircle-shaped blank from a metal sheet and weld one part of the front side of the case with it. Thus, the plug will not allow snow to scatter, but will direct it into the deflector. It should be located in the central front part of the plug.
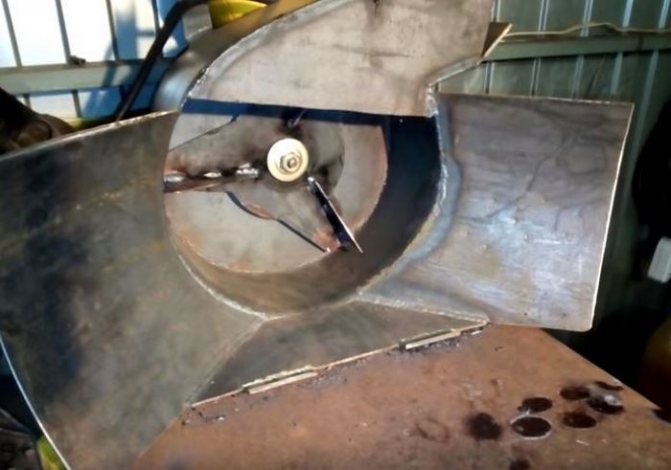
- Make a rotor (impeller) with which snow will be collected. To do this, take a trimmer disk blade, and cut out four blades from metal, each of which has a size of 25x10 cm. These blanks are welded to the disk blade crosswise.
- Proceed to complete work on the deflector. Attach the pipe to the hole on the body, which can be made of steel. The size of the tool should be 10 cm. Attach an elbow of the same length so that the snow is thrown to the side. If the deflector is round in shape, the elbow can be taken from a plastic sewer pipe.
- Next, a shovel is made from a steel sheet measuring 30x40 cm. Sides are folded on its sides, the height of which is 2 cm. The structure should be welded to the bottom of the tool body.
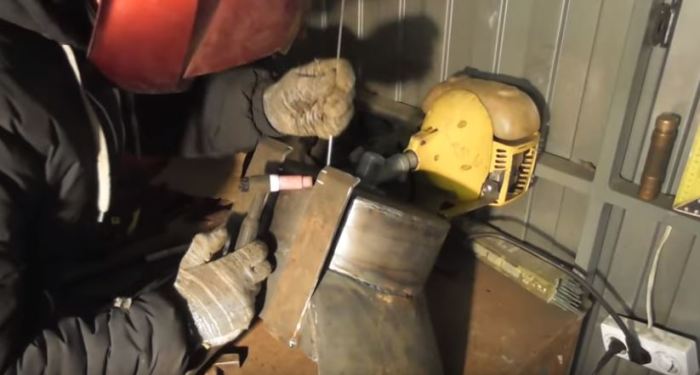
- The collection of parts begins with a trimmer. The gearbox is bolted to the bottom of the homemade product, and then the wings are put on the shaft. The handle of the snow blower can be the trimmer handle itself, or you can make a more convenient design.
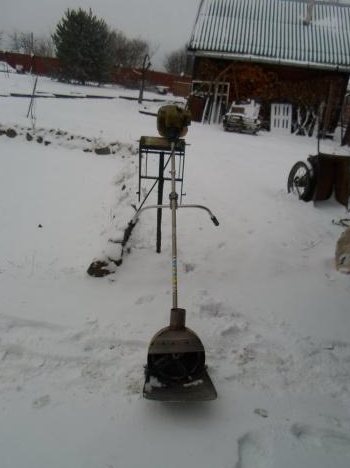
You need to put a snowplow from a trimmer on the frame yourself, for which a special rectangle is made. Skis or ordinary wooden runners are attached to it from below, which will allow you to push the unit through the snow.
Bicycle with engine from trimmer
A homemade bicycle with a trimmer motor is a high-tech vehicle that differs from simple analogues in its high riding speed, practicality and reduced cost due to the use of cheap equipment.
To assemble a motorbike, the following equipment is required:
- the bike is in working order;
- trimmer motor;
- chain;
- tensioner;
- star;
- clamp;
- cable;
- fuse;
- controller;
- exhaust pipe;
- bushing, bolts, washers.
Converting a bicycle to a bike:
- 2 rubber spacers are attached to the rear wheel: the first - between the spokes, the second - behind them.
- The sprocket must fit the trimmer motor. It is inserted into the bushing, which is located on the outer part of the wheel. A crescent moon is attached to the inside.
- The engine is mounted on the trunk or behind the seat using a clamp purchased or made from a steel plate with your own hands.
- Install the chain on the sprocket and power unit and adjust it with a tensioner. It is not recommended to use belts instead of a chain. Under the influence of friction, they often become unusable and their service life is minimal.
- The throttle handle and the engine are connected by a cable.
- Attach the fuel tank and carburetor.
- The exhaust pipe is welded with a weld seam.
Some craftsmen create a braking system and replace standard wheel tires with non-slip ones. After assembling all the components, be sure to check the operation of the bicycle. The functionality of the mechanism and its own safety will depend on this.