Payment for goods and downloading of the book in electronic form (PDF format) is made on the website.
To do this, you need to find the book you are interested in and click on the “Buy” button. The price of the book is indicated on the button.
For convenience, the price on the website for residents of Russia, Belarus and Kazakhstan is presented in rubles.
For residents of Ukraine in hryvnias, and for all other countries - dollars.
After clicking on the “BUY” button, a payment window will open where you can select a payment system with which you can pay for the selected book using any bank card (Visa, MasterCard, MIR, etc.)
When you click on the “Pay by bank card” button, the Portmone payment system will open, which is the easiest way to make a payment.
In addition, the website offers four payment systems for payment:
- Yandex (payment from any bank cards, Yandex Money account, QIWI Wallet, terminals, etc.);
- Portmone (payment from any bank cards, Portmone account);
- PayPal (payment from any bank cards, PayPal account);
- WebMoney (payment from any bank cards, payment from WebMoney wallets).
Payment via Yandex Cashier
After selecting payment via Yandex, the Yandex Cashier payment system will launch, where you need to select a convenient payment method (bank card, QIWI, Yandex Money account, etc.)
After specifying payment details and confirming payment, payment for the goods will occur.
If you have a bank card in a currency other than the ruble, then the money will be debited from the card at the rate of the Central Bank of Russia at the time of the purchase.
This payment method is optimal for residents of Russia, Kazakhstan and Belarus.
Official website of the Yandex Kassa payment system https://kassa.yandex.ru
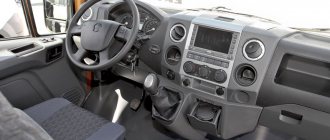
Control panel gazelle 3302 description and diagram
Gazelle Sable. CONTROLS AND INSTRUMENTS
Location of controls (old-style instrument panel)
:
1a- light switch above the rear row of seats*
(van with two rows of seats). On some vehicles, the switch is installed on the body of the lamps; b – switch for the lamps on the left side of the passenger compartment (bus);
2 a – microprocessor ignition system fault indicator (van and eleven-seater bus with 3M3-4063 engine);
b – indicator for turning on glow plugs (van and eleven-seater bus with a GAZ-560 engine); c – fog lamp switch (seven-seater bus);
3 – left steering column switch (lever for direction indicators, headlights and horn button*);
4 – instrument cluster;
5 – right steering column switch (lever of the windshield wiper, windshield washer and horn switch*);
6 – rear fog light switch;
7 – switch for the lamp on the right side of the passenger compartment (bus);
8 – knob for setting the daily mileage counter to zero;
9 – alarm switch;
10 – deflector (supply ventilation nozzle);
11 – button for opening the document compartment cover;
12 – document section cover;
13 – niche for installing a radio or radio;
14 – switch for the fan and electric pump of the additional heater (bus). To avoid failure of the electric pump, turn it on only when the heater tap is open;
15 – heater control panel;
16 – gearbox lever is engaged;
18 – parking brake lever;
19 – central light switch. The switch has three fixed positions: the handle is recessed - everything is off; the handle is pulled to the middle position - the side lights and license plate lights are turned on; the handle is fully extended - the side lights, license plate lights and headlights are on;
21 – gas pedal;
22 – brake pedal;
23 – steering column fixation lever;
24 – clutch release pedal;
25 – battery switch button;
26 – steering shaft (steering wheel removed for clarity);
27 – ignition switch;
28 – control handle for electric headlight adjustment;
29 a – microprocessor ignition system fault indicator (seven-seater bus with 3M3-4063 engine);
b – indicator for turning on glow plugs (seven-seater bus with GAZ-560 engine);
30 – fuse blocks;
31 – carburetor choke control knob (car with 3M3-4063 engine). * Depending on the version, the sound signal can be activated using the right steering column switch lever or the button on the left steering column switch lever.
Location of heating and ventilation controls:
1 – heater fan switch;
2 – air flow control lever;
3 – control knob for the heater air intake damper;
4 – heater tap control handle;
5 – control handle for heater distribution flaps;
6 – switch for the fan and electric pump of the additional heater (bus).
Location of controls under the instrument panel:
1 – hood lock drive handle;
2 – portable lamp socket.
Instrument cluster: 1 – alarm indicator for emergency drop in oil pressure in the engine lubrication system; 2 – oil pressure indicator; 3 – tachometer; 4 – generator malfunction indicator; 5 – indicator for an emergency drop in the brake fluid level and activation of the parking brake; b – turn signal indicator; 7 – daily mileage counter; 8 – speedometer; 9 – indicator of fuel reserve in the tank (turns on when the remaining fuel is less than 8 liters); 10 – fuel level indicator in the tank; 11 – voltmeter; 12 – odometer; 13 – signaling device for turning on high beam headlights; 14 – signaling device for turning on the side light; 15 – coolant overheat indicator; 16 – backup signaling device; 17 – coolant temperature indicator.
* The digital values given in this column are not indicated on the instrument scales.
Location of controls (new instrument panel): 1 – left steering column switch (turn indicator switch, headlight switch and horn button*); 2 – instrument cluster;
3 – right steering column switch (windshield wiper and headlight washer switch lever and horn button*); 4 – interior light switch; 5 – alarm switch; 6 – plugs (reserve sockets for additional switches); 7 - deflector (supply ventilation nozzle); 8 – deflector damper control dial; 9.12 – niches for installing additional equipment (radio, on-board computer, etc.); 10 – button for opening the document section cover; 11 – document section cover; 13 – glove box cover; 14 – heating and ventilation control panel (for more details, see “Ventilation and heating system. Design features”, p. 266);
Payment via Portmone
After selecting payment through Portmone, the payment system will launch, where you need to select the payment method: bank card or Portmone account.
The price in the Portmone payment system is converted into dollars at the exchange rate of the Central Bank of the country where you are located.
If you have a bank card in a currency other than the dollar, then the money will be debited from the card at the rate of the Central Bank of your country at the time of the purchase.
After specifying payment details and confirming payment, payment for the goods will occur.
Official website of the Portmone payment system https://www.portmone.com
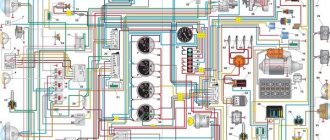
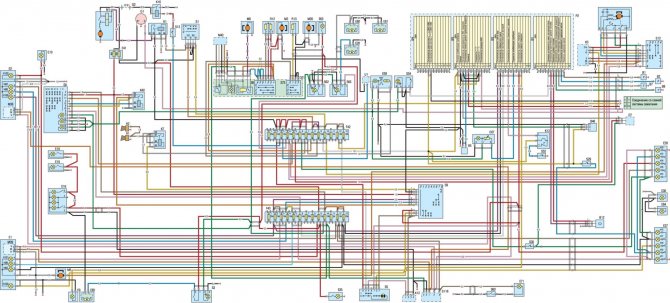
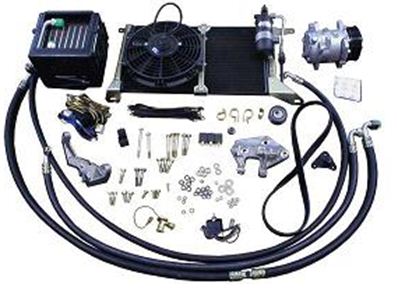
Radical changes to the electrical circuit
In particular, the electrical wiring of the Gazelle 3302 has changed significantly due to the appearance of long-awaited elements:
- Diesel engine;
- ABS in the brake drive;
- Air conditioning;
- Cruise control.
Diesel Gazelle
With the advent of long-awaited diesel engines in the line of power units, in particular, a Cummins engine made in the USA, the electrical equipment layout has also changed.
Although the diesel engine is free of the ignition system traditional for gasoline engines, its design contains a lot of other electrical components, among which the main ones are:
- Fuel pump control unit;
- Exhaust gas afterburning system control unit.
Caution: using non-standard firmware for the engine control unit is not recommended, since the factory settings are designed to balance the different torque of the engine and gearbox.
Accordingly, the wiring of the Gazelle Business has also undergone changes (compared to the wiring diagram of the Gazelle with the 402 engine), since in the diesel version the following is installed:
- more powerful battery,
- new starter with improved characteristics;
- high performance generator;
The installation of energy-intensive equipment led to an increase in the load on the on-board network, which also required alteration of the Gazelle's electrical wiring diagram. Naturally, the automaker began shipping electrical wiring kits corresponding to different power units to service points and auto parts stores.
Sanden air conditioners
With the advent of air conditioners from the Japanese company Sanden, the electrical wiring on the Gazelle 3302 also underwent changes. In addition to additional consumers of the current source in the car interior (control unit), power was required in the engine compartment for both the electric fan and the pump.
Brake system
ABS, a system that prevents wheel locking during braking, also appeared on Gazelle Business for the first time.
The automaker began installing products from the German company Bosch in the brake drive:
- master brake cylinder;
- vacuum brake booster;
- ABS control unit;
- wheel sensors.
For reference: Preference was given to a 4-channel system with separate adjustment of the braking torque of each wheel.
Since 2011, ABS has become the basic equipment of minibuses intended for transporting passengers.
Payment via PayPal
After selecting payment via PayPal, the PayPal payment system will launch, where you need to select the payment method: bank card or PayPal account.
If you already have a PayPal account, then you need to log into it and make a payment.
If you do not have a PayPal account and you want to pay using a bank card via PayPal, you need to click on the “Create an Account” button - shown with an arrow in the picture.
PayPal will then prompt you to select your country and provide your credit card information.
After specifying the information required to make the payment, you must click on the “Pay Now” button.
Official website of the PayPal payment system https://www.paypal.com
Pinout of instrument panel gas 385 3801010 30
Almost all signaling devices on the PP are designed for mass supply! therefore, for such indicators as open doors, heated mirrors and rear windows, and I don’t remember what else... you need to purchase a relay converter from + to -... I found one that was only used for opening doors.
There is a digital odometer on the left side. The top shows the total mileage and the bottom shows the daily mileage. It is reset by pressing the key on the left. Also on the new model panel there are 20 indicators (including ABS and EBD), which light up in the event of a malfunction of one or another system.
How do you monitor oil pressure? I just have a 406 carb and I also want to install such a panel, but I still don’t get around to it and I still want to install a separate device for pressure, otherwise I’m not happy with the emergency light.
By default, only time is shown here. But if you click on the button on the right, you can switch the mode. So, the driver can find out the data from the voltmeter and oil pressure in real time.
Payment via WebMoney
After selecting payment via WebMoney, the payment system will launch, where you need to select the payment method: bank card or WebMoney wallet.
If you already have a WebMoney wallet, then you need to log into it and make a payment.
If you do not have a WebMoney wallet and you want to pay in another way, you need to select any of the methods that WebMoney offers and make the payment
After specifying payment details and confirming payment, payment for the goods will occur.
Official website of the WebMoney payment system https://www.webmoney.ru/
Downloading a book
After successfully completing the payment (by any method) and returning to the KrutilVertel store from the payment system website, you will be taken to the successful payment page:
On this page you need to indicate your e-mail, where access to download the book will be sent.
If you are already registered on our website, then simply follow the link to your personal account.
The book you purchased will be in your personal account, from where you can always download it.
Please note that after making the payment, you need to return back from the payment system website to the KrutilVertel website.
If for some reason you did not return back to the site and closed the payment system tab with a message about the successful completion of the payment, please let us know - we will send you a letter indicating access to download the book.
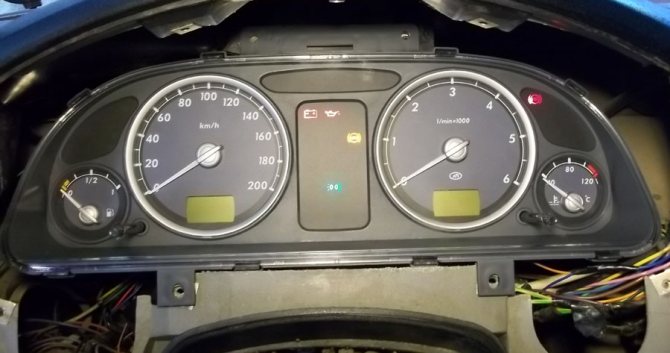
"Euro-3"
For the first time, such a tidy appeared on Gazelle Business cars. The old-style Gazelle instrument panel went out of fashion, and all Gazelle drivers began installing the updated panel in their car. The Volga owners also made the same modifications. Indeed, the new dashboard has become much more informative, convenient and practical. What can I say, its design is much more modern. As reviews say, it makes the interior look fresher and less dull. The reader can see what the updated tidy looks like in practice in the photo below.
But it is worth noting that this shield has slight differences in design. So, on some models the instrument scales had a darker shade. But this did not affect the information content in any way - the reviews say. Another feature of the new shield is the presence of sound indication. Now the driver can hear a characteristic signal if:
- The fuel level has dropped to the minimum level.
- The engine temperature increased to 105 degrees Celsius or more.
- The handbrake was not released. What is noteworthy is that the signal is triggered only when the car starts moving at a speed of 2 kilometers per hour or more.
The new tidy has large modern dials. Now the speedometer and tachometer scales are in opposite places (compared to the “Rizhskaya”), and their diameter has become the same. On the left is the fuel level indicator, and on the right is the coolant temperature sensor. But where did the mains voltage and oil pressure indications go? The answer is simple - this data is in the on-board computer. It is located in the tachometer “well”. By default, only time is shown here. But if you click on the button on the right, you can switch the mode. So, the driver can find out data from the voltmeter and oil pressure in real time.
What’s noteworthy is that when the oil drops below 0.2 bar, a flashing window with a sensor will light up.
There is a digital odometer on the left side. The top shows the total mileage and the bottom shows the daily mileage. It is reset by pressing the key on the left. Also on the new model panel there are 20 indicators (including ABS and EBD), which light up in the event of a malfunction of one or another system.
Problems when paying with bank cards
Sometimes difficulties may arise when paying with Visa/MasterCard bank cards. The most common of them:
- There is a restriction on the card for paying for online purchases
- A plastic card is not intended for making payments online.
- The plastic card is not activated for making payments online.
- There are not enough funds on the plastic card.
In order to solve these problems, you need to call or write to the technical support of the bank where you are served. Bank specialists will help you resolve them and make payments.
That's basically it. The entire process of paying for a book in PDF format on car repair on our website takes 1-2 minutes.
If you still have any questions, you can ask them using the feedback form, or write us an email at [email protected]
Treatment of joints
Many car owners of a gazelle or Volga car with an old-style instrument panel strive to change it to a new-style instrument panel, in which most of the indicators have been replaced with modern LED ones, and such an instrument panel looks much prettier and brighter.
But if you click on the button on the right, you can switch the mode. So, the driver can find out the data from the voltmeter and oil pressure in real time.
But there’s just one problem: you can’t change the instrument panel one-on-one. Either half of the indicators will not light up, or, on the contrary, extra indicators will light up. Let's figure out how to install a new type of instrument cluster (panel) 385.3801-10 instead of the old panel with light bulbs 384.3801-10, which has served for many years.
To begin with, let us present to your attention a combination of instruments of the old and new models. Instrument cluster Gazelle (Volga) old model 384.3801-10
Instrument cluster Gazelle (Volga) new model 385.3801-10
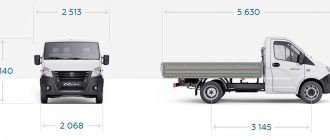
Instrument panel, "Gazelle": device, principle of operation and reviews
"Gazelle" is a very popular truck in Russia.
A lot of vehicles for other purposes are also produced on the basis of the GAZ-3302. This includes both public transport and passenger minibuses.
What do all these models have in common? They are united not only by a common frame structure, but also by a single instrument panel.
We recommend reading: You can use PNS under the general tax regime
"Gazelles" of different years of production were equipped with different instrument panels.
Well, let's look at exactly what and what the features of each shield are.
The function of any “tidy” is informational.
This also applies to the Gazelle Business instrument panel. In a small area of the dashboard there are all the necessary indicators, lights and scales. Usually the shield is located behind the steering wheel, in front of the driver’s eyes. But there are also exceptions. For example, in the UAZ Hunter the panel is located in the center. But we won’t consider the tidy of this car yet.
Let's return to our Gazelles. Externally, their panels consist of three to five round dials with several alarm sensors.