Cars admin26.02.2020
The clutch of Kamaz-4310, 55111, 43118, 5320 vehicles must be replaced:
— Slipping of the clutch discs as a result of weakening or breaking of the pressure springs, wear of the friction linings of the driven discs, in which it is impossible to restore the free play of the clutch release fork shaft lever by adjustment.
— Incomplete release of the clutch as a result of distortion or warping of the driven and pressure disks, as well as loosening of the rivets of the driven disk hub.
— Mechanical damage to the clutch, interfering with its normal operation.
Removing the clutch of Kamaz-4310, 55111, 43118, 5320 vehicles
— Remove the gearbox, do it without draining the oil from the gearbox housing.
- Screw four technological bolts into the pressure disk until they stop in the casing. Bend the tabs of the lock washers.
— Remove the bolts securing the clutch housing to the flywheel and remove the clutch housing with the pressure plate assembly, the middle and driven clutch discs.
Installation of clutch KamAZ-4310, 55111, 43118, 5320
— Insert the driven and middle disks into the flywheel cavity.
Technical condition - Correct location of the hubs of the driven disks - with short protruding ends towards each other
Align the holes on the clutch housing with the holes in the flywheel.
— Insert the drive shaft of the gearbox into the splined holes of the driven disks KamAZ-4310, 55111, 43118, 5320, insert the casing mounting bolts and tighten them. The tightening torque of the bolts is 53.9–61.8 nm (5.5–6.3 kg/cm). Tighten the bolts evenly in 2-3 steps
Technical specifications - Before installing the Kamaz-4310, 55111, 43118, 5320 clutch housing with the pressure plate assembly, check the correct position of the thrust ring
To check, install and secure the pressure disk assembly on a test stand or on a flywheel with an insert, providing an installation dimension of 29 ± 0.1 mm, and loosen the technological bolts. The correct position of the thrust ring is determined by the mounting size of 54±0.3 mm, the runout of the ends is no more than 0.2 mm.
— Unscrew the technological bolts and remove the spline mandrel
— Install the gearbox.
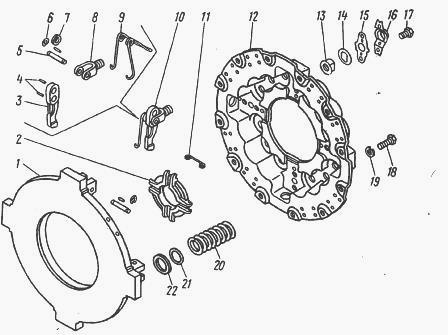
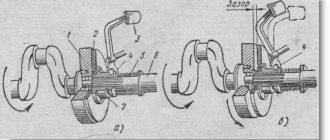
Fig.1. Clutch disc KamAZ-4310, 55111, 43118, 5320 pressure
1—clutch push disk; 2-ring persistent pull-out levers; 3 — pull lever; 4 — needle roller for tightening the levers and forks of the levers; 5 — axis of the lever fork; 6—thrust ring; 7, 19 — washers; 8 — lever fork; 9 — thrust ring spring; 10 — pull lever with fork and spring assembly; 11 — spring loop; 12 — clutch casing; 13 — adjusting nut of the lever fork; 14 — lock washer; 15 — support plate; 16 — locking plate; 17 - bolt; 18 — coupling bolt; 20—clutch pressure spring; 21 — lining washer; 22 — pressure spring lining
Disassembling the clutch mechanism KamAZ-4310, 55111, 43118, 5320
— Install the clutch housing assembly with the pressure plate on the stand and secure
— Bend the mustaches of the locking plates 16 (Fig. 1), unscrew the bolts 17 securing the locking and support plates and remove the support 15 and locking plates 16
— Remove the lock washers 14 of the adjusting nuts and unscrew the adjusting nuts 13
— Mark the relative position of the casing 12 and the pressure plate
— Unscrew the coupling bolts 18 from the pressure plate 1 and remove the clutch cover 12 from the stand
— Remove the thrust ring 2 release levers and the hinges 11 of the thrust ring springs
— Remove the pressure springs 20, washers 21 and pads 22 from the clutch pressure plate
— Remove the thrust rings 6 and flat washers 7 from the axles 5 of the lever, pressure plate
— Press out the axles 5 of the forks of the pressure plate levers, remove the levers 10 assembled with the forks 8 and the springs 9 of the thrust ring and remove the needle rollers 4 of the release levers 3
— Remove the pressure plate from the stand
— Press out the axles 5 of the forks of the levers, remove the springs 0, disconnect the forks 8 from the levers 3 of the pressure plate, remove the needle rollers from the holes of the levers
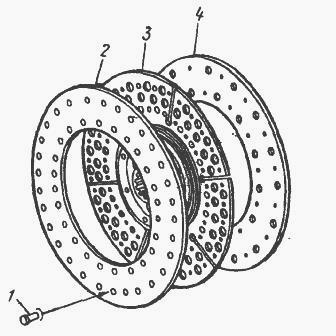
Fig.2. Driven clutch disk KamAZ-4310, 55111, 43118, 5320
1 - rivet; 2, 4 — friction lining; 3 — clutch driven disc assembly
— Install the driven disk assembly on the press, press out rivets 1 (Fig. 2) securing the friction linings to the clutch disk and remove friction linings 2 and 4 from the driven disk
— Install the middle drive disk 1 (Fig. 3) on the workbench
— Bend the edges of the lock washers 2, unscrew the axles 6, remove the bushing 5, release lever 4 and spring 3
— Wash the parts of the middle drive disk and check their condition
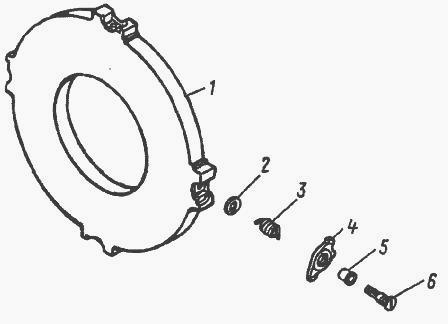
Fig.3. Clutch disc KamAZ-4310, 55111, 43118, 5320 middle drive
1— clutch disc leading middle; 2—lock washer; 5—spring; 4 — release lever; 5 — release lever bushing; 6 — axis of the release lever
Technical conditions for defect detection and repair of clutch mechanism parts KamAZ-4310, 55111, 43118, 5320
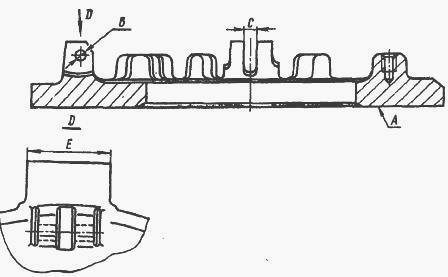
Fig.4. Pressure disk KamAZ-4310, 55111, 43118, 5320
Pressure plate KamAZ-4310, 55111, 43118, 5320 (Fig. 4). Not allowed:
— non-flatness of the friction surface A more than (0.07 mm);
— wear of the friction surface under the release levers is more than 0.5 mm;
— cracks on surface A (thermal, radial) with a depth of more than 0.5 mm;
— width C of the grooves for the clutch pressure plate levers is more than 12.2 mm;
— diameter B of the holes for the axis of the clutch pressure plate lever is more than 10.85 mm;
— width E of the studs is less than 59.64 mm.
Needle rollers. Traces of corrosion and dents on the surface of the needle rollers are not allowed.
Fig.5. Clutch housing Kamaz-4310, 55111, 43118, 5320
Clutch housing Kamaz-4310, 55111, 43118, 5320 (Fig. 5). Not allowed:
— wear of the guide surfaces A under the pressure springs to a wall thickness of less than 5 mm; local wear of guide surfaces 0.6 mm, no more;
— thickness B on spherical surfaces for adjusting nuts is less than 3.2 mm.
Fig.6. Driven disk KamAZ-4310, 55111, 43118, 5320
Driven disk KamAZ-4310, 55111, 43118, 5320 (Fig. 6). Not allowed:
— runout of friction surfaces A and C when centering along the side surfaces of the splines is more than 0.5 mm;
— the width of the depressions D of the spline hole of the hub is more than 6.1 mm;
— wear of the friction lining to the rivets.
Discs must be repaired for the following defects:
— loosening of the rivets securing the friction linings, which can be remedied by replacing the rivets;
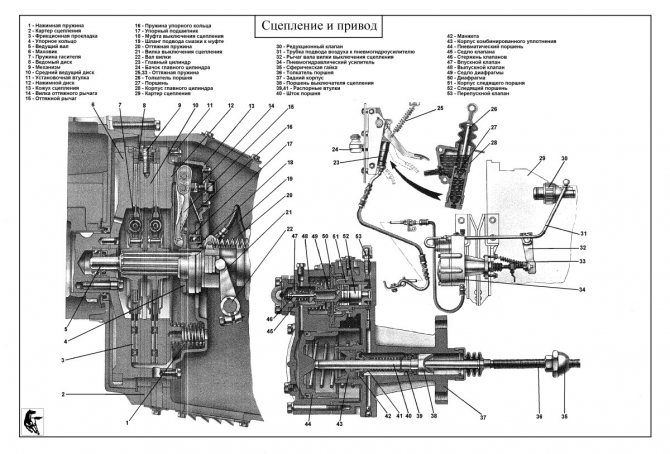
Design features of the clutch
The bulk of KamAZ trucks use a double-disc clutch with a radial arrangement of power springs. To operate the mechanism, a hydraulic drive with a pneumatic amplifier is used. Thanks to this design, the force required to press the clutch pedal is significantly reduced. During the operation of KamAZ, wear occurs on the clutch discs, which must be compensated for by adjustment. Correct adjustment of the mechanism ensures the fuel consumption declared by the factory and confident acceleration of an empty or loaded vehicle.
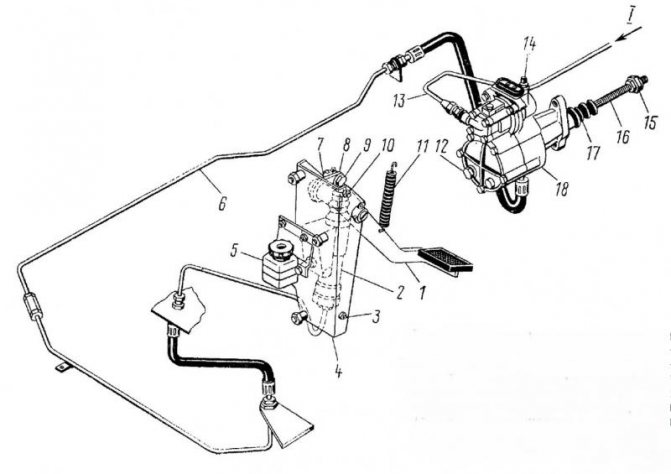
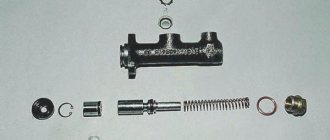
KamAZ clutch drive mechanism diagram
The main components of the drive, which is shown in the photo, are:
- pedal (1);
- hydraulic unit (2) with reservoir (3);
- highway (6);
- executive pneumatic cylinder (16).
The KamAZ clutch of models 55111, 5320, as well as 43118 and 740 consists of the following structural units:
- clutch housing (A);
- release disc with stamped metal casing (B);
- pressure springs (B) and levers (D);
- one drive disk (E);
- two driven disks (D) with linings (W).

Clutch diagram for KamAZ 740 with diesel engine
The driven discs in the clutch design of a KamAZ truck are made using heat-resistant friction linings, which ensure a long service life of the mechanism. The design of the disks provides a damper for vibrations that occur when the motor shaft rotates. The drive pedal is mounted on special bushings and rarely requires lubrication during operation.
On more modern KamAZ models, single-disc clutches of the so-called Euro type are used. This mechanism is found, for example, on models 6520 or 4308. The supplier of elements for such units is Sachs, and amplifiers made by Wabco are used. There are several clutch models that differ in the amount of transmitted torque. One of the differences between imported amplifiers is the built-in indicator of friction lining wear. Wear is measured by the distance between the amplifier body and the washer on the rod. When the linings are completely worn out, this distance ranges from 23 to 25 mm. In this case, driving a car is still possible, but repair work must be carried out urgently.
How is the adjustment carried out?
If problems occur with the clutch, you should try to make adjustments. When disc slippage occurs (sluggish acceleration, slight burning smell), it is necessary to set the correct clutch stroke.
If the disks are not fully spaced (difficult switching), you will have to perform more operations:
- Set the pedal stroke.
- Remove air from the drive lines.
- Check the liquid level in the PSU.
When using the Euro unit, only the pedal free play needs to be adjusted. Lubrication and adjustment of other clutch parts during operation of the machine is not provided, except for monitoring the height of the fluid level in the drive reservoir.
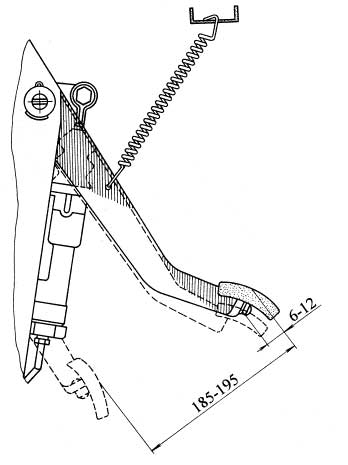
By adjusting the clutch on KamAZ 5320 and other models we mean setting the correct gap between the release plate plane and the lever heads, as well as adjusting the free play of the pedal and drive clutch. The permissible free play for the clutch pedal must be in the range from 6 to 12 mm.
The gap is understood as the distance between the points of the central part of the pedal platform when the pedal is released and at the moment the master cylinder begins to turn on. The free play is regulated by rotating the eccentric pin located in the connection of the pedal lever with the upper eye of the amplifier rod. The adjustment is made with the pedal tension spring fully depressed, i.e. the pedal should rest against the upper rubber buffer, which serves as a travel limiter.
For example, on KamAZ 65115 the do-it-yourself adjustment process is as follows:
- Unlock the pin castle nut pin.
- By rotating the finger you need to achieve acceptable free play.
- Tighten the nut and secure it with a cotter pin.
- Check the pedal's full travel. If everything is adjusted correctly, it should be between 185 and 195 mm.
On single-disc MFZ units, the adjustment is similar, but the pedal travel should be from 140 to 150 mm.
Below, the process of adjusting the free wheel is demonstrated using the example of KamAZ 4310, the author of the video is Vladimir Krasikov.
Adjusting the KAMAZ clutch: instructions
Reliability, excellent performance, efficiency - all this can be said about KAMAZ trucks. The machines are in demand for household, commercial and military purposes. The key to long-term and trouble-free operation is constant checking of the technical condition. Adjusting the KAMAZ clutch is always relevant. This brand is usually equipped with a dry double-disc or single-disc clutch (friction type). During its entire service life, the unit experiences enormous loads. Competent selection of spare parts and timely maintenance will guarantee long-term operation. Adjusting the KAMAZ clutch basket requires experience and certain knowledge.
Setting is necessary when:
- A crackling sound occurs when changing gears.
- Slipping at high speeds.
- Changing the free play of the clutch pedal (it has certain digital values).
If you ignore these signs, expect a serious accident!
Clutch debugging
The next stage of adjustment will be to adjust the free play parameters of the clutch, the value of which should be from 3.2 to 4 mm. The measurement is carried out by rotating the adjusting nut.
The sequence of actions in this case:
- Loosen the fork mounting nut.
- Unscrew the fastening pin, allow it to move freely and remove it.
- Rotate the traction fork until the required clearance is obtained.
- Tighten the nut and install the pin in place.
- Install the locking pin.
- Check the setting. When the pedal is fully depressed, the clutch stroke should be at least 25 mm.
KAMAZ clutch adjustment technology
Removing and adjusting the KAMAZ clutch is carried out in several steps.
Adjusting the free travel of the KAMAZ clutch pedal
The pedal must have a play of 6 to 12 mm. Measurements are taken from the central part of the plate. The pedal must be lowered until the main cylinder starts working. If there is a deviation from the norm, adjust the distance between the PSU pusher and the stop at the top.
To do this, you will need an eccentric pin connecting the pedal to the top eye of the pushrod. The pedal for traction must press the clutch pedal against the stop from above. The finger is turned so that the gap between the piston and the PSU pusher is in the range from 6 to 12 millimeters. When finished, tighten the castle nut securely. The full pedal travel should be approximately 19 centimeters.
Adjusting the KAMAZ clutch
The manufacturer recommends maintaining a free play value in the range from 3.2 to 4 millimeters. To measure, you will need to move the fork shaft lever by hand. It must move in the direction from the spherical nut of the pusher. It is located on the pneumatic or hydraulic clutch drive amplifier. Adjusting the KAMAZ clutch clearance will require removing the spring: the lever should move no more than five millimeters. If the free play is less than three millimeters, then it is adjusted using a spherical nut. The idle speed of the clutch must be from 3.2 to 4 millimeters.
Debugging the full stroke of the amplifier pusher
Before starting to debug the mechanism, it is necessary to find out the stroke length of the pusher. To do this, you need to completely disengage the clutch and measure the stroke. If its value is 25 mm or less, then the clutch will not disengage completely. The driver will notice this problem immediately by the difficulty of shifting gears. To find the cause of the problem, you need to check the level of working fluid in the pusher cylinder. The standard volume is 380 cubic meters. see. If the level of the substance is insufficient, it should be topped up.
Hydraulic system diagram
Using the KamAZ 5511 model as an example, adding fluid is done as follows:
- You need to open the reservoir cap located on the drive housing.
- Add liquid to a level 15-20 mm below the edge of the neck.
The second reason for unsatisfactory operation of the amplifier may be air in the system. In this case, the drive system must be bled. This procedure is somewhat more complicated.
On KamAZ 55102 for this you need:
- Add fluid to normal level.
- Remove the protective cap from the bypass valve (installed on the CCGT housing), put on a rubber hose and lower it into a container with liquid.
- Sharply press the clutch pedal all the way.
- Open the valve one turn and press the pedal until the substance stops bubbling at the outlet of the hose. In this case, it is necessary to constantly add new fluid to the supply tank, not allowing it to fall below the 40 mm mark from the top of the tank.
- Close the valve, remove the hose and replace the cap.
- Add fluid to the operating level.
- To control the quality of work, you must press the pedal all the way - the pusher stroke should not be less than 25 mm.
Adjusting the full stroke of the booster pusher
To determine the full stroke of the booster pusher, squeeze the clutch all the way. If the pusher stroke is no more than 25 mm, before performing further actions it is necessary to set the free play of the clutch pedal and check the amount of fluid in the master cylinder. If no problems are found, air has entered the hydraulic system, which must be removed.
When carrying out maintenance, the KAMAZ clutch adjustment is performed as follows:
- Tighten the fasteners of the pneumatic clutch booster.
- We make sure that there are no traces of fluid in the clutch drive. If residues are found, we look for a leak, restore the area and bleed the system to release air.
- We check the functionality of the springs that pull back the release fork shaft lever and the clutch pedal. If the springs do not work properly, they must be replaced.
- We adjust the clutch drive using the tips from this article.
- Lubricate the clutch fork shaft bushing and the release clutch bearing.
- Let's see how much liquid is in the compensation tank. Top up if necessary.
- We remove condensate that has appeared in the pneumatic amplifier.
Unfortunately, we cannot provide detailed photos. If you have such an opportunity, we advise you to contact specialists and carefully monitor how they adjust the operation of the clutch. In the future, adjusting the clutch will not be an overwhelming task for you.
Adjusting the KamAZ clutch basket
By adjusting the clutch basket we mean adjusting the tabs placed on the basket. This debugging can be done with the box removed or adjusted directly on the car.
When performing the task without removing the box, you will need a homemade tool, which is a 3.5 mm thick wire with a 20 mm long end bent at a right angle. Using such an improvised feeler gauge, check the gap between the release bearing and the support ring of the clutch feet. The gap is adjusted using a nut on the PSU rod. You can bring the paws to the ring through the hatch in the upper part of the clutch housing. At the same time, it is important to ensure that the paws fit as uniformly as possible to the surface. But it is more correct and reliable to adjust the clutch removed from the engine.
- Place the assembled pressure plate on the template, which will provide a gap of 29 mm.
- Loosen the mounting bolts.
- Set the position of the stop ring for the feet. All four paws should touch the ring at the same time.
- Check the runout of the working surface of the disk.
- Lubricate the front bearing located in the crankshaft.
- Install the clutch using a mandrel, which will ensure alignment of the mechanism discs and the engine shaft.
This adjustment is carried out only with a double-disc clutch. A unit with one disk does not need such adjustment.
The video from the Auto and Moto channel shows the removal of the clutch and clearly shows the design features, as well as the drive for the operation of the mechanism.
Video: adjusting the clutch basket
The Auto and Moto channel in its video explained how the clutch of KamAZ 5320 and other models is adjusted.
Reliability, excellent performance, efficiency - all this can be said about KAMAZ trucks. The machines are in demand for household, commercial and military purposes. The key to long-term and trouble-free operation is constant checking of the technical condition. Adjusting the KAMAZ clutch is always relevant. This brand is usually equipped with a dry double-disc or single-disc clutch (friction type). During its entire service life, the unit experiences enormous loads. Competent selection of spare parts and timely maintenance will guarantee long-term operation. Adjusting the KAMAZ clutch basket requires experience and certain knowledge.
Setting is necessary when:
- A crackling sound occurs when changing gears.
- Slipping at high speeds.
- Changing the free play of the clutch pedal (it has certain digital values).
If you ignore these signs, expect a serious accident!
Do-it-yourself KAMAZ clutch replacement
To replace the clutch yourself, you will need help removing the gearbox.
Work order:
- Unscrew the fastening nuts, remove the cardan, pneumatic hydraulic booster, and release the starter from the mounting.
- Remove the pipes for the reduction gear, as well as the gear lever.
- Take a jack.
- Place a jack under the engine sump and lift the engine.
- Remove the rear cross member and the spacer rod.
- Release the bracket from the fastening.
- Secure the hoist and tighten it.
- Remove the engine side mounts. Unscrew the gearbox fasteners to the engine.
- Using a hoist, move the gearbox away from the engine until the input shaft comes out, then remove it.
How to remove the clutch basket
Repairing the KAMAZ clutch basket with your own hands involves removing it. It includes the flywheel, pressure plate and protective cover. The driven part is made of steel discs that dampen vibrations.
Repairing the KAMAZ clutch basket requires its preliminary removal. To do this, you need to screw 4 bolts into the pressure disk and press the disk into the casing. Using pliers, you should carefully press out the antennae on the lock washers, then remove the elements with which the casing is attached to the flywheel, then remove the discs and clutch casing in turn.
Before repairing the KAMAZ clutch and removing the clutch basket, it is necessary to use a core to mark the location of the basket and the flywheel.
Removing the clutch discs
Replacing a KAMAZ clutch disc requires its removal. KAMAZ has a friction 2-disc clutch, pressure springs and a device for automatically bringing the middle drive disk to the middle position.
When removing the flywheel, it is necessary to take into account the specifics of its design: the drive middle disk is installed in the grooves of the flywheel, which are located around the circumference of this disk. To ensure heat dissipation in the clutch and its ventilation, the disc in its “body” has holes that separate the ribs (spikes). These cleats have a lever that adjusts the position of the driving middle disc. Both the pressure and middle drive disks are located on spikes in grooves located in the flywheel.
The other side of the disk has protrusions that are designed for pressure springs. You should remember the order in which they are placed. The driven disk includes a hub, a spring, a rivet, linings, and a torque vibration damper. The hub with the disk does not have a rigid connection, there are only 8 springs. The space between the driven and driving disks is where the release springs are located, as well as the intermediate disk adjusting bolt.
KAMAZ clutch basket - adjustment - price
The KamAZ clutch basket is a very important and necessary element of an automobile clutch, consisting of a casing, pressure and middle drive plates.
It is through these disks that the torque from the engine is transmitted through the flywheel to the driven disks. And also, on many new cars, in particular the 5320th model, a special device is installed here, which, when the clutch is disengaged, automatically ensures that the drive disk is set to the middle position. So, at least in this aspect, the design solution on which the KamAZ 5320 clutch is made makes it easier to adjust the basket, however, it will not be possible to completely abandon adjustment work.
So, during operation, you will need to adjust the paws-levers - to make sure that the pressure plate moves evenly without distortions. Sometimes, especially after repairing a basket, it is necessary to adjust the position of the thrust ring so that all four pull arms touch the surface of the basket.
Adjusting the KamAZ clutch basket is even more tedious when it is necessary to ensure the required clearance between the release bearing and the heel of the basket. This happens because it is very difficult to set all the adjusting nuts without being able to measure the size of the gap - the caliper simply does not fit through. Some experienced drivers advise using improvised means in such cases - “if two matches pass through with difficulty, then the gap is normal.”
| Consultation on technical issues, purchase of spare parts 8-916-161-01-97 Sergey Nikolaevich |
In fact, this method of “adjustment” is acceptable only when there is no other way out, and you must strictly adhere to the manufacturer’s recommendations specified in the repair manual.
At the same time, a correctly adjusted clutch basket for KamAZ 5320 or any other model, although it makes driving easier, does not guarantee the durability of the unit itself. But the product can provide such a guarantee. All components for the clutch mechanism and its drive, such as discs, levers, forks and KamAZ PGUs made by our company, have passed mandatory MADI certification. And as a result of all the checks, it was confirmed that the 100,000 km warranty for spare parts for the clutch (and brake system) is not a desire to embellish the situation, but a statement of the real increased service life of the listed components. In general, if you want the adjustment of the basket and other components to make sense, buy spare parts from SpetsMash.
Assembly of parts and their replacement
Installing and replacing a double-disc clutch on a KAMAZ is a simple process. Common types of damage to the driven and pressure disks are cracks on their surfaces, on the linings, wear of the rings and linings, curvature of the disk, deterioration of the hub fastening, damage to the rivets, and scuffing on the disk surfaces. Replacing used gaskets with new ones requires removing old rivets. Disks that have become unusable also need to be replaced.
Not every car owner knows how to properly install clutch discs on a KAMAZ. There is a certain procedure.
The first of the driven disks is installed with the long end of its hub to the motor, and the second - with the same end to the gearbox. Before tightening the basket, the discs must be balanced.
As the linings on the driven disks wear out, as well as their replacement, the clutch drive should be adjusted, as well as the free play of the clutch.