Having a large summer cottage or garden plot, it is impossible to do without a reliable assistant - a mini tractor. Digging, plowing, and sowing by hand is not easy, and not every owner has time for such activities. It is more useful to acquire an inexpensive but functional unit, especially since the choice of modern agricultural machinery is simply huge. And if you choose the right replacement equipment for it, you can mechanize almost all labor-intensive processes in agriculture. Below is an overview of the most popular attachments.
How to choose attachments for a mini tractor?
With the help of compact agricultural technology, they perform a wide range of functions, which boil down to plowing the field, planting and cultivating crops, mowing grass, raking hay, transporting cargo and much more. Therefore, purchasing only a tractor will not solve all economic problems; you will also need a variety of attachments for it. And the more units of equipment are used with a mini tractor, the faster the costs associated with its purchase will be reimbursed.
When choosing a tractor hitch, manufacturers recommend paying attention to the following points:
- does the attachment correspond to the power of the tractor engine;
- whether the rotation speed of the removable device and the power take-off shaft of the motor-tractor coincides;
- whether the weight of the equipment exceeds the permissible standards, that is, 30% of the weight of the tractor;
- what type of fastening does the agricultural implement have, and is it compatible with the design of the agricultural machine?
Before purchasing a Chinese or other mounted tool for a mini tractor, it is important to study the basic parameters, dimensions of the equipment and the operational and technical characteristics of the unit itself. And if they are compatible, then all that remains is to choose the appropriate model at the most suitable cost.
Self-production
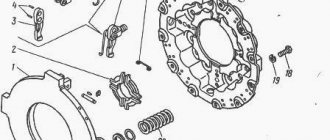
Most of the additional equipment is attached from the rear (ploughs, harrows, planters), so the equipment is equipped with a rear linkage. Main design elements:
- outer lever;
- rotary shaft bracket;
- upper and lower links;
- brace;
- eye;
- screed;
- axis.
The actual equipment is attached to this basic structure.
Main types of equipment for a mini tractor:
- plow - used for plowing the soil, i.e. turning over a layer of earth;
- harrows - crush clods of earth left after plowing and make it easier to plant crops;
- potato planter - makes it easier to plant root crops: potatoes, beets, Jerusalem artichoke, etc.;
- potato digger - speeds up the harvesting of root crops, moving them to the surface of the soil, from where they can be easily collected by hand;
- rakes - for caring for crops and row spacing;
- cultivator - for loosening the soil before planting and caring for plants during growth;
- sprayer - designed for watering and applying liquid fertilizers (both organic and mineral).
Types of attachments for mini tractors
Due to the need of buyers to have inexpensive but multifunctional attachments, manufacturers have developed a wide range of such products. Tractor owners have a good opportunity to choose devices depending on their income and tasks.
Plow
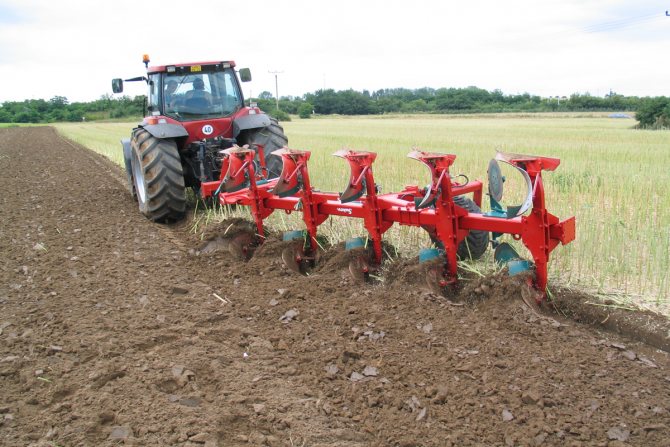
This agricultural implement is used to plow the land. When choosing it, you should take into account the power and weight of the mini tractor, the composition and degree of development of the soil, the presence of a counterweight, the number of bodies on the suspended equipment and the working width that it is capable of providing. The more productive the unit, the greater the processing width this attachment can have. The use of a plow with a total body size of more than 150 cm is only possible with a tractor with a power of at least 24 hp, for example the Chinese brand Xingtai 244.
When you plan to operate a low-power agricultural machine, it is more advisable to use a mounted mechanism with fewer bodies so as not to deteriorate the quality of plowing. Thus, double-hull equipment with a working width of up to 70 cm (Chinese 1L-220) can be mounted on a mini tractor with a productivity of 12-15 hp. Such a unit has enough power to pull heavy equipment and plow with sufficient depth.
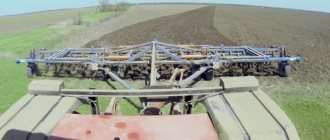
Harrow

This attachment is used for loosening the soil, killing weeds, and leveling the sown area. The canopy can be disc or toothed, with a single-point and three-point fastening mechanism. Disc equipment for aggregation with a tractor can have 12 or 16 cutting discs and provide a working width of 110 cm and 150 cm, respectively. The toothing device is capable of covering an area up to 400 cm wide and reaching a loosening depth of up to 9 cm.
The choice of harrow type for a mini tractor should be determined by the tasks that will be solved with its help. You should also take into account what material it is made of, what is the strength of the hinged structure and working units and, importantly, the availability of spare parts.
Potato planter
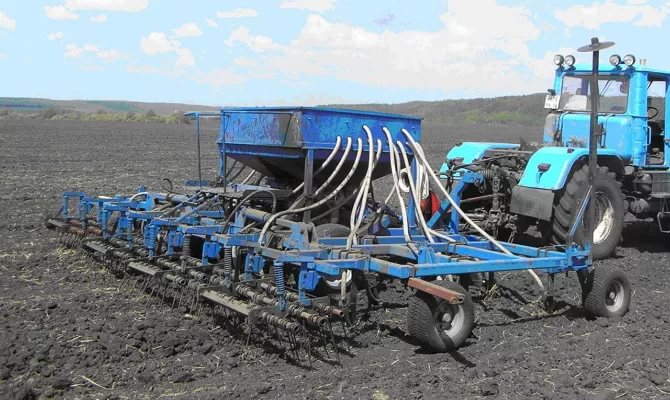
Using such a device, potato planting is mechanized. It can be used with any tractor with a power of 14 horsepower or more. For a large area, it is better to purchase double-row equipment, for example, PL-50/2 with a single-point fastening type. In this case, fuel consumption will be more economical and the soil will be compacted less, since in one pass of a motor unit with a two-row mounted planter, planting is carried out in two rows at once. A hitch with an additional barrel for fertilizers, which are mainly produced in Poland and China, will also help you save on fuel.
When planting tubers with a two-row planter, you will need a 3-section cultivator or hiller with a three-point attachment system (such as the Chinese 3Z-2), which allows simultaneous processing of two potato beds. And if you purchase a potato digger for the Scout tractor with a single-point attachment, you can completely mechanize the operations of growing root crops, right up to harvesting. Only for this you will need to observe the row spacing dimensions, and this is different for different models of mini tractors. So for equipment with power:
- 14-16 hp row spacing reaches 40-55 cm;
- 16-23 hp – up to 60 cm;
- 24-35 hp – up to 70 cm.
These parameters are approximate, but they should be taken into account when purchasing a tractor and additional equipment that will be used when growing and harvesting potatoes.
Shovel blade
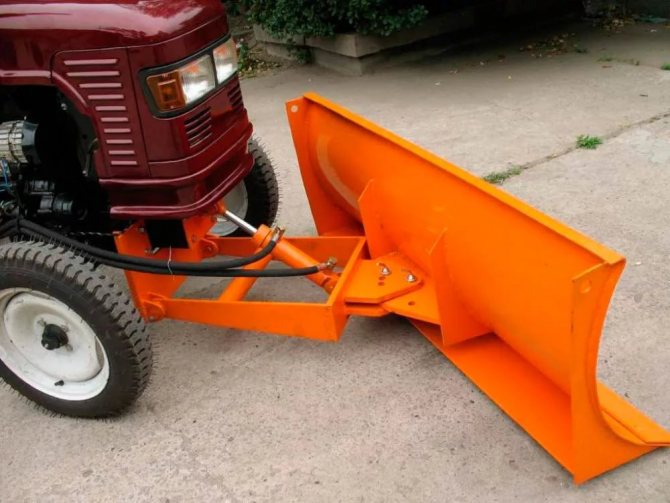
This type of equipment is used for leveling sites, clearing areas of debris and snow cover. Depending on the location of aggregation, it can be rear-mounted or front-mounted. The rear-mounted shovel is located at the rear of the minitractor and is driven by connecting the hitch. To work with such a device, a hydraulic cylinder rod is not required. The front mounted blade is mounted in front of the tractor and driven by a hydraulic system.
Selecting a shovel blade for the “iron horse” should take into account the power of the machine, the parameters of the hitch and the method of attachment. To work with equipment weighing up to 85 kg and a width of up to 150 cm, it is enough for a mini tractor to have 14-18 hp, such as, for example, Scout T-15, Scout T-18. With a heavier and wider shovel, he will need at least 20 horsepower (Scout T-25). It is better to remove debris from the territory with a tractor blade, which has a front type of fastening, and snow removal work - with a hitch with a single-point or three-point fixation mechanism.
Loader
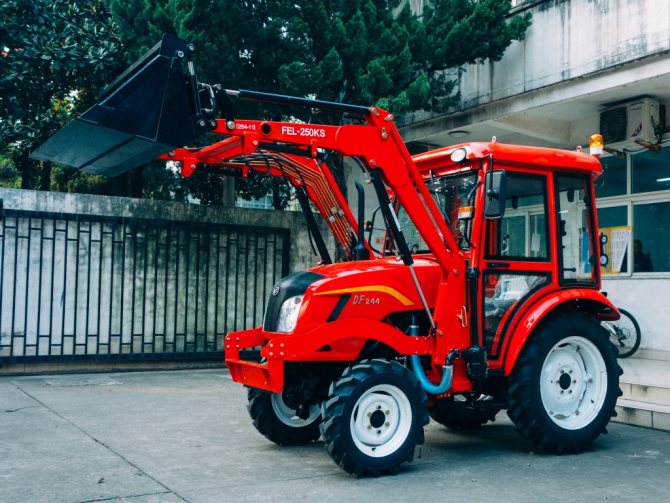
This mechanism allows loading and unloading of various materials. Its design includes a bucket and a boom. In the basic equipment, the tractor bucket has a load capacity of 0.5-4.5 m3. Instead of a bucket, you can mount other attachments (forks, blade, crane lift, ripper), thereby further expanding the functionality of the motor unit. This unit is a complex attachment. The loader lifts up and down, just like a bucket.
A mounted loader comes with a front-end or three-point attachment type and can differ not only in the capacity of the bucket, but also in its load capacity. For mini tractors, equipment weighing up to 1.5 tons will be optimal, for heavy tractors - over 1.5 tons.
It is clear that such equipment is not cheap, and therefore some tractor owners use a homemade mechanical mini-loader on their farm. It is made from thick metal (at least 6 mm thick), steel pipes and angles using a welding machine and metal scissors.
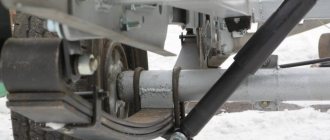
Trailer
The towbar attached to the rear of the mini tractor allows you to transport loads weighing up to 2000 kg over short distances. It can be tipper or onboard, have one or more axles. The dump truck version is better suited for transporting bulk cargo such as sand, crushed stone and makes it easy to unload. It is more expedient to use on-board equipment for the transportation of packaged cargo - building materials, block structures, containers, etc.
The number of axles on the trailer is also important. The more weight a tractor has to transport using this means, the more axles it must have. Also, when choosing a trailer, you should take into account that devices with one axle are lighter and more mobile, and those with two and three axles are more stable and have better maneuverability, which is very important when driving on bad roads.
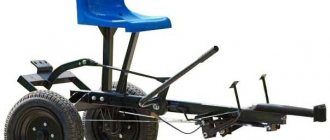
three-point hitch
Experts, please help with advice - I was planning to make a hitch for a minivan in the winter, in the image of a tractor, but I’m pretty bad at imagining the details, there are no tractors in the foreseeable space
this is it, but I would like something homemade, I can’t handle industrial samples
Belo wrote: this is it, but I would like something homemade, I can’t handle industrial samples
do it anyway in the image and likeness, but where to do it depends on the material base. The OPK mini tractor has a lot of information on the linkage
Kit for a mini tractor, homemade once homemade twice. Maybe it will come in handy))) Good luck!
VladimirF, Thank you. Option 2 looks like what you need
It’s just not clear where the top link is attached and what the stroke is
The ears are attached to the frame, box, bridge, rigidly, through a finger, traction. Good luck!
There are no adjustments for the position of the right and left rods relative to each other. If you had asked yesterday, I would have photographed mine today. There is nothing complicated there. I took the ball joints from the steering arms at the hinges of the lower arms. Medium top rod based on a large turnbuckle. The vertical rods that lift the hitch are adjustable: a 12″ tube has 2 nuts welded to the end and an M14 pin goes inside. At first, in their place there were M10 lanyards, I really didn’t like them, they are not so convenient to twist and need to be adjusted! There are no adjusting bolts, only persistent ones that hold the racks of the working parts in the locks, everything really washes off and is installed almost with bare hands. During the season, nothing burst or tore off anywhere, which means the design is correct. I refused the bracket on the hitch for a walk-behind hitch, because everything on a walk-behind tractor on a mini will be a “weak link”. And everyone does this according to their own conditions.
umnyi, When hooked like yours, the distance from the pins is the same (Blue), and if turned 90 degrees, then the correct position (yellow and red)
kanol wrote: When it is hooked like yours, the distance from the pins is the same (Blue color), and if turned 90 degrees, then the correct position (yellow and red)
I needed to rake the tops from the garden. That’s why I got hooked on “as wide.” Our land is practically not cultivated with harrows, only if heavy ones are dragged.
umnyi wrote: There are no adjustments for the position of the right and left rods relative to each other.
I'm not afraid of it
I modernized it a little to begin with, when it comes to metal there will be more thread
White, position 1 is a brace, place it as position 2 (in your drawing) and there will be an adjustment))) Good luck!
what and why, in more detail.
Hello everyone. Tell me, what are the basic rules for building a three-point hitch on a mini tractor?
Maybe you'll find something
While still looking at people’s hitches, I noticed that some people attach the central link of the hitch to the lever that raises and lowers the hitch, and some attach it rigidly to the frame. so is there any difference?
Yes, it turns out 3-point and 2-point. Read the thread about adapters, there is so much information about the attachment and its types. With all the pros and cons.
ApTEM wrote: while still looking at people’s hitches, I noticed that some people attach the central link of the hitch to the lever that raises and lowers the hitch, and some attach it rigidly to the frame. so is there any difference?
If the rod clings to the lever that lifts, then this lever does not determine the type of hitch, but simply drives the lifting of the hitch. The 2-point is used only on general-purpose crawler and wheeled tractors and is not used anywhere else. I have never seen it on MT or adapters and there is no point in using it here. In some distant version of the 2T hitch there is a “free” on the MB when a small slack is left on the thrust bolts. The purpose of this is the same as in the 2T hitch, but only horizontally, and not in two planes. The purpose of the hitch is to be able to install the gun by manipulating it in all planes or to gain some freedom in which min. the position of the gun changes. Many MB hitches are simplified versions of the same 3t tractor hitch, which are quite sufficient, especially if the set of implements that will be used is known in advance. Formulate specific questions in which you have difficulty and then you will receive specific answers, otherwise it can be discussed for a long time
What is better - a ready-made hitch for a tractor or a home-made one?
The functionality of any mini tractor model should not be limited only to agricultural work. It is necessary to make maximum use of the capabilities of agricultural technology, for this there are additional mounted, trailed and special equipment.
Some owners use devices they made themselves to work with their motorized unit. Homemade attachments for a tractor, of course, cost less than purchased ones. But homemade equipment cannot always meet the necessary requirements, since due to the complexity of the design, not every home craftsman can achieve a high-quality result.
You can save some money on attachments for a mini tractor by using an attachment designed for a walk-behind tractor or motor-cultivator. Similar parameters of motor vehicles and standardized fastening units make it possible to attach mechanisms from “smaller brothers” to mini tractors and absolutely without limiting their operational capabilities.
order and buy agricultural attachments for mini tractors in the Gardenshop specialized store, where this type of product is presented in a wide range of designs, models and prices. A diverse range of products will make it easy to choose a device for a tractor with the most suitable characteristics and price. In addition, the equipment offered by the store, unlike homemade equipment, has undergone pre-sale training, which confirms its reliability and operational safety. For increased safety, when working with a tractor-mounted tractor, you need to install a roll bar to protect the operator from the machine tipping over.
About the working principle
After the work of mowing the grass is completed, the grass must be prepared to turn it into hay, so all other work is carried out to clean up the grass after haymaking. The cut grass is raked with a hay mower, turned over and wrapped into windrows to dry it.
It will be easier to understand the sequence of a rake for a mini-tractor using the example of a photo of the most popular option - wheel-finger equipment, which outwardly most often can consist of a connection of several blocks.
The reliability of the system of such rakes is ensured by a special thickened pipe; to move additional equipment, independent wheels are installed using a roller bearing system.
An excellent shock absorption system helps the attachments to be used effectively for a specific plot of land. Due to the fact that the wheels operate autonomously, the nozzle can perform its functions in any terrain conditions. The hinge system is used in the chassis of the structure.
Advantages
The simplicity and strength of the tedder design make it possible to use this type of hay harvesting equipment on almost any soil.
The rake teeth and most parts of the unit are made of durable spring steel, thanks to which the rake can work even after being hit by stones.
Even self-made mounted tedder rakes on a tractor allow you to efficiently and carefully collect the mown dry plant mass and place it in even hay windrows. The most popular are the “Solnyshko” tedders. This is due to a number of advantages:
- minimal equipment maintenance costs;
- the hinged design ensures a long service life;
- the design has a powerful frame and traction drawbar;
- convenient transfer of equipment to transport or working condition;
- price.
We invite you to familiarize yourself with Beautiful ceiling design - stylish new items and fashion trends of 2020 (photo)
Most farmers claim that thanks to the use of rotary rakes and tedders aggregated with mini-tractors, the loss of dried plant matter during raking is minimized. In addition, the “fingers” on the turner wheels not only beat the hay well, but also turn it over, which improves the ventilation of the windrows and, accordingly, increases the quality of the hay mass.
Application of tedder rakes
After mowing, you should prepare the grass for turning it into hay. This means that it is necessary to form windrows, turn over from time to time, and collect into bales or rolls.
Factory or homemade tedder rakes collect the mown grass into windrows and, if necessary, turn them over to dry. To use hay harvesting equipment, walk-behind tractors, mini tractors, tractors and even horses are used.
This is much more efficient than working with hand tools. You can perform the following operations:
- raking of mown plant matter;
- tedding the grass;
- windrow wrapping and spreading;
- doubling of arranged rows of rolls.
Do-it-yourself rakes for mini tractors have a number of advantages. The device is more efficient than hand tools, is easily transported to the storage area and takes up little space. Affordable price and no problems purchasing spare parts.
Detailed assembly instructions
After all the diagrams and drawings are ready, you need to collect the necessary materials and tools. The main and irreplaceable parts are the engine, frame, transmission and steering.
It is not always possible to find such parts at home, so if necessary, you can go around the market or look through websites selling used spare parts in order to minimize the cost of such a product. On such resources you can buy the necessary parts at very low prices.
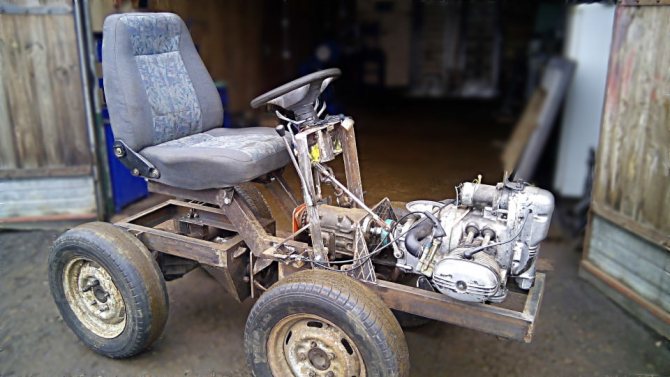
Frame production
The “fracture,” as a rule, is made from ordinary channels or a metal profile. This material has sufficient elasticity and softness to give the desired shape, but at the same time strength to support the weight of the mini tractor with all its components. Two frame elements are welded from a channel or profile, which, in turn, will be fastened with a hinge joint. Alternatively, for these purposes you can use a cardan from a truck or from a VAZ, etc.
Powerful lawn mower for the home: which one to choose
If this option is not suitable for the intended tasks, then you can make an all-metal frame.
Typically, such a design will consist of four elements:
- left and right side members;
- rear traverse and front.
All elements can be made from the same metal profile or channels of different sizes. A transverse beam is also needed; it can be made from a metal beam.
Engine Installation
In order for the minitractor to perform all the functions assigned to it, you can mount any engine that will have the necessary power for this. The best option for home use would be a motor with a power of about 40-50 horsepower. It happens that they also use engine models from Soviet cars, for example, Zhiguli or Moskvich.
In the case when the mini tractor will be manufactured according to the 4x4 scheme, and the M-67 motor will be used, then some changes must be made to such a motor. It is necessary to increase the transmission ratio, otherwise such a motor will not have enough power for the wheelsets. In addition, such a design often requires an additional cooling system. This will prevent the motor from overheating.
Which transmission to choose
This part can also be replaced with old spare parts from domestic cars. For example, the gearbox and camshaft can be removed from an old GAZ. You can also take a clutch from this model of car; it is ideal for these purposes. But there are certain nuances here too. In the factory state, such spare parts will not fit and in any case you will need to seek help from a mechanic or turner to adjust them to the required dimensions.
To connect the clutch and engine, it is necessary to weld a new clutch box to the required dimensions . The flywheel must be shortened and an additional hole drilled in the center. Such manipulations with the flywheel can be done on a lathe.
Steering and wheels
For steering, hydraulic cylinders must be prepared. In this way, you can make a tractor with high controllability with your own hands, since the hydraulics will greatly help when turning the steering column, and the process itself will be easy. But, unfortunately, it is impossible to make such a system yourself, so in any case you will have to buy it or remove it from other old equipment. You should also take into account that you need to purchase a pump to circulate the liquid.
Electric cultivator for the garden: electric cultivator and walk-behind tractor
As for the rear axle, it can also be taken from old vehicles (cars or trucks) and installed on a mini tractor. But you need to remember that the axle shafts must be shortened. This can be done on a lathe. If there is no solid factory part from the car, then you can assemble a bridge for a homemade device from different cars. Any unit can be used for the front axle, since it is not a drive unit.
The tires and diameter of the wheels directly depend on the purpose of use of the future design. For transportation purposes, it is better to choose wheels with a diameter of 13 to 16 inches, and for work in the field 18-24.
The brakes, in turn, are mounted on the rear wheels. They must be the leaders. The ideal option for these purposes would be to use the factory brake system from a UAZ vehicle. The brake pads must be installed on the rear wheel discs, and they must be controlled through a pedal inside the cabin with a corresponding output. If there is a need for this, the brakes can be made manual, and all controls can be transferred to the lever.
The principle of operation of the technology
Let's study the principle of operation of a rake for a mini tractor using the example of a wheel-finger type technique. This is a modular design consisting of several blocks. The thickened pipe ensures guaranteed reliability. The wheels of the structure, the diameter of which is 1500 millimeters, are interchangeable and independent; they are fastened using tapered roller bearings.
The raking tine system is made of high-strength steel, which guarantees their resistance to any type of soil. The fingers are placed on wheels, each of which holds about forty elements.
The central wheel has hydraulic height adjustment. The modules are also equipped with hydraulic lifting at three points. The operation of the chassis is carried out according to the hinge type.