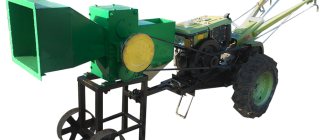
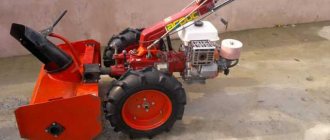
Making an adapter for a walk-behind tractor with your own hands
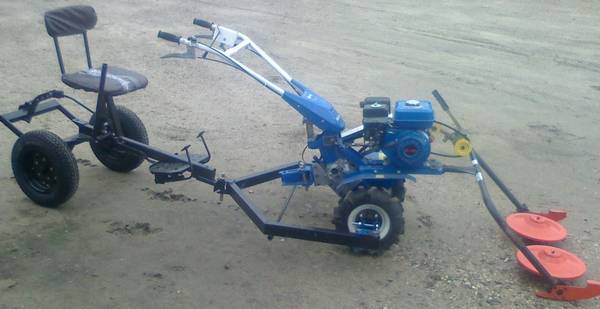
At the moment, there are several types of adapters, as a rule, their designs are similar, and are a device attached to the back of the walk-behind tractor with a comfortable seat.

The adapter is made of a square metal profile, 160 to 180 cm long. Across this profile, another one, 50-60 cm in size, is welded, depending on what track you need (wheel stands are attached to it). The height of the racks to the wheel axle from the top to the adapter wheel axle can be from 25 to 40 cm, depending on the design.
Next, braces are welded to the main metal profile and wheel bushings; they also serve as stiffeners. Their length depends on the angle of inclination relative to the entire structure and other parameters. Then, the frame structure to which the attachments will be attached is calculated and welded. The side guides of this design are attached to the wheel stands with bolts.
After this, a control lever with three bends with dimensions of 35, 55, 20 cm is welded to the main frame. To increase the applied force, another lever is attached to the lever, but with dimensions of 80 cm.
The adapter seat is mounted on a support welded to the central metal profile. As you can see, making an adapter for a walk-behind tractor with your own hands is not so difficult.
Purpose of the adapter
Here, I think everything is clear, there is a fairly large amount of work on the ground that is easier, faster and more convenient to do with an adapter. And working with such attachments as a tiller is generally safer.
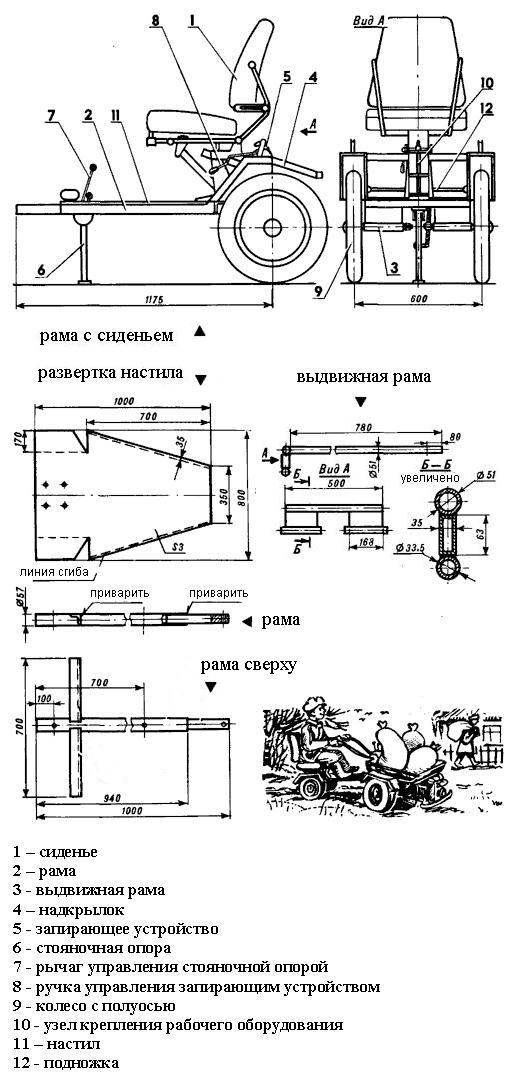
Design diagram of the adapter for the walk-behind tractor
The adapter for a walk-behind tractor is a kind of towed device made on a frame and having two wheels. Structurally, adapters are divided into several types; in simple terms, they can be simple or more complex. The main types are considered universal, those that are capable of transporting loads and performing soil cultivation, and simple ones, capable of only performing soil cultivation.

For walk-behind tractors of different power, different adapters are used; for a low-power one, an adapter with a short drawbar is installed, for a powerful one, with a long one. Also, universal adapters are equipped with additional functionality, increasing the track, lifting attachments, etc.
How to make an adapter for the Neva walk-behind tractor with your own hands
In order to make an all-wheel drive front adapter for the Neva MB walk-behind tractor with a steering wheel, you need a base. It can be a rectangular pipe, the length of which is 1.7 m. Next, a 50-centimeter pipe is welded to it as a transverse crossbar. Then you need to weld on it special stands for the wheels of the adapter for the Neva walk-behind tractor type MB-2 or another model of motor-cultivator.
The height from the wheel axis to the top of the stand should be 30 cm. For the adapter to the Neva walk-behind tractor model MB or KTZ, wheels from a garden cart are perfect. It is necessary to bore the inner bushings on the machine in order to put the outer bearings on them.
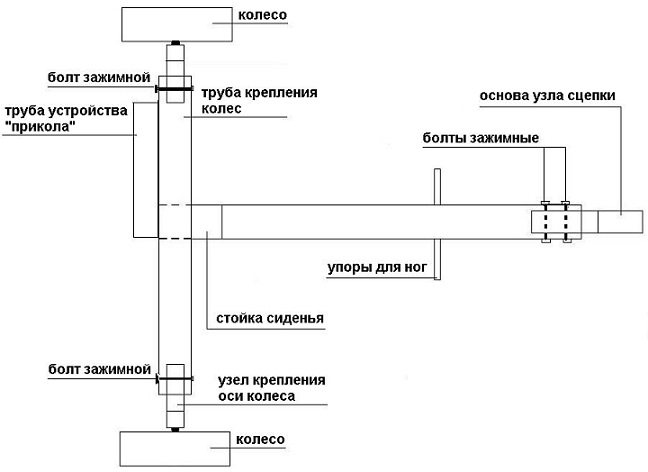
Do-it-yourself walk-behind tractor adapter, drawings and dimensions
Below are the drawings and dimensions, as well as the materials required for the manufacture of an adapter for a walk-behind tractor of complex design.
What you will need to make the adapter
— Metal sheets for footrests
- Square metal. Profile

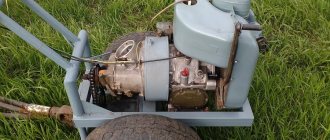
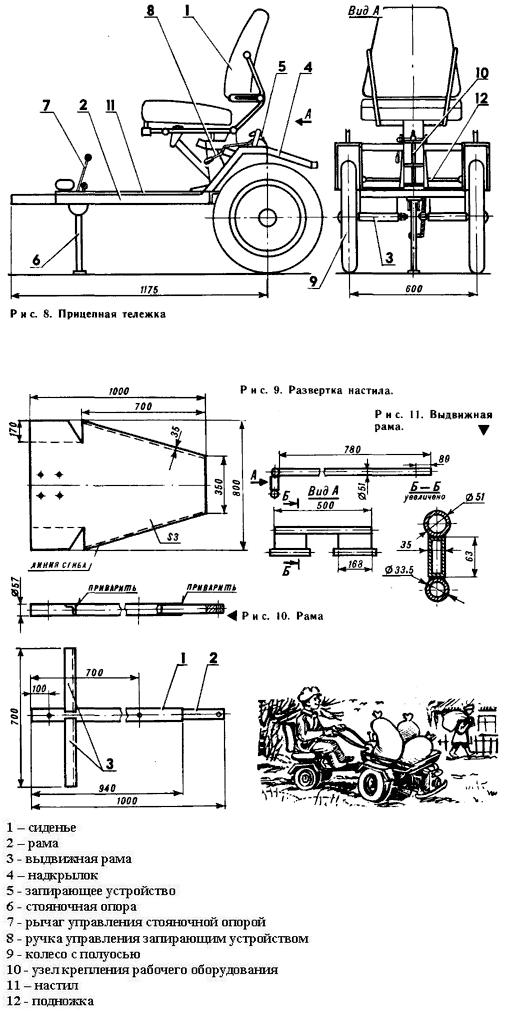
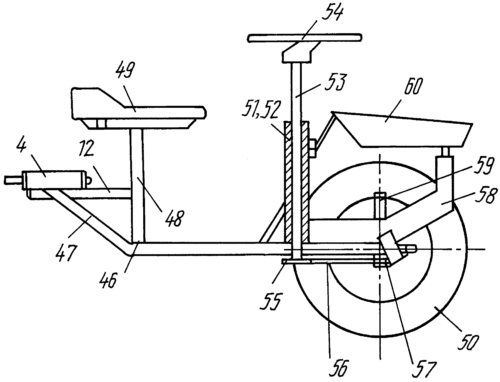
Below is a kinetic diagram that will help ensure the balance of the structure and avoid additional load. The drawing below shows the diagram of a mini tractor made from a Neva walk-behind tractor.
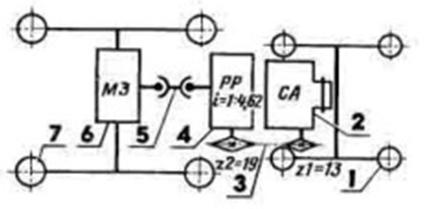
The engine of the power unit (2), driving the front wheels (1), transmits torque through the chain (3) to the reverse gearbox (4), and from it, through the cardan transmission (5) to the rear axle (6), driving rotation of the rear drive wheels (7).
— When making the frame, you must not forget about the arrangement of the bushing and fork to ensure free rotation of the trailer.
— The body of the adapter to the walk-behind tractor is made of steel sheet, and the sides of the body must be at least 30–35 cm high.
— The seat is installed on a beam welded to the main frame using bolts. The distance from the beginning of the frame to the seat should be 80-90 cm.
— Checking the robotic capability of the entire mechanism.
Additional simple adapter drawings
Below is a drawing of one of the simplest adapters in terms of design.
The following are welded to a frame made of square profiled pipe measuring 50*50 mm and thickness 2 mm:
— Footrest in the form of a perpendicularly installed pipe;
— A stand with a seat installed on it;
— Square pipe of the same cross-section for installing wheels;
Drawings of key adapter components
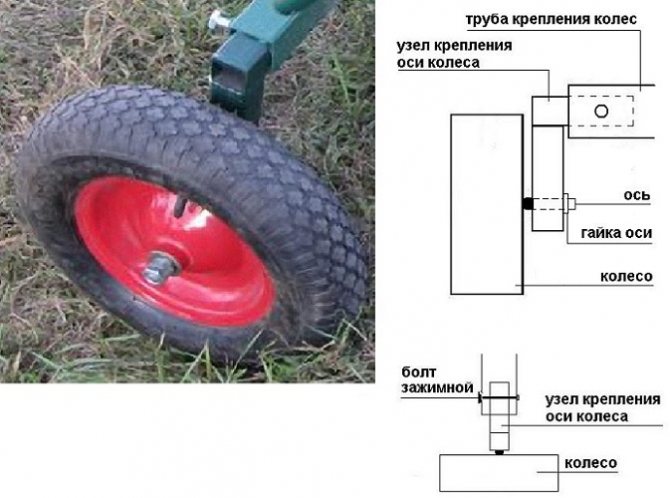
Hitch mechanism
. It looks like a welded structure inserted into the main frame and secured with bolts. It consists of two sections of a square pipe welded onto each other and a section of a regular “water” pipe with a caliber of 1-1.5 inches.
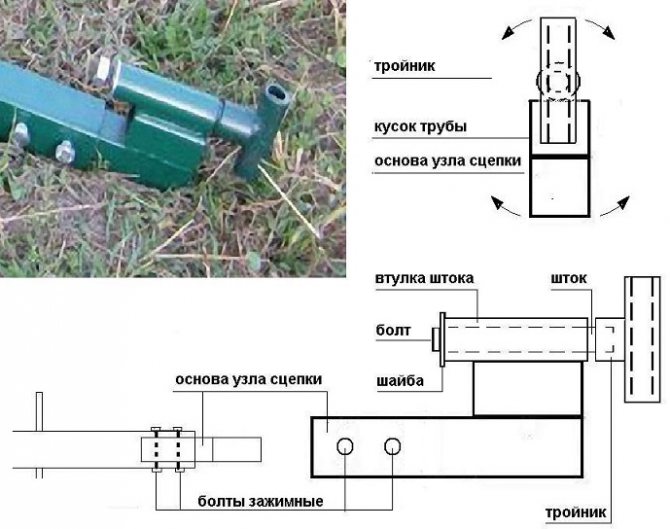
A rod with a welded homemade tee is inserted into the pipe, not fully inserted, clamped with a bolt. The rod is lubricated with grease and ensures that the tee rotates along the axis to ensure a rolling effect when moving on uneven ground.
Wheel mount
. The design consists of two pipe sections welded perpendicularly. The horizontal section is inserted into the mounting pipe and fastened with a bolt. An axle with a wheel is mounted on the vertical part (on bearings).
Other adapter components are not so important, and we will not consider them.
Adapter for walk-behind tractor Neva
Drawings and dimensions for different walk-behind tractors may vary depending on the design. So for popular models of walk-behind tractors Neva, MTZ, OKA, homemade adapters can differ significantly.
By making a homemade adapter for a walk-behind tractor and using various types of attachments with it, you can not only make your work easier, but also significantly increase productivity.
What is an adapter for a walk-behind tractor?
two wheel trailer
Some models have a special lifting lever, which makes operating the mechanisms more comfortable. If necessary, the walk-behind tractor is used to transport small loads.
Depending on the purpose of using the equipment, drawbars are:
- extended (for large vehicles);
- shortened (for light structures).
To connect the adapter to the walk-behind tractor, use a single enlarged hitch, which consists of two parts. The first acts as a link, and the second is a regulator. If there is a need to equip the equipment with several implements at the same time, then a double universal hitch is used.
What types of adapters for walk-behind tractors are there?
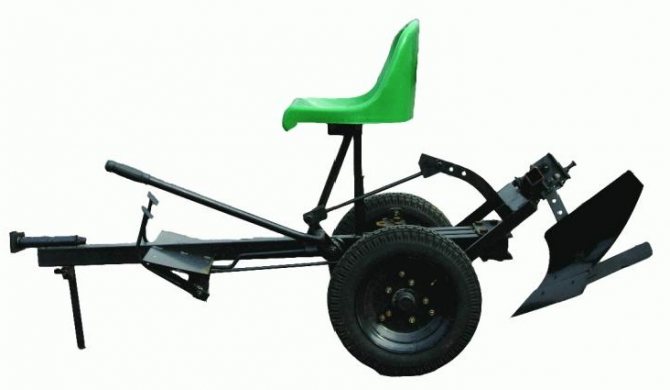
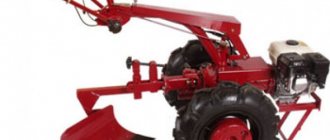
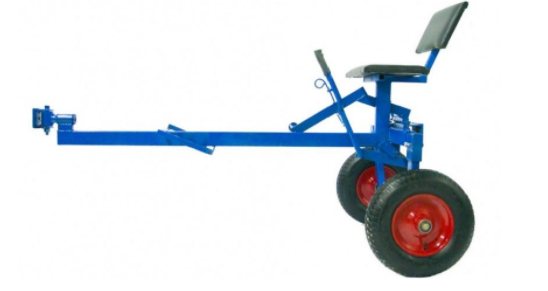
Externally, the adapter design is a small frame with two wheels, a platform for feet, a drawbar and a seat for the operator.
By equipping a walk-behind tractor with such a “new thing”, you will actually turn it into a mini-tractor - working will become much more convenient, faster and easier, and the ability to adjust the seat will make the work process more comfortable. There are several types of adapters for walk-behind tractors. In order to buy or make the most suitable option for you, you should familiarize yourself with all types of this equipment.
Based on the type of clutch, adapters are divided into adapters with steering and movable joints. Depending on the location - on the front adapters and rear ones.
Adapters can also be classified into a separate classification based on the purpose of use: with an extended drawbar for powerful large walk-behind tractors, with a shortened drawbar for small, lightweight units.
Adapter with steering
This type of adapter will turn your walk-behind tractor into a fully-fledged, comfortable vehicle. The adapter is in close contact with the walk-behind tractor itself and is securely connected to it. Wheels can be located both at the back and at the front of the structure.
Movable joint adapter
This type of adapter has its undeniable advantages - it is easier to manufacture, you can easily adjust the angle of inclination relative to the walk-behind tractor. The downside is that it is a little harder to control, the turning radius increases when maneuvering, and you need to put in more effort.
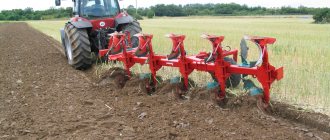
Front and rear adapter
The classification accordingly depends on the location of attachment. The choice of this type of adapter depends purely on the individual preferences of the owner of the equipment and the work to be done. For example, a front adapter is more suitable for plowing and cultivating because the attachment does not need to be constantly monitored during these operations. But when hilling beds, a rear adapter would be more appropriate, which will allow you to conveniently monitor the work process.
How to make an adapter for a walk-behind tractor with your own hands?
A homemade adapter for a walk-behind tractor will not require any special financial or material costs or specific knowledge from you.
It will be enough to think through the drawings and dimensions, acquire some materials and the appropriate set of tools. The required minimum of accessories for self-assembly of an adapter for a walk-behind tractor is as follows:
- metal corners;
- square metal profile;
- 2 wheels of suitable size;
- welding;
- dense sheets of metal (for support under the feet);
- small hand tools (screwdriver, saw, tape measure, etc.).
We have already given a general idea of what the adapter should look like at the beginning of the article. Now let's take a closer look at the other main elements of its design.
- Frame. The main component of future equipment. The design of some adapters allows for integration with a walk-behind tractor into one unit, but such an adapter requires reconstruction of the walk-behind tractor itself (a new stand for the engine will be needed).
- Suspension.
- Hitch. Provides stability and reliability of the entire structure. The type of coupling device should be taken into account depending on the type of adapter. If the adapter is with the steering wheel, the hitch must be rigid. With a movable joint, the hitch must be rotatable, on a horizontal hinge.
- Sitting. The finished product is created or selected based on the designer’s preferences.
- Control system. Suitable for rigid coupling. You can also cook it yourself or buy it.
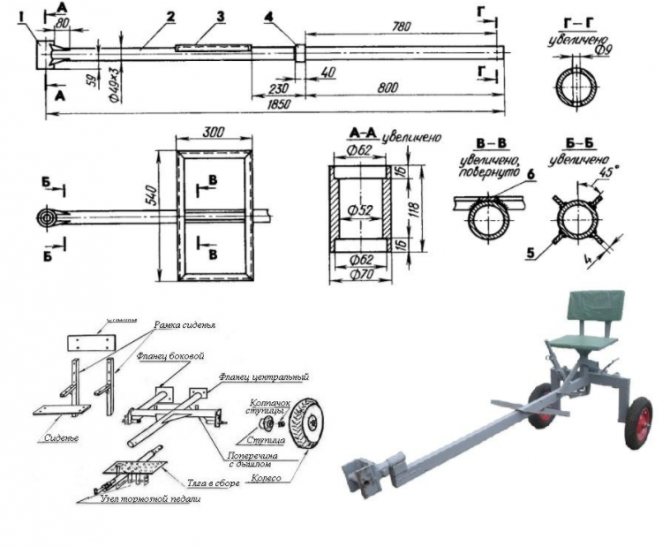
The drawings below show in detail the dimensions of the adapter structure, as well as its main connecting units.
Walk-behind tractor dimensions
Walk-behind tractors can be divided into two classes:
- lightweight, engine power up to 6.5 hp;
- heavy - over 7 hp
The weight of walk-behind tractors, regardless of class, is at least 60 kg and can reach up to 300 kg.
Standard sizes are the following:
- length - 174 cm;
- width - 65 cm;
- height - 130 cm;
- track - 32 cm;
- ground clearance - 14 cm;
- the smallest turning radius is 110 cm.
To design a homemade adapter for a walk-behind tractor, no special education is required, it is enough to rely on the recommendations of professionals and drawings, and have welding skills
Necessary tools and materials for work
All necessary materials and tools, which are low in cost, can be easily purchased at construction shopping centers. In order for the work on making the adapter to be effective and continuous, you should first prepare everything you need:
- a pair of wheels with an axle on which they are mounted;
- chair ready or for its manufacture: frame, covering material and filling;
- metal profile for frame, corner;
- steel circle with holes for making a coupling device;
- bearings to support the axle;
- fasteners;
- lubricants, primers, painting products;
- welding machine;
- lathe, grinder and drill.
Read also: Copper wire clamps
Drawing
Main design elements:
- frame;
- suspension;
- portal for rear adapter;
- hitch;
- sitting;
- steering.
Step-by-step assembly of the adapter
After the necessary drawings and dimensions of the parts have been thought out, the material has been found and the tool has been prepared, you can proceed directly to assembling the adapter.
- We weld a metal profile about 60 cm long perpendicularly to a section of a square metal profile about 180 cm long. It is this section that will be the mount for the wheels. Wheel stands must be at least 30 centimeters high.
- We weld the braces to the main frame and wheel hubs.
- The dimensions of the main frame will be about 40x40 cm, they can vary depending on the individual wishes of the designer. Channel No. 10 is welded to the rear edge of the frame. The side pipes are fastened with reliable bolts.
- Then the control lever is welded to the frame. To increase the control effort, the lever may have one or more elbows about 70-80 cm long. The elbows are bolted together.
- As a stand for the seat, you can use a pipe about 30–40 cm long, which is securely welded to the main frame.
- We weld the hitch to the walk-behind tractor.
We also invite you to watch the video, which demonstrates various types of adapters and their features for walk-behind tractors of several well-known brands.
Firework:
MTZ:
Agro:
Forza:
Algorithm of actions

To begin assembling additional equipment for a motor cultivator, you will need a drawing, in accordance with which the fastening elements and the construction of fragments will be made. If you have special skills and experience, you can make a homemade adapter for a walk-behind tractor and a drawing yourself. If you are afraid of making a mistake, you should take ready-made drawings. Before designing, it is recommended to check and verify the compliance of dimensions and numbers.
Tools and consumables:
- metal corners, square profile;
- bearings for the steering wheel and column;
- metal sheets;
- a pair of wheels, preferably on an axle;
- drills, electrodes, discs for grinders;
- fasteners;
- wrenches of various sizes;
- electric welding machine;
- lubricants – grease;
- Bulgarian;
- screwdriver;
- drill.
At the preparatory stage, it is necessary to select a kinematic diagram that provides indicators of the equilibrium of the entire structure. Overload warning must also be provided. It is recommended to use ready-made drawings of an adapter with a steering wheel to a walk-behind tractor.
Work progress:
- The beginning of work is the manufacture of the frame. The structure is made from cut parts of the selected steel building material. The metal is cut to the required length using a grinder. The fragments are fastened with bolts or welding.
- A 1.8 m piece of square metal profiled product is welded to a metal profile 60 cm long. The elements are placed perpendicularly. This fragment will serve as a mount for tires. The wheel stand must be at least thirty centimeters high.
- The spacers are welded to the main frame and wheel bushings. The size of the frame is 40x40 cm, it can vary depending on the individual project.
- A profile is welded to the edge of the frame. The axial pipes are bolted together.
- The control lever is welded to the frame. To increase power performance during control, the lever is constructed with one or more elbows with a length of 70-80 centimeters. The knee fragments are fastened with bolts. It is recommended to check the dimensions of the adapter for the walk-behind tractor with the drawings and diagrams, because they will help you create an error-free design with your own hands.
- A pipe 30-40 cm long serves as a stand under the seat; it is welded to the main frame. With a driver's seat, the equipment is easier to control during gardening.
- The coupling part of the mechanism is welded to the walk-behind tractor at the rear. The fastening is made of steel or cast iron material. An electric welding machine is used to connect spare parts. The fastener is an important component that ensures reliable coupling. The most suitable is a U-shaped connecting node. Thanks to this spare part, transport becomes sustainable.
- There are two types of wheels suitable for the walk-behind tractor adapter - rubber or metal. The latter option is used for work in the field. The rubber wheel has a deep tread, which will allow you to move on unpaved roads and, if necessary, drive off-road. Wheel radius fits 15 to 18 inches. Suitable wheels are from the domestic automobile industry - VAZ, Moskvich.
- I treat the resulting device with a primer and paint it. This technique will prevent metal corrosion.
Video review of the front adapter
Making an adapter for a walk-behind tractor with your own hands
Any activity on a plot of land takes a lot of time and effort. For this reason, gardeners are increasingly using special equipment, such as walk-behind tractors. However, it is impossible to do everything with this unit. Without a special adapter, you will not be able to weed or hill up the ground, or clear the area of snow and construction debris. A cart with a seat for a walk-behind tractor nowadays costs quite a lot of money. However, there is a way out. Today we will talk about how you can make a homemade adapter for a home walk-behind tractor without any special effort.
Description of the adapter for the walk-behind tractor
The adapter is a special module for moving on a walk-behind tractor. With its help, you will be able to operate the unit in a sitting position and at the same time cultivate the land. For example, the adapter for the MTZ walk-behind tractor has steering control. It is quite possible to do it yourself. One of the sections of the article below is devoted to how this can be done. In the meantime, let's talk about the purpose of this attachment.
Using an adapter can greatly simplify the use of this home appliance. You will have the opportunity to change attachments for hilling or planting potatoes, a flat cutter, a plow and other devices. The adapter also speeds up absolutely any garden work . In other words, if such a device is used in practice, the speed of the workforce will increase from 5 to 10-11 km/h.
Purpose
An adapter for a walk-behind tractor was created for the convenience of gardening. If you attach a hinge to it, you can expand the scope of application of the device:
- remove hay;
- level the soil surface;
- transport goods;
- harrow the ground;
- clear the area of snow.
An adapter is a device that is designed for movement on a motor cultivator. With it, you can control the unit while sitting in a chair, and at the same time cultivate the soil. The trailer for the Neva motor-cultivator is equipped with a steering control. It makes it easier to use the walk-behind tractor.
This trailer speeds up work in the field. Using this design, you can increase the speed of the cultivator from 5 to 10 km/h. Let's look at the adapter device. The adapter for the motor cultivator consists of:
- frames;
- operator seats;
- two wheels;
- axles;
- coupling mechanism.
After attaching the adapter, the cultivator looks and is used like a mini-tractor. To create an adapter for a cultivator with front steering, you need a frame. The operator's seat is installed on it. The frame is fixed to the chassis.
The seat is fixed to the frame. This will make it easier for the operator to control the cultivator. The wheel system will help move the unit around the site. There are 2 types of wheels: metal (used in the field) and rubber (used for driving on the road).
made of steel or cast iron by welding. She attaches the cart to the cultivator. The U-shaped fastening system is considered the best. With this design the device will be stable.
Specifications:
- The highest travel speed on a walk-behind tractor with a trailer is 12 km/h.
- Maximum load capacity - 100 kg.
- The track diameter is 67 cm.
- Dimensions are 130x70x71 cm.
- The weight of the device is 22 kg.
- The warranty period is 5 years.
Adapter design features
This attachment includes:
- frame;
- driver's seat;
- a pair of wheels;
- wheel axle;
- coupling device.
That is, the adapter gives the impression of a cart that is attached to the main equipment. As a result, it looks like a mini tractor.
Now let's talk about each component in detail.
- To make a front adapter for a walk-behind walk-behind tractor with your own hands, a frame is required. The body or driver's seat is attached to it. The frame is mounted on the chassis.
- For ease of use, a driver's seat is attached to the frame. This is designed to make it pleasant and easy to operate the equipment during gardening work.
- The wheels and axle make it easier for the operator to garden with this small tractor.
- There are two types of wheels for a home tractor - rubber and metal. Metal wheels can be used for reliable work in the fields. Rubber wheels are equipped with a deep tread pattern. This way they can allow the operator to move the unit on unpaved roads and, if necessary, off-road. In any case, the wheels for the adapter are supplied with the purchase as part of the equipment itself. But if the user wants to change them, you need to pay attention to their type and size.
- Device for coupling (fastening) with a walk-behind tractor. The mount for the MTZ unit is made of steel or cast iron, using welding. The hitch is one of the essential components of the units. It provides a reliable connection to the part with the motor of the trailed equipment. The U-shaped attachment point is considered the most commonly used, because thanks to this device the vehicle is more stable.
Instructions for making the adapter
Now we’ll tell you how to make a front adapter with steering for your small tractor yourself.
To produce an adapter for a walk-behind walk-behind tractor, you will need the following materials:
- Two identical wheels on an axle. The radius of the wheels ranges from 15 to 18 inches. Even wheels from an old Soviet Volga might work.
- Bearings for steering wheels and columns.
- Steel for the frame (channel, pipe or angle).
- Fastening elements (washers, bolts, nuts).
- Lubricants (litol or grease).
- Consumables (drills, electrodes, discs for grinders).
- Set of wrenches.
- Bulgarian.
- Welding machine.
- Drill.
Before starting work, it is important to consider that the wheels should not have a very large or small radius.
Algorithm of actions
We begin to manufacture attachments for the walk-behind tractor.
First of all, you will need drawings, in accordance with which all parts will be fastened and manufactured.
a drawing of the adapter circuit for a walk-behind tractor from MTZ yourself, especially if you have the proper skills.
If you are afraid of making an error in your calculations, you can refer to materials on the Internet on specialized sites or forums. Based on them, according to reviews and practice, it is quite possible to independently make the most simple adapter for a walk-behind tractor. Important! Before you start working on the drawings, be sure to check the compliance of the dimensions and numbers.
To make a steering adapter for a walk-behind tractor, you will need a frame with a bushing and a fork. This will ensure free rotation of the walk-behind tractor using the steering wheel .
- Everything will start with making the frame. It can be done from cut pieces of selected steel of the required length. The metal can be separated with a grinder and the elements can be fastened with electric welding or bolts.
- Next we build the chassis. If the motor of your walk-behind tractor is located in front, therefore, the track size must be determined by the main wheels. The rear ones are mounted to the frame using an axle. It can be created from a piece of pipe of suitable width. At the ends of this pipe we press bearings with bushings. The wheels will be installed on them. If the walk-behind tractor engine is located at the rear, then the track width must be larger, otherwise the minitractor will not be able to move normally during operation. In such a situation, it would be best to remove the base wheels of the walk-behind tractor and reinstall it, but on a more spacious axle.
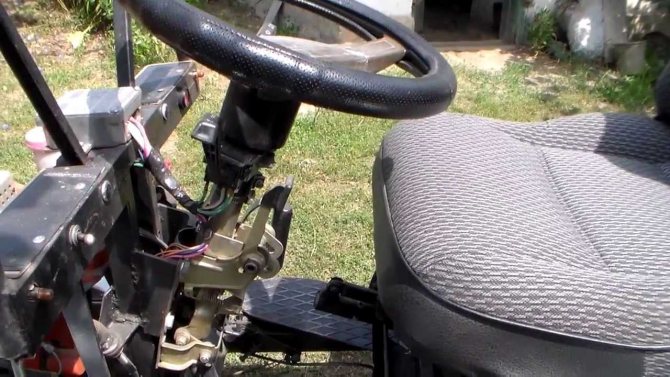
- To make a steering wheel for the unit, you do not need to additionally remove the handles from the car or motorcycle. Stop using the handle. In other words, the operator will have the opportunity to control the minitractor with a steering wheel that looks like a motorcycle. However, with it the operator will not be able to reverse normally. That is why it would be preferable to mount the steering column on a mini tractor.
- When using an all-metal frame, the steering will be integrated with the front axle of the walk-behind tractor. You can make an articulated support, then the control column will rotate the entire front half-frame. To do this, the technician will need to attach a gear to the front half frame. The second gear is installed on the steering column.
- The seat, which can be previously removed from a passenger car, must be welded to the frame of the slide. The technician needs to make sure that it is adjusted, especially when controlling the front adapter attached to the walk-behind tractor.
- If you intend to use the minitractor to work with plows and cultivators, then you will need additional welding of the bracket. An auxiliary hydraulic system must be installed to operate the attachment. The pump for it can be easily removed from agricultural machinery. If you have to work with semi-trailers, then you need to take care of additional welding of the towbar to the rear of the frame. It can also be successfully borrowed from a passenger car.
- You can do the fastening (coupling) yourself. To do this, you will need drawings, which are easily found in articles based on the top results of the desired topic. And we will talk about how exactly to carry out the coupling.
To make a U-type hitch, you will need a metal channel of suitable thickness and size. The hitch is attached to the walk-behind tractor under the steering column through pre-drilled holes in certain places. The bracket and pins are inserted into them. It is important to ensure that the parts are of high quality, this will avoid unnecessary problems in the future and wasting time in the present.
All parts must be made from high-quality high-strength steel. This completes the installation of the front adapter on the Neva walk-behind tractor. After completing the assembly, all that remains is to lubricate the minitractor and check it for functionality. After this, the adapter assembly can be assessed as complete. Now you can safely carry out the required work on land using new equipment.
Tipper front cart for walk-behind tractor
Traditionally, to transport various loads using a walk-behind tractor, a two-wheeled trailer is used that is attached to the back of the walk-behind tractor. Classic walk-behind carts differ little from each other, mainly: load capacity (from 250 to 650 kg); body type (tipper or not); less or more comfortable place for the driver; and also a little in appearance.
However, on a personal plot or on a livestock farm, in a vegetable garden or garden, where the movement of goods is carried out over short distances (carrying the harvested crop to the cellar, transporting building materials or fertilizer, taking garbage to the nearest landfill, transporting and distributing feed to livestock), more is required. compact, convenient and inexpensive delivery vehicle.
A dump cart with a load capacity of 200 kg, attached to the walk-behind tractor at the front, is exactly such a wheeled device. Thus, the garden walk-behind tractor can be used in personal farming as a lightweight, mobile and economical motorized transporter. The Forza trolley, weighing only 45 kg, has simple equipment: two 4×8″ wheels and a flatbed dump truck with a front tailgate.
A similar configuration, when the body was located in front of the cab, is known to many as the Kharkov T-16 tractor, popularly known as “Chassik”. In the USSR, these mini-tractors often appeared on city streets, where they were actively used by public utilities, and on state and collective farms they were used for the delivery and distribution of feed in cowsheds and pigsties. Today, the T-16 tractor can only be seen in Soviet cinema.
Like the self-propelled tractor chassis of the Kharkov Machine-Building Enterprise, the walk-behind front bogie is intended for use as a cargo transporter. The volume of the metal flatbed body is 0.18 m³ (85×70×30 cm) allows for the transportation of packaged and bulk cargo. The latter can be unloaded by simply tipping the body, like from a dump truck.
Buying a Forza front trolley will be interesting not only for owners of walk-behind tractors of the same brand, but also for gardening units produced under the brands Neva, Oka, Cascade, Ugra, Salyut, Luch, Tselina, Favorit and the like. The low price of a conveyor cart and its functionality are the main advantages that favor the purchase of attachments of this type.
To avoid misunderstandings and unnecessary expenses, when ordering a trailer, please indicate the name and model of the walk-behind tractor for which you are purchasing this trailer equipment. Delivery of Forza products is carried out directly from the warehouse of the Perm manufacturer, within 7-10 working days after receipt of payment from the customer, with the preliminary conclusion of a supply agreement.
Working on a walk-behind tractor with steering control
Let's say a few words about the control features of a walk-behind tractor with a steering wheel, and why it is recommended to use this option during assembly. It’s not for nothing that this type of conventional and home-made machines is so popular, because it has a lot of advantages:
- the operator will not have to waste his energy walking behind the mini tractor;
- the traction potential of the equipment is realized one hundred percent;
- such a mini tractor is more maneuverable and functional;
- Now, in order to cultivate a plot far from home, you will not have to additionally transport a walk-behind tractor - you can simply drive it, like a regular car or tractor;
- control is more lightweight and convenient than other types;
- Now you don’t need to hold the entire mass of this heavy and bulky device in your hands,
- it becomes possible to quickly assemble and disassemble the unit;
- control parts are not significantly modified during rework;
- good balance in weight along the axes.
We will not mention here the noise of operation and other characteristic features of, in principle, all tractors . Let's just talk about one characteristic drawback - not very reliable stability, which is associated with a movable coupling. However, the advantages are, of course, more impressive.
Steering devices
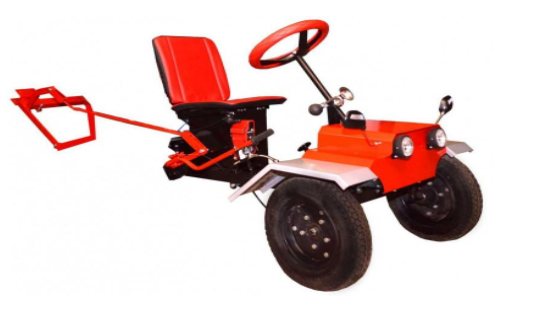
Such devices make it possible to rebuild the walk-behind tractor into a full-fledged mini-tractor; the only difference, as already mentioned, is the preservation of the power of the engine used in the unit. It is attached to the walk-behind tractor using a hitch, which is placed in front of the adapter. This block is perfect for motor engines such as Sadko, Don, Plowman, Forza, Huter, Champion, Profi.
In particular, such an adapter includes: steering; pair of wheels; clutch; brake and gas pedal; driver's seat; frame structure.
Behind such an adapter there is a special lifting mechanism, to which it is possible to connect additional trailed and mounted equipment.
Types of adapters for walk-behind tractors
There are several types of adapters for mini tractors, including homemade ones.
- With lifting lever. The presented type of suspended equipment will simplify control and movement around the site.
- For transporting goods. They are equipped with special bodies that can withstand maximum loads.
- With long or short drawbar. The short type is for a lightweight type, the long type is for a heavy mechanism.
- With telescopic drawbar. This design allows for width adjustment.
Types of adapters for motorcycles
Adapters for walk-behind tractors are divided depending on the method of their attachment.
The following types of devices are distinguished:
- Rear adapter for walk-behind tractor. The hitch is located at the front of the device, so after connection the adapter will be located at the rear of the unit;
- Front adapter for walk-behind tractor. Accordingly, traction occurs from the rear. The adapter is located in front of the motorcycle and will definitely have a steering wheel for control. Devices with steering control have a more complex design type, and therefore their price on the market is much higher.
Depending on the area of use, the following adapters are available:
- Shortened . Small in size, which can be used with a light walk-behind tractor. The low weight allows the adapter to be attached directly to the wheel of the unit;
- Elongated. Copes with heavy-duty agricultural machinery. They are distinguished by their significant dimensions and relatively large mass.
Depending on the presence of the body, the following designs are distinguished:
- Bodywork. The existing body allows you to transport various cargo over long distances. They are actively used for everyday tasks and harvesting;
- Bodyless. They are used only for connecting to a walk-behind tractor.
When choosing an adapter, you need to pay attention to the design features of the device. It must fully meet the needs of the owner.
Preparatory stage of adapter manufacturing
The adapter has a simple design, but its manufacturing procedure cannot be called simple. Initially, you need to take into account the drawings and dimensions, which will help you create a device without any defects.
You need to acquire the following materials and tools:
- Electric drill;
- Welding;
- Electric hacksaw;
- File;
- Square;
- Sheet of steel with a thickness of 5 millimeters;
- Several square pipes with a diameter of one inch;
- A set of fastenings.
Key structural elements are manufactured as follows:
- Hitch. Installed on the frame and secured with bolts. The coupling is two welded pieces of square pipes and a piece of water pipe. The latter is inserted into the rod with a welded tee;
- Wheel fixation unit. Two pieces of pipe 10 centimeters long are welded at right angles. The horizontal section is inserted into the mounting pipe and securely fixed with a bolt. An axle and bearings with wheels are attached to a vertical blank.
When all the tools are prepared and the main parts are made, you can assemble the adapter.
Manufacturing a device with a movable joint
This is the simplest device. The adapter itself will be located behind the walk-behind tractor. It is not difficult to make, but the process requires attention and concentration. The service life of the mechanism depends on the quality of work. This adapter is suitable for heavy walk-behind tractors, for example, “Neva”. It has an engine power of over 7 hp. With. and weight from 105 kg. This allows you to pull not only the adapter, but also agricultural implements without slipping.
For manufacturing you will need the following materials and tools:
- electric drill with the necessary set of drills;
- DC welding machine and electrodes;
- grinder with a set of cutting and grinding discs;
- hammer, file, square, various hardware;
- sheet metal with a thickness of at least 5 mm;
- several profile pipes measuring 40 x 50 and 50 x 50 mm;
- round water pipe with thick walls with a diameter of 30−45 mm;
- steel rods with a diameter suitable for a round pipe;
- channel 40 x 50 mm;
- two wheels from a Zhiguli or Oka with bearings and hubs;
- driver's seat.
You can choose any adapter size, but based on the needs of the mini-equipment. The frame itself can be made slightly higher or lower than the axis of the walk-behind tractor. For wheels, the optimal suspension is portal, providing decent ground clearance. It is not necessary to install shock absorbers on the adapter - this complicates the design. The easiest way is to take a seat with built-in elastic elements.
Next, they proceed directly to the manufacture of individual components.
- Hitch. This is a welded mechanism, which is a hinge that operates in two planes. It is then installed into the base of the adapter frame and bolted to it. It consists of two pieces of 40 x 50 pipes welded to each other and a piece of round water pipe. A welded tee is inserted into it. The tee itself consists of a rod and part of the same pipe. This is the most critical unit, so the welds must be perfect.
- Adapter frame. Here you will need a profile pipe and channel. They are welded together, strengthened, and then made into racks for the wheels. Next, the racks are fixed with braces welded to the frame and wheel hubs. Install and secure the wheels.
- Several pieces of pipe are welded to the main frame to install the seat.
- Fix and adjust the seat. It is placed so that when the steering wheel is turned, the operator’s back does not leave the backrest. There is no need to remove the walk-behind tractor controls - this is done when the power plant is located behind the driver.
- Install the finished coupling device.
- Attached to the walk-behind tractor.
Next, the wheel locking mechanism is made. To do this, use a ready-made brake system from any passenger car and fit it to the installed wheel hubs.