Design and principle of operation of the GCS
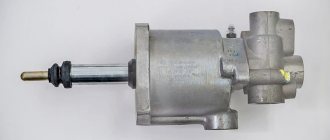
In principle, the design of the master cylinder is quite simple:
- force is transmitted from the pedal through the pusher (10) to the rod (8),
- the piston (14) moves forward, while closing the valve (C), from which liquid from the compressible part of the cylinder can flow into the tank (1),
- the fluid in the cylinder is compressed and pushed through the fitting (19) into the hydraulic line to the working cylinder, which directly drives the fork,
- when the pedal returns to its original position, the piston returns back using a spring (18).
The operation of a hydraulic drive (no matter whether it relates to the clutch system, brake system or any other) is based on the fact that the fluid under pressure is practically not compressed, but at the same time instantly transmits force through the system of pipes to the desired point.
Operating principle and replacement of the clutch master cylinder
We repair the clutch master cylinder of VAZ 2101
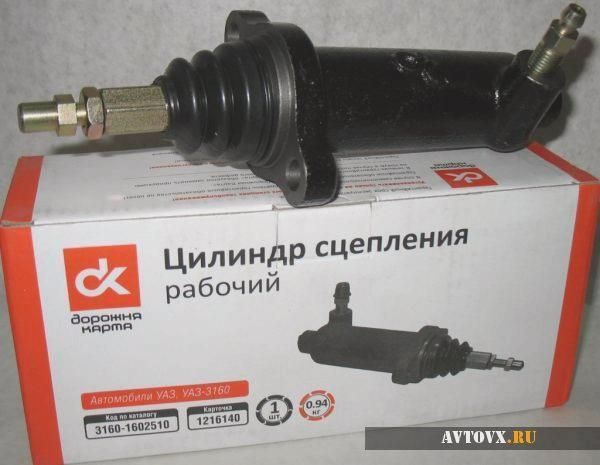
The clutch master cylinder itself serves to transmit the maximum fluid pressure from the foot pedal of this mechanism to the VAZ 2106 clutch slave cylinder, forcing it to move within the required limits in its plane. As has already been noted, the transmission of the pressure force of the foot drive through the clutch master cylinder entails an increase in the pressure parameters in the hydraulics of this complex.
Next, the system pressure is transmitted to the clutch slave cylinder, which drives the vehicle’s transmission. However, there are defects that require repair and replacement of the GCS and RCS. This can be determined if the following signs are present:
- The drive unit of the system does not completely disengage (the clutch “drives”).
- Leakage of working fluid from the components of the unit, incl. from hydraulic pipes and their connections.
- “Wedging” of the clutch master cylinder when the foot drive is in the lowest (recessed) state.
Timely replacement of the VAZ 2106 clutch cylinder is done in the following sequence:
- Use a bulb or other device to pump out the working fluid from the clutch hydraulic reservoir.
- Having loosened the fastener in the form of a crimp clamp, disconnect the hydraulic hose from the drive fitting.
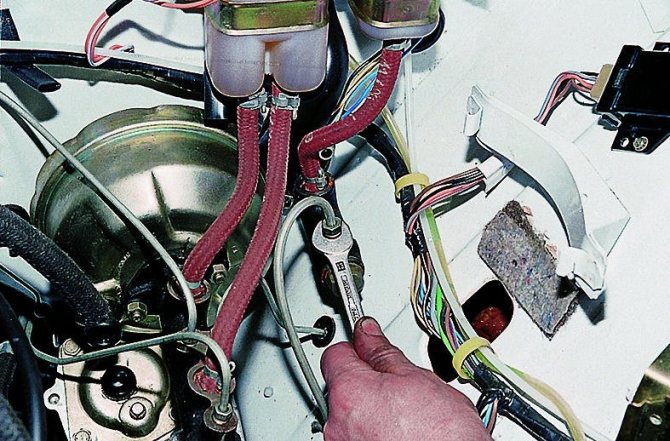
- Unscrew the pipeline drive fitting using a “13” wrench.
- Unscrew the 2 nuts of the studs securing the foot clutch drive using a socket set to “13”.
- Carefully remove the GCS.
- When installing an updated product, assembly is carried out in reverse order.
- We pour special fluid into the hydraulic tank and pump the hydraulic system.
- We remove from the end part the cap for the protective function of the VAZ 2106 clutch cylinder, the price of which is low, which protects this spare part from mechanical deformation.
- Use a screwdriver with a thin blade or an awl to remove the lock washer-gasket and dismantle the fitting device with the seal.
- Having installed the clutch master cylinder in a vice on a bench, use a 22mm wrench to unscrew the plug.
- We take out the retaining ring and the remaining elements of the GCS.
- We inspect in detail the components of the GCS: the “mirror” of the product and the piston outer surface must be smooth, without burrs. The return element must have the necessary rigidity, otherwise it will need to be replaced. The sealing o-rings must be replaced with updated products, as well as the protective cap. If the lock washer of the fitting device is defective, it must also be replaced.
- We wash all the elements of the GCS with a degreaser solution, after which we assemble the product into a single whole.
in this video I change the clutch master cylinder
for
VAZ
2107. similarly,
the master cylinder is replaced
...
Operating principle and replacement of the clutch slave cylinder
If a car owner is replacing the clutch slave cylinder of a VAZ 2106, then it is necessary not only to prepare a set of plumbing tools, cleaning and degreasing products. It is required to have sufficient skills in plumbing, to imagine the structure of the product being dismantled and to have the desire to make such a replacement.
Dismantling the clutch slave cylinder is carried out according to the following algorithm:
- Starting the dismantling process, it is necessary to slightly loosen the screw securing the rubber hydraulic tube, which leads to the connection with the clutch slave cylinder of the “six”.
- We remove the spring mount that pulls back the clutch fork, and then dismantle it.
- We fix the location of the pusher element of the clutch working cylinder, and then remove the cotter pin.
- Remove the bolted connections of the clutch slave cylinder to the vehicle's clutch housing.
- Remove the spring-type pull-out bracket and remove the pusher element from the mechanism fork.
- The next stage is the removal of the clutch pipeline from the control center, this requires fixing the front tip from rotation, while using a circular motion we dismember the connecting element from the control center.
- Then we remove the sealing washer, which during further assembly of the product must be replaced with an updated product, because its reuse is unacceptable.
- After this, we substitute an empty tank to place the liquid in it, which circulates in the hydraulic drive of the mechanism.
The disassembly of this unit has been completed; then it is necessary to carry out preliminary and main work on the installation of the updated part. After carrying out this type of repair operation, the functionality of this system should be restored, for which we must pump the vehicle’s clutch.
Specifications
In the specifications for the master cylinder, manufacturers indicate the following parameters:
- side of the steering wheel (left, right) – important for asymmetric mounting,
- Is there a tank included (GCS can be sold with or without a tank),
- connection method (left, top, etc.) – help with selection if non-standard parts are installed in the hydraulic drive,
- body material: cast iron, aluminum, steel, polymer,
- dimensions of the body and structural elements (nozzle diameter, rod length).
These characteristics can be taken into account as auxiliary information when selecting a master cylinder for your car. Car enthusiasts pay special attention to manufacturing materials: the most common today are cast iron and aluminum, and there are also quite a few offers of cylinders with polymer bodies. Steel cases are quite rare, since steel combines high price and difficulty in processing.
Clutch master cylinder failure
The simple design and the absence of complex “filling” make the clutch master cylinder resistant to damage. Its main enemy is time, since even very high-quality parts wear out from constant loads (and the load on the clutch during city driving is an order of magnitude higher than during long trips).
The first thing that fails is the rubber parts. These are boots that fit onto the rod and protect the cylinder from abrasive particles, as well as sealing collars that prevent fluid from leaking out.
The weak point is also the spring inside the cylinder, which bears a serious load. Due to work and exposure to brake fluid, the quality of the metal deteriorates over time and the spring bursts (sometimes falling apart into several parts).
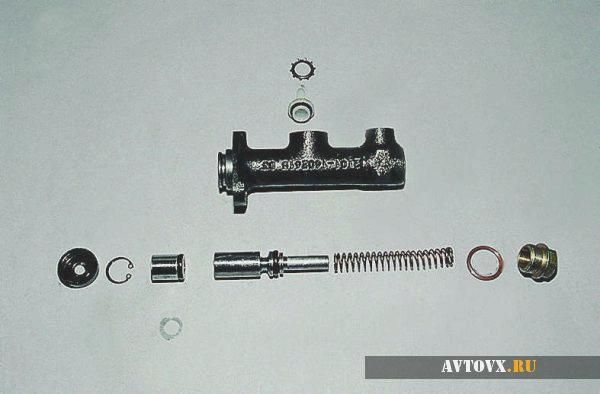
To replace worn parts, they sell special repair kits for the cylinder head, which contain everything necessary for updating and further operation of the cylinder.
Repair kit GCS
If problems arise with the operation (torn seals were not replaced in time, installed incorrectly, the fluid was not changed, etc.), the cylinder mirror wears out: abrasions and scuffs appear on the metal, corrosion, after which the master cylinder begins to provide various “special effects” to the car enthusiast. In advanced cases, no repair will help, only replacing the entire spare part.
Malfunctions and repairs of the clutch master cylinder
If we talk about the GCS, like any other device, this element can also fail. Although the clutch master cylinder is simple in design and reliable, over time individual elements wear out due to constant loads, especially if the car is operated in the city.
As a rule, seals and rubber parts are the first to fail. To put it simply, such sealing elements should be understood as boots that are put on the rod to protect the cylinder from dirt and small abrasives, as well as sealing collars that do not allow the working fluid to leak out.
Another element that can cause problems with the cylinder head is the spring in the cylinder. The spring of the clutch master cylinder constantly experiences loads during vehicle operation, and it is also affected by the brake fluid, which in this case performs the working function. When the metal becomes more brittle, the spring may simply burst.
One way or another, if there is a problem, the cylinder needs to be replaced. At the same time, in a number of cases it is also possible to get by with repairing the main central heating system rather than replacing it. Taking into account the relatively high cost of the part for many cars, this method is optimal. For these purposes, you need to purchase a clutch cylinder repair kit, which includes the necessary spare parts.
This approach usually allows you to sort out the device and completely restore its functionality. The main thing is that the repair kit is of high quality, and that the repair of the clutch master cylinder itself is carried out by experienced specialists.
Signs of a GCS malfunction
When problems begin with the master cylinder, it most often manifests itself as a hydraulic fluid leak. When the clutch pedal begins to work poorly, the first stage of diagnosis will be a visual inspection: any leaks on the cylinder and even just slightly moistened seals are a sign of a problem that needs to be solved.
Basically, when there are problems with the cylinder, the clutch pedal begins to sink or move slowly, and the pedal “sticks” in the lower position.
Another problem with the GCS is clogging of the holes in the tank lid. For normal operation, the level in the cylinder reservoir must rise and fall freely, and for this purpose, ventilation holes are provided in the cover. If they become clogged with dirt, the hydraulic drive begins to work with difficulty: the pedal becomes stiffer and does not return well to its original position.
Malfunctions of the clutch master cylinder VAZ 2107-2101
The list of breakdowns and signs of malfunction of the VAZ 2107 clutch master cylinder is quite wide and can be caused either by elementary aging and natural wear and tear of materials, or by a low-quality product that was installed as a result of past repair work. There are also frequent cases of mechanical damage to the case and internal parts, which lead to desynchronization of the entire operation of the device. Typical breakdowns that disable the entire clutch system include:
- Damage to the product body as a result of mechanical stress or metal wear due to aging. If the housing depressurizes when the clutch pedal is pressed, fluid under pressure enters not only the system, but also beyond it, directly into the engine compartment. Subsequently, this leads to a decrease in the overall level and failure of the system. To prevent such serious damage, it is necessary to inspect the body for leaks or fogging every few thousand kilometers. If any are found, promptly replace the failed part.
- The failure of the piston is its jamming. This failure occurs as a result of mechanical excessive impact of the rod, as a result of shock shock loads or due to natural wear. During a routine inspection of the part, it is impossible to determine the condition of the piston, since it is enclosed in a housing. However, signs of a malfunction can also include leaks in the housing, a clutch that is not engaged, or a spontaneous transition to another gear.
- It is not uncommon for the bypass valve to malfunction, which can lead to major damage within the entire clutch. In this case, the fluid actually stops flowing into the system and, accordingly, neither the main nor the working cylinders can create the appropriate hydraulic pressure that is necessary to move the flywheels. In fact, this results in the inability to change gear. Such a breakdown is also diagnosed only when disassembling the element and is eliminated by replacing the valve.
- Failure of gaskets promises the occurrence of housing leaks in the future with problems in the form of fluid loss and destruction of housing parts. Accordingly, such a malfunction can also be detected only when dismantling and disassembling the entire device.
Read also: Tomahawk lr 1010 instructions
Despite the hidden nature of most faults, the owner is obliged to check the condition of the entire clutch system every few thousand kilometers. To do this, you do not need to dismantle parts or lift the car - just a visual inspection is enough. And since clutch problems can be caused by other damage to individual parts, repair work in some cases may not give the desired result.
A few words about hydraulic fluid
The hydraulic clutch usually uses brake fluid that has a set of characteristics that are optimally suited for the given task. For the operation of the system, what is primarily important is a sufficient fluid level, which can be determined by looking at the reservoir on the master cylinder. If for some reason there is less brake fluid, top it up without waiting for problems to appear.
When working, you need to remember that brake fluid is quite aggressive to plastic, fabric, paintwork and even leather. So you need to work with it carefully, and immediately wipe off any drips or drops on parts or the car body with a clean napkin. For the same reason, you need to monitor the condition of rubber parts that come into contact with the brake fluid: they can deteriorate very quickly and literally dry out under the influence of aggressive chemicals for which they are not intended.
And, of course, you need to add brake fluid to the system in a clean, closed room (garage or auto repair shop) so that dust does not get inside.
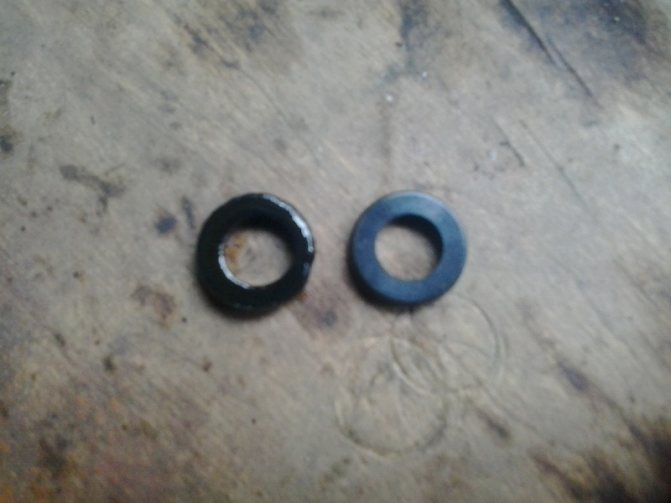
An interesting property of brake fluid is its very good penetrating effect, due to which it seeps out through microscratches on the cylinder surface or piston, even if the rubber seals are replaced. For this reason, the repair kit includes a new piston, and scratches and abrasions inside the cylinder become a clear indication for replacing the entire part.
Installing the clutch master cylinder repair kit
It is not difficult to determine when it is necessary to repair the master cylinder; the main signs of its malfunction are:
- Insufficient clutch release (clutch drives)
- Any type of leakage, whether from under the nuts securing the hose and tubes, or from the end from under the rubber seals
- Master cylinder stuck in pressed position
In my situation, the main leak was due to a worn out sealing ring, in other words, fluid flowed down the clutch pedal into the passenger compartment.
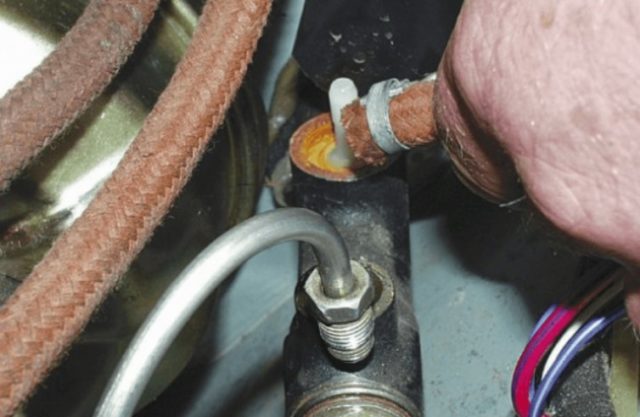
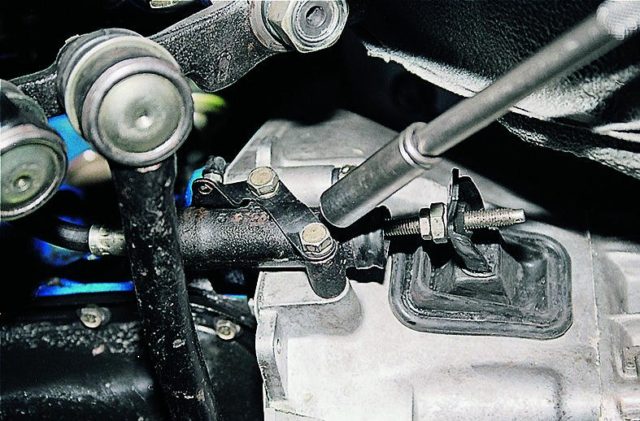
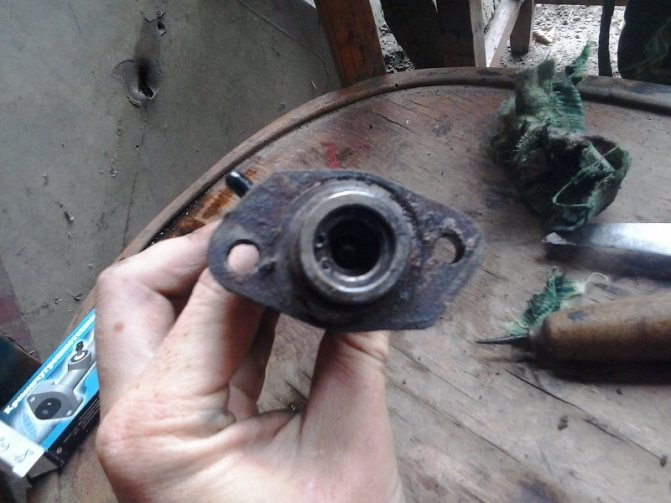
I started the repair by dismantling the reservoir hose, unscrewed the clamp on the main cylinder and quickly removed it from the main cylinder, turned it up and pinched it behind the reservoir cap so that the liquid did not flow out of the reservoir. Next, I unscrewed the tube that goes to the working cylinder, I did this with a special key, it’s a pity there is no photo, but you can buy one without any problems at any auto store. All that remains is to unscrew the main one itself, it is secured with two 13 nuts and remove it from under the hood.
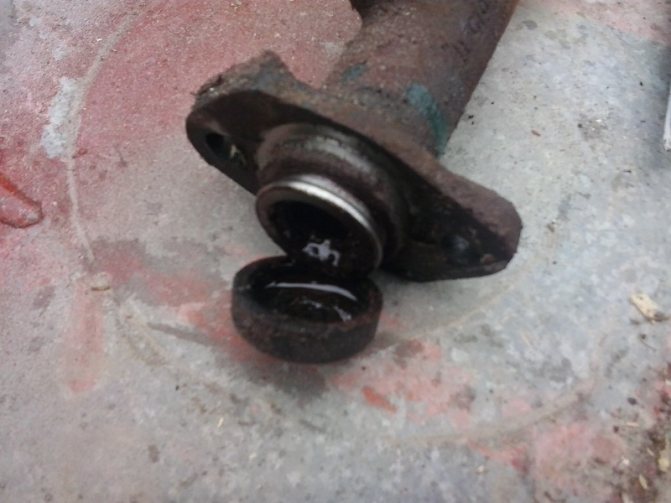
The boot was removed and it was noticeable that fluid was flowing from here.
Having picked up the boot with a screwdriver, I saw exactly where the liquid was flowing from; the assumption was absolutely correct.
Next, you need to wipe the cylinder, remove dirt and rust.
Attention. Do not use gasoline or similar liquids for washing, as they will very quickly ruin the new rubber bands. To flush the clutch and brake elements, use clean brake fluid.
After cleaning the dirt, you can begin disassembling. To do this you will need an awl or similar object.
Next, you need to carefully remove the insides, keeping in mind that the piston is under the action of a spring.
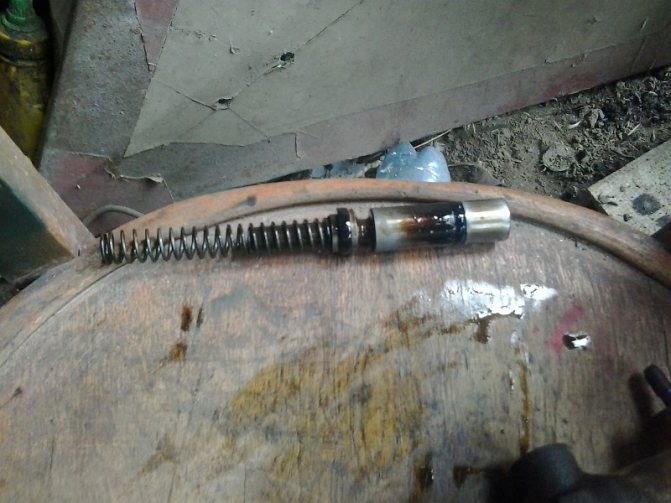
This is what it looks like
Next, you need to clean the master cylinder body, you cannot scrape the parts with a screwdriver, sandpaper, etc., this is just in case, I use a rag with brake fluid. In repair manuals, I often came across such expressions that if rips, scratches, etc. appeared on the parts, then it is unusable. But despite all this, practice shows that despite all the risks, provided that a high-quality repair kit is installed, the master cylinder works without problems. I used this kit:
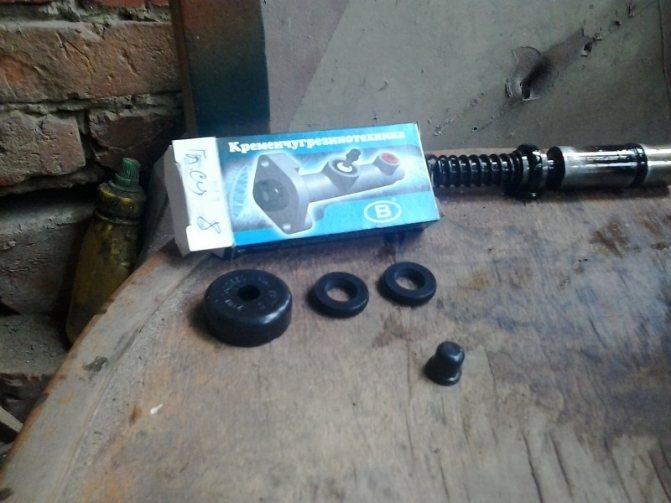
Repair kit for clutch master cylinder VAZ
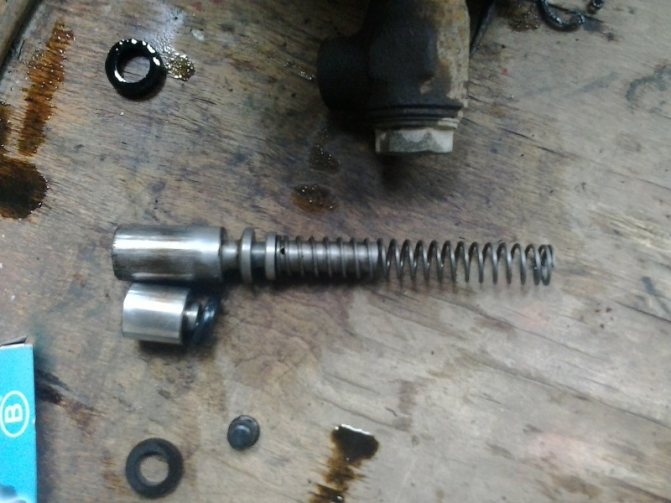
We remove the old rings, clean all the grooves and holes. There should be no dust or debris there.

The ring is removed, clean the piston, install a new one
Thanks for subscribing!
And by the way, here is the reason for the clutch cylinder leaking:
The ring is not worn evenly
After cleaning and replacing the rings, you can assemble the cylinder, below is a photo of what should be there and how:
Here is a photo not cleaned, I added it here to show the correct assembly
Having assembled the cylinder, install the corkscrew ring
Bleeding the clutch on a VAZ 2106
After the repair has been made, it is necessary to bleed the clutch. In all repair manuals you can find standard instructions for bleeding the clutch, but it may not always help.
- The first bleeding option is standard; it consists of filling the tank with liquid, unscrewing the bleeding fitting, putting a hose on the fitting, and lowering the other end into a container with clean liquid. Then, by pressing the pedal, we monitor when the air stops being released, and also do not forget to control the level in the tank.
- The second method is to use an assistant - one person presses the pedal 4-6 times and keeps it pressed to the floor. The second unscrews the bleeder fitting; air bubbles should come out of the fitting; as soon as they stop coming out, you need to screw the fitting in and then release the pedal. And so on until normal operation of the pedal is restored and air bubbles stop coming out.
- There is also the simplest method of pumping, but which does not always work - to implement it you just need to pour liquid into the reservoir and unscrew the fitting on the working cylinder. The liquid will flow by gravity through the entire system and when it begins to flow steadily out of the fitting, it can be closed and the pumping can be considered complete.
The use of a hydraulic drive in the “seven” is caused by the design features of its clutch. It not only transfers force to the driven disk, but also allows the car to move off smoothly. True, this somewhat complicated the design of the car and its operation. Therefore, it is necessary to know how the VAZ-2107 clutch cylinder is designed, its operating principle and operating features.
Read also: Car back massager
Interesting fact: where does sand come from in the clutch drive?
Sometimes auto mechanics repairing the clutch drive see a sediment in the brake fluid that resembles small grains of sand. There seems to be nowhere to get sand in such quantities.
The reason for the appearance of sediment is that most brands of brake fluid are unstable to electrical influence, and when exposed to even very low voltage, some components of the fluid precipitate (crystallize). But where does the electricity come from in the system if the wiring is in good condition?
As it turns out, the cast-iron cylinder body and aluminum piston create a small electrical potential in the presence of brake fluid, which is why crystallization of the fluid elements begins. For this reason, many manufacturers make pistons from polymer alloys, which, in addition to neutral interaction with metal, also have a reduced impact on the cylinder bore. The second option is a brass piston, but the price of such a part can scare off even the most daring buyer.
For a longer service life of the entire hydraulic clutch system, there is nothing better than timely replacement of brake fluid, because over time it also develops anti-corrosion additives and turns into an aggressive oxidizer. With regular maintenance, the system will not be damaged by daily standing in traffic jams, cast-iron-aluminum parts, or other loads.
Removal and repair
Regardless of whether the owner decided to restore the GVC or preferred to buy a new one, the first step is to dismantle the old one. To work you will need:
- set of spanners;
- medium sized screwdriver;
- pliers;
- brake fluid for topping up;
- repair kit for clutch cylinder VAZ-2107 (in case of repair);
- small container for draining brake fluid.
The sequence for removing the clutch master cylinder is as follows:
- It is necessary to drain the brake fluid from the reservoir. This can be done using a syringe. However, it will be more professional and faster to loosen the clamp, remove the hose from the fitting and quickly place a suitable container under it.
- Using a 10mm open-end wrench, unscrew the metal tube from the main center and move it to the side.
- Using a 13mm socket, unscrew the two nuts securing the cylinder to the engine compartment bulkhead.
- The GCS can be removed.
First of all, the cylinder must be inspected. This will help you decide on repair or replacement. It makes sense to restore the cylinder only if the rubber seals are worn out. The work is carried out in the following sequence:
- Unscrew the plug at the end of the GCS; if necessary, it will have to be clamped in a vice.
- Pull out the return spring.
- Using a screwdriver, remove the rubber cap.
- Now you need to remove the retaining ring.
- Using a screwdriver from the side of the unscrewed plug, push out the cylinder piston.
- Replace all rubber gaskets, rings and seals. To make installation easier, they must be pre-lubricated with brake fluid.
Read also: Craft clutch on Priora
Assembly and installation of the VAZ-2107 clutch cylinder is carried out in the reverse order. After installing the reservoir, it must be filled with brake fluid. True, the clutch will not work yet. Air must be removed from the system.