DIY differential for walk-behind tractor
The differential allows you to reduce the turning radius and increase the wheel track width.
Due to this, walk-behind tractors become more mobile in operation. There is no chance that it will unexpectedly tip over when turning. The differential allows you to lock one of the wheels, due to which independent wheel movement provides smoother turns. Without the use of physical force, the turn increases to 240 degrees. Thus, due to this agricultural device, walk-behind tractors can make any turns easily and quickly at the end of the bed.
In this article we will talk in detail about how to design a differential for a walk-behind tractor with your own hands, and we will tell you about all the advantages and disadvantages of homemade products.
Simple homemade agricultural structures
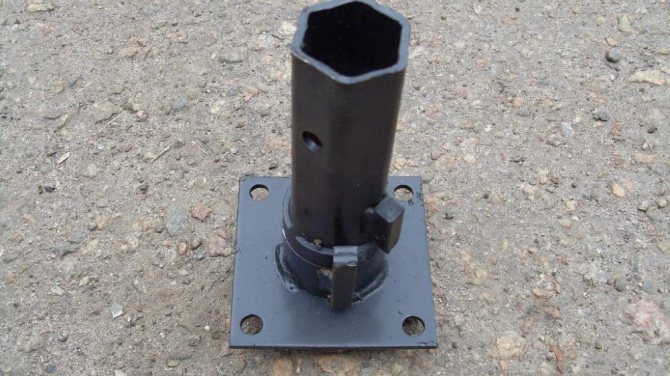
How to make a differential with your own hands? The easiest way to construct a homemade differential is as follows. You need to attach a bushing that has a transverse slot to the walk-behind axle. You need to place a short axle inside the bushing, and you can secure it from falling out using bolts inserted into the “body” of the bushing through a slot. The wheel itself is fixed on the axial side.
During operation of the walk-behind tractor, the drive axle easily rotates the bushing until the reverse slotted side presses against the bolt.
When turning the wheel, the wheel, trying to “get ahead” of the drive, pushes the bolt forward along the hole. Thus, the transmission of the turning element is “broken.” The angle of easy turning of agricultural machinery depends on the slotted length. This extension mechanism is very simple. It is quite possible for a junior specialist level turner to make it. That's why these extension cords are so popular and relatively inexpensive. As a rule, they are made with a couple of holes. Due to this, the track width can vary and connect the drive axle to the wheel.
Screw self-blocks
Continuing the topic of self-locking differentials, I decided to dwell a little more on the choice that Bronto company specialists made when creating their Lynx-1.
Why? Yes, because the Lynx, although a tuned car with increased cross-country ability, like the standard Niva, has retained its versatility. It feels great both on asphalt and off-road. So. Lynx -1 is equipped with self-locking screw-type differentials in the front and rear axles. The main advantages of self-locking differentials.
1. A self-locking differential allows you to partially eliminate slipping at different coefficients of adhesion of the vehicle wheels. 2. A self-locking differential increases the vehicle's maneuverability and controllability when driving on roads with different surfaces. 3. A self-locking differential improves vehicle acceleration dynamics on roads with any surface. 4. Self-locking differential does not require additional effort from the driver. Under normal driving conditions, they work like a classic differential, and when one of the wheels begins to slip, they are blocked. As a result, torque is supplied to both wheels, and the car continues to move! Their main drawback is that when entering a turn, the “self-block” tends to spin the drive wheels at the same speed and the car strives to drive straight, despite the fact that the driver turns the steering wheel. further Example of driving with free cross-axle differentials: as soon as the car hits an uneven surface, two unloaded (front and rear) diagonally located wheels - which have the least grip on the surface - receive all the torque. While the wheels, standing firmly on the ground, remain idle. Reverse example: The video clearly shows that the suspended wheels work equally as they touch the ground, and the car overcomes the terrain without any problems. The operating principle of a self-locking helical differential and what is preload The figure shows a sketch of a limited-slip differential. When one of the wheels (for example, the right one) begins to lag behind, the side gear 4 associated with it rotates slower than the housing 1 and turns the satellite 5 engaged with it. It transmits the movement to the associated satellite 5 from the left row, which, in turn, left side gear 3. This ensures different angular speeds of the wheels when turning. Due to the difference in torque on the wheels in the screw engagement, axial and radial forces arise, pressing the semi-axial gears 3, 4 and satellites 5, 6 with their ends to the housing 1, 2. The satellites 5, 6 are also pressed against the surface of the holes 8 in which they are located. Due to this, forces arise that carry out partial blocking. Preload As a result of the operation of any screw-type or cam-type cross-axle self-locking differential (hereinafter referred to as “self-locking”), short-term peak loads appear in the vehicle transmission, which contribute to increased wear of transmission parts. When the “self-locking” system operates on the front axle of the car, an additional push force can be created on the steering wheel, which requires special care and skills of the driver and sharply reduces the car’s handling characteristics for a short time. The preload clutch connects the axle shafts with a certain force, specified by the preload value. When the force is exceeded, the axle shafts rotate relative to each other and the mechanism works like a regular screw lock. The preload clutch used in “self-blocks” produced by VAL-RACING: - allows you to eliminate the occurrence of peak loads in the vehicle transmission and on the steering wheel; — promotes earlier activation of the self-locking device in driving conditions that require increased vehicle cross-country ability; — in the complete absence of torque on one rotating wheel, it allows the second stationary wheel of the same axle to be reliably put into operation (the situation of starting a car in conditions of diagonal hanging or starting a car when hanging one wheel of the drive axle on a jack).* * — this property purchases a car using a “self-block” with high “preferences”, the exact values of which are currently being established by road tests. Such “self-blocks” are recommended to be installed only on the rear axle of cars used mainly for off-road driving or for participation in off-road competitions. And finally. In the first test of Bronto Lynx-1, which we conducted near Kiev - a comparison of the standard Niva and Lynx, with self-blocks - it is highlighted as a separate item. Where Niva began to dig in and was able to pass only on foot, Bronto-Lynx did not have any difficulties. Good luck to you on the roads and off them) Tags: Bronto, Mechanics, Niva, Off-road, Lynx, Samoblok, Equipment
Tags: How to make a differential with your own hands for a walk-behind tractor, video
Blueprints
To assemble a differential for a walk-behind tractor with your own hands, you will need drawings. Fortunately, there are a large number of diagrams and pictures on the Internet on how to make a differential for a walk-behind tractor with your own hands.
As a rule, experience shows that all homemade differentials for walk-behind tractors assembled according to drawings have a small possible angle of free wheel rotation (up to 250 degrees), since the transverse groove seriously reduces the power of such an agricultural device. Also, homemade differentials on a walk-behind tractor have greater friction force, especially if dirt gets inside the bushing. Therefore, self-made differentials for walk-behind tractors are usually used for lighter walk-behind tractor models, such as the Neva.
General recommendations
Here are some tips for farmers on how to assemble an excellent homemade differential for a walk-behind tractor:
- The gap between the extension axle and the bushing cannot remain too small. If the corrosion process begins, they will “stick” to each other;
- To lubricate the agricultural device without preliminary disassembly, it is a good idea to place a grease nipple on the bushing;
- Extensions can be constructed from low carbon steel. The unit will be strong, reliable, and at the same time quite inexpensive in cost.
Need for differential
Before considering the process of self-assembly of this element, it is advisable to find out why walk-behind tractors with a power take-off shaft with a differential use it. Its main purpose is the correct adjustment of the operation of the wheels of the unit. When making a turn relative to the axis, such an element allows you to prevent slipping, and will also avoid overloading one of the sides during such maneuvers. This helps to increase the service life of the suspension, due to which it is possible to make repairs much less often.
The design of such an element may seem quite complicated, but with minimal knowledge, a drawing diagram of the product, materials and tools, the master will be able to assemble a homemade differential for a walk-behind tractor without any problems.
Most popular models
There are many models on the market that come with a differential. Some of them are especially popular among modern gardeners, among them the following stand out.
- Crosser CR-M8E.
- "Oka MB-1D2M9".
- "Ugra NMB-1N9".
- Farmer FM-1309MD.
The first unit has an impressive cost. According to some users, the price is deliberately inflated, since a walk-behind tractor for 80 thousand rubles does not correspond to the functionality it has. In fact, the price of the equipment is justified if you delve into its features in more detail. It’s worth starting with the fact that the equipment in question belongs to the professional class. This means that it can no longer have a budget value. The scope of use of such walk-behind tractors is large processing areas, reaching three hectares.
The design features a 5.2 kW 4-stroke engine with a power take-off shaft (PTO). Attachments are mounted in the same way as on mowers. This was made possible thanks to the front PTO. The diesel unit has an electric starter. The walk-behind tractor is supplied disassembled, since this is the only way to transport it. The plowing width is 750 mm, and the clutch is a belt design.
If we talk about the horsepower of such a walk-behind tractor, it is equal to 8. The immersion depth of the cutter is 180 mm, and the total weight of the model is 225 kilograms. The fuel tank can hold 5.5 liters of fuel.

Users could not help but note the numerous advantages of the heavyweight, including:
- ease of control;
- frame reliability;
- excellent cross-country ability regardless of soil type;
- high efficiency in performing any work.
The manufacturer took care to make the walk-behind tractor handle as user-friendly as possible. It is easy for even a beginner to work in virgin soil, since the diesel unit has the power necessary for high-quality plowing.
Special attention can be paid to the vehicle's maneuverability. Excellent performance was achieved through the use of large-diameter wheels and their aggressive treads in the design. The user makes his choice in favor of this walk-behind tractor also due to the presence of a water cooling system and a plow included in the package. During operation, the equipment does not make much noise, which is also important. The average motor life is 3100 hours. Simple and quick starting from the starter is made possible due to the decompressor.
"Oka MB-1D2M9" has an affordable price and is available for sale for 39 thousand rubles. Its power is slightly lower than that of the previous walk-behind tractor, and there are only four speeds - two in each direction. If necessary, the operator can change the plowing width from 720 mm to 1130 mm, which is very convenient. The immersion depth of the cutting part is 300 mm.
The design features a chain-type gearbox, which ensures its reliability. The volume of oil required is up to two liters. The equipment is supplied complete with pneumatic wheels, four cutters for loosening the soil and a coulter.

Walk-behind tractors under the Ugra brand are no less popular , since their price and build quality, together with the equipment, represent an ideal union. The price of the unit reaches around 55 thousand rubles. The ground clearance is 17 centimeters, hence the excellent maneuverability. There is a reduction gearbox and a fuel tank made of metal.
The speed is 3.6 km/h, which is quite high for such a vehicle, and this is only in first gear. At third speed the figure increases to 8.52 km/h. The engine power is 6 horses, and the fuel tank volume is standard - 3.6 liters. The transmission consists of a manual gearbox, a gear reducer and a universal hub. The total weight of the completed model is 85 kilograms.
Types of mechanisms
There are several types of distribution mechanisms used in various models of walk-behind tractors. They differ significantly in their performance characteristics and have their own advantages and disadvantages. Most often, the unit can be equipped with the following components:
- rigid drive, which provides for uniform distribution of power across a pair of wheels, which is most often used on two-axle modifications;
- overrunning clutch, characterized by a simple design, capable of increasing the torque of 1 drive wheel through more active rotation of the axle;
- classic gear-type differential, which allows you to distribute the load between the axles when turning in inverse proportion.
The last variety, which seems to be the most effective, deserves special explanation. A walk-behind tractor with a differential lock is capable of increasing torque on one side when turning and significantly reducing it on the other, which allows you to successfully complete the maneuver.
Differentials, unlockers, overrunning clutches, etc.
Yeees! But without diffs I drove five times or more. I can’t say for sure, I don’t have a speedometer
Well, any diff is connected to the wheels or gearbox using holes and bolts. I think they won't break much less.
And another minus is the large camber of the wheels due to additional play in the diff itself. This of course does not apply to serious diffs.
I am more tormented by the question: How does the gearbox feel better, with or without a diff?
ZeVic wrote: I am more tormented by the question: How does the gearbox feel better, with or without a diff?
If the design of the differential causes dynamic shocks on the output shaft of the gearbox, then I think it will be easier for the gearbox without a differential.
Yes. But on the other hand, there are the typical twisting moments on the output axis of the gearbox when turning.
Once upon a time, your sales consultant at Budyonny did not recommend differentials for Salut. He said that this is an additional load on the gearbox. He referred to specialists from the factory.
ZeVic wrote: Yes. But on the other hand, there are the typical twisting moments on the output axis of the gearbox when turning.
Example (probably not a good one?)
Try pushing a nail into a board with a hammer without swinging it.
(Static load) And by swinging a hammer, a craftsman will drive a nail into the board with one blow. (Dynamic load uses inertial forces)
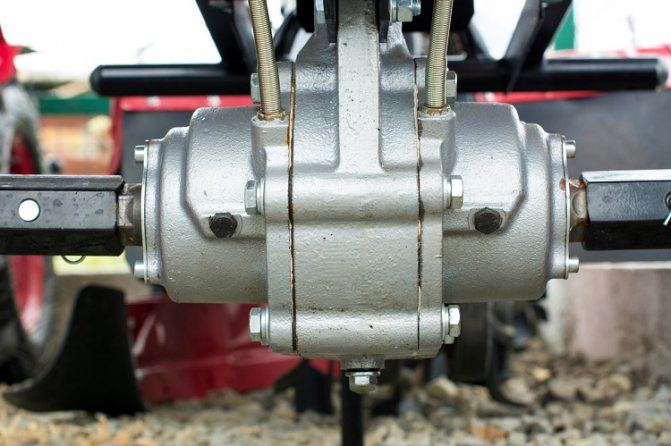
Making a differential
Motoblocks with a differential and disc clutch are in great demand among farmers, due to their many advantages. When planning to equip a product with this element or replace a damaged analogue, you can make it yourself.
You will need to decide on the type of distribution mechanism, as well as select a suitable part drawing that will be used throughout the assembly to avoid errors. It is extremely important to first adapt it to the model of walk-behind tractor used, which will ensure the correct operation of the element. Assembly will require fasteners, as well as a powerful drill.
What is needed for production
When planning to make this element yourself, you will need to make sure you have the necessary parts and tools. The main material for turning differential components is steel blanks that do not have wear, which will guarantee a long service life of the element.
When considering the tools necessary for successful assembly of the unit, it should be noted that their exact list depends on the type of device being manufactured. In most cases, a drill and cutting tools will be enough for the master, but for more complex designs a lathe may be required.
Procedure
A walk-behind tractor with a low gear and differential has many advantages over analogues that do not have similar elements, and therefore it is advisable to make them yourself. Having made sure that you have everything necessary to create a differential, you need to follow the simplest algorithm of actions:
- Attach a bushing with a transverse slot to the walk-behind tractor axle.
- Place the short axis inside the installed element.
- Secure it with fasteners to prevent it from falling out.
- Place the wheel on the axle base.
How to choose
Before choosing a walk-behind tractor from a certain manufacturer, you need to take into account some features of the models:
- functionality;
- plowing parameters (width of strips, depth);
- engine characteristics (power first);
- weight.
If the equipment is for general use, where the processing area is small, then there is no point in overpaying for power and performance that ultimately will not be needed. It is better to inquire about the attachment of attachments and the functionality of the walk-behind tractor.

It is worth remembering that equipment with a large weight is considered professional; its power sometimes reaches up to 16 hp. pp., hence the high cost, attractive capabilities, but also the complexity of management. It’s good to have a walk-behind tractor with a low gear, wheel locking and unlocking, or a differential extension. But the price of such a full-fledged unit will be much more expensive. If you need the latest compact unit, then you should take a closer look at simpler models.
Next, see the review of the Brait-135gbd walk-behind tractor with a differential.
Design and purpose of a walk-behind tractor differential
The main purpose of the walk-behind tractor differential is to distribute power more evenly between the wheels of the walk-behind tractor.
The differential will be especially useful when turning. To turn a walk-behind tractor, you usually need to put in a lot of effort, especially if the equipment has lugs and attachments. The differential allows for easier turning due to faster wheel rotation. Thanks to it, the wheels rotate faster than the one that occurs only due to the axle. For different models of walk-behind tractors, differentials have their own design features and differences. For example, for light Neva walk-behind tractors, differentials with a small wheel rotation angle (240°) are used. Also, due to the transverse groove, it has little strength; strong friction of the parts is observed inside the mechanism.
Motoblocks from Salut are equipped with differentials of a more complex design. They are distinguished by greater mass and wheel rotation angle (about 330°). The extension has bearings, which reduces the effort when turning.
For Farmer brand walk-behind tractors, differentials consist of two clutches, and control is carried out using levers on the steering wheel.
Differential for a walk-behind tractor - how it works and what it’s capable of
Diary entry created by user CaimanTeh, 02/26/15 .807,
Recently, a video of the Caiman Vario walk-behind tractor with a snow thrower attachment was posted on YouTube. During the story about the features of winter use of the walk-behind tractor, “additional differentials” installed on the wheels were mentioned.
To demonstrate the differentials, Denis turned the walk-behind tractor back and forth. The demonstration was short, but this option interested the participants in the Pubert & Caiman Motor Tillers
In the topic, it seemed like they quickly figured out what these additional differentials were for a walk-behind tractor, but since the question arose, I decided to make a short photo report. After filming, the demonstration walk-behind tractor with a differential was full of gasoline and oil, so it was taken to the service room. It's cramped there, there's a lot of other equipment around, so we couldn't spin it. All I got from Caiman Vario was a photograph.
Differential for Caiman Vario walk-behind tractor
So, here are these differentials, or rather semi-differentials installed together with standard rubber wheels of size 4.00-8. (The set of two semi-differentials is called “Differentials with extensions for the VARIO/Q Junuor/Q Max walk-behind tractor” and has code R0101.)
How it's done
The design of such differentials for walk-behind tractors (and walk-behind cultivators, by the way) is extremely simple:
- the wheel hub is not secured to the axle
- there are protrusions on the axle and hub (indicated by green arrows) that prevent the wheel from turning a full turn
How it works
During normal movement of the walk-behind tractor, the protrusion on the axle rests against the protrusion on the hub and transmits rotation to the wheel. In this case, both wheels will rotate simultaneously.
But if you push the walk-behind tractor forward, the differential hubs will work as overrunning clutches, and the protrusions on the wheels will “run away” from the protrusions on the axle. They won’t be able to run far - having made almost a full turn, the protrusion on the hub will touch the protrusion on the axle, but this will be enough to complete the maneuver.
After completing the turn, the walk-behind tractor with the differential will be able to move only at the expense of one wheel until the protrusion on the axle of the second wheel “catch up” with the protrusion on the hub. It is also possible to slip one wheel until the “unlocked” one comes into working condition.
Why do we need differentials for a walk-behind tractor?
To put it simply, the walk-behind tractor needs differentials to turn at the end of the furrow. This is how the same Caiman Vario turns around on lugs and without differentials.
To turn the walk-behind tractor and return to the cultivated area, the lugs have to be dragged along the ground. And here it all depends on the weight of the walk-behind tractor (or cultivator) and the strength of the operator.
At the end there will be a video showing how much differentials make this task easier.
Differentials on the Pubert Quatro Junior walk-behind tractor
Above was a picture with a differential hub different from that installed on the Caiman Vario - in the showroom there was another walk-behind tractor with a similar design of differentials.
Differentials on the Pubert Quatro Junior walk-behind tractor
Unlike previous domestic differentials suitable for several models, these are part of the native French “Plowing Kit” (code 8000010205) for the Quatro Junior and QJ V2 models (Caiman, Pubert and MasterYard, including models with a diesel engine) which includes includes:
- differentials
- wheels 5.00-10
- weights
- reversible plow
Quatro Junior with this kit has a wide track and weighs over 100 kg. In order to turn it around with its wheels locked, you need to be either very strong or very stubborn. In any case, such a turn at the end of each furrow will take a lot of time and effort in total.
Being roughly in the same weight category with walk-behind tractors, I decided to fight him. To do this, I rolled it out into the open area of the showroom.
Testing the capabilities of differentials on a walk-behind tractor
I filmed the testing. There were several tests, one of them was caught on video. The video clearly shows how the wheels rotate during a turn.
The maximum rotation angle is 270 degrees (3/4 turn), the minimum is 180 degrees (1/2 turn). In real work, it is better to rely on the minimum value. A 270-degree turn turned out to be possible due to the artificiality of the situation and the pushing of the walk-behind tractor back and forth. Although, in real life, a 3/4 turn is possible.
The rubber wheels squeak terribly on the marble when turning, and when locked they do not move at all. This can be seen in the video at the beginning and end of the spread. Attempts to move this hundredweight with locked wheels led to nothing.
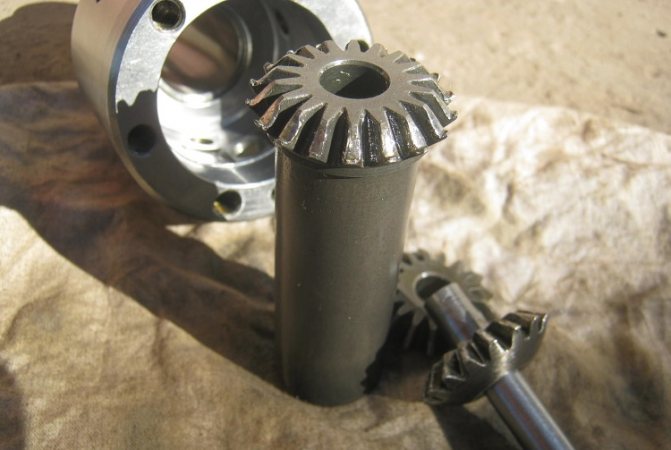
How to make a differential for a walk-behind tractor with your own hands?

To avoid unnecessary financial costs, you can make a homemade differential. This process is not complicated, and the availability of freely available drawings and various materials makes the task even easier.
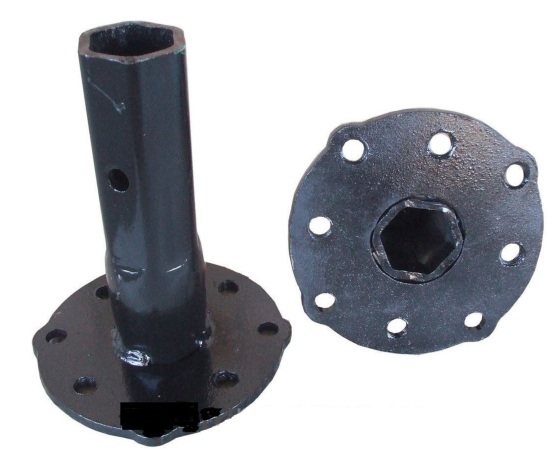
The manufacturing process looks like this:
- using a lathe, a part is turned according to the drawings;
- the flange is turned out and carefully welded to a part of the metal pipe;
- To make a differential, use only high-quality steel blanks, since this part is subject to high loads.
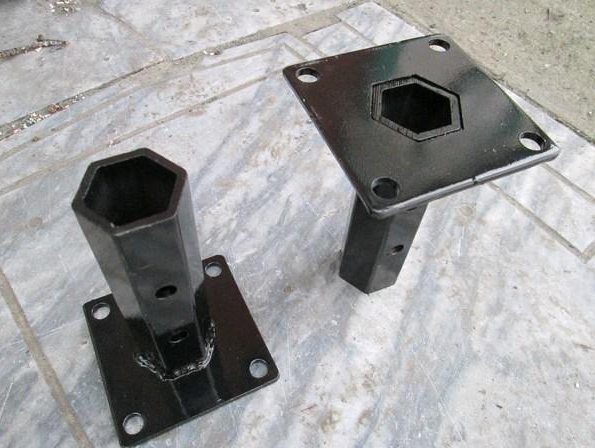
Characteristics and types of hubs for walk-behind tractors

A hub for a walk-behind tractor is needed to install pneumatic wheels or steel lugs.
Walk-behind tractor wheel hubs come in 3 main types:
- differential hub with unlocking;
- semi-differential hub (simplified version of the previous one);
- the hub is ordinary.
A differential hub for a walk-behind tractor is considered a universal part and is needed in cases where the walk-behind tractor is not equipped with a wheel unlocking system, and turning the vehicle around causes difficulties. The hub with bearings greatly facilitates control and improves maneuverability. To perform a turn, you just need to remove the lock from the lock of the required wheel.
Based on the diameter of the hub, they are classified into:
- hexagonal (24 and 32 mm);
- round.
Self-production of a hub for a walk-behind tractor
As already mentioned, there are different options for the design of hubs for walk-behind tractors. To make the simplest version, you can use the following drawing:

The main thing to remember when making your own is to follow safety precautions and use high-quality materials for a longer service life of the part.
We also invite you to watch a detailed video that describes the intricacies of making a homemade hub for a walk-behind tractor:
How to make a differential for a walk-behind tractor with your own hands?
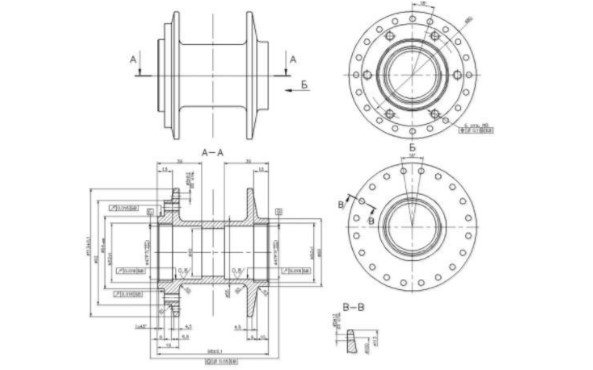
Despite the fact that the differential for the walk-behind tractor has a rather simple design, before making it yourself you will need to prepare and study the drawings. They should indicate the dimensions of the mechanism spare parts and methods of fixing them in the device.
Practice shows that every homemade differential has a small rotation angle of the wheels in the free position. As a rule, this parameter does not exceed 250 °. This disadvantage is due to the fact that the design of the mechanism includes a transverse groove, which significantly reduces the power and efficiency of the design. Another significant disadvantage is the rapid wear of the parts of a homemade differential, especially if a large amount of dirt accumulates between them. In this regard, self-made differentials should be used for exceptionally light models of walk-behind tractors.
In order for a homemade differential to be more durable and effective, you should adhere to a number of rules:
- there is no need to leave too small a groove in the space between the bushing and the extension axle. If corrosion occurs, these parts will quickly stick to each other;
- in order to timely lubricate the differential without regularly disassembling it, you need to place a pressing oiler on the mechanism bushing;
- For the manufacture of extension cords, it is best to use carbon steel. As a result, the mechanism will be more reliable and, at the same time, not expensive. The video will tell you more about making the differential.
- ordinary hub - a part of this type has a simpler design, but is less efficient in use. It only slightly improves the maneuverability of the walk-behind tractor, so every year it is in less and less demand among farmers.
Differential hubs, or semi differentials as they are also called, consist of one or a pair of bearings, as well as retainers. When using such a part, in order to turn the walk-behind tractor, it is necessary to disconnect the lock from the corresponding latch.
Depending on their diameter and shape, differential hubs for walk-behind tractors can be of the following types:
- round hub;
- sliding part;
- hexagonal hub - can have a diameter of 24 or 32 mm.
This kind of classification of semi-differentials allows the farmer to select the part that is optimally suited for installation on his walk-behind tractor and will bring maximum benefit when used.
DIY gas stove repair
dom_servisIf one day you discover that your gas stove has stopped burning its burners, then do not rush to call the emergency service.
Often this problem can be solved on your own, and moreover, in just 5 minutes. One simple cleaning of the connections and contacts can bring your gas stove back to life - repairing a gas stove with your own hands is possible. Warning No. 1: Any repair work that is related to the gas supply must be carried out by professional technical services. Before we get down to business, I must warn brave and daring craftsmen not to neglect in any case the rules and regulations of technology. The following tips for cleaning gas stove components, setting up and adjusting the stove are not very dangerous and do not require turning off the stove. HOWEVER, no one is safe from accidentally turning the gas supply control knob, so it is still necessary to turn off the gas tap while cleaning the stove. In addition, you must unplug the stove from the electrical outlet if your stove has a power cord. Let's look at the most common breakdowns and options for fixing them. Stove Ignition System 1. Check that all control switches are off, open the doors, and allow the gas to vent. 2. Hold a burning match near the stove burner. If the burner does not light within two minutes, proceed to step 3. 3. Turn the gas control adjustment screw (located near the control or thermostat) up and continue turning until you see a blue flame. Cleaning the Burner Channels 1. Check that all gas control devices are turned off. 2. Remove the bottom of the slab (usually secured with tabs or fasteners). 3. Remove the partition under the stove from below. 4. Turn on the oven and watch the burners. If the flame is not continuous along the entire length of the burner, some of the burner passages are clogged. Turn off the oven and let the burners cool. Clean each channel in the burner using a sewing needle. What should a configured gas stove look like? The flame should be blue, symmetrical in shape, and about 2.5-5 cm in size. Ragged flames and hissing flames indicate that there is too much air. A yellow-orange flame indicates that there is too little air. Before adjusting the flame, make sure the gas stove is turned off and cool. Adjusting the Gas Stove Flame During Gas Stove Repair 1. Make sure all gas controls are turned off. Open the door and remove the stove partition from below (see above). 2. Turn on the stove and check the flame. 3. Find the air damper that we will adjust. It can be located near the stove burner, just above the safety valve, or placed along the gas supply pipe. 4. Loosen the set screw (headless screw) that locks the damper or plate and adjust the opening to increase or decrease the amount of air/gas mixing. 5. Turn on the oven and check the settings again. If necessary, repeat the procedure. 6. Once the flame is properly adjusted, turn off the oven and tighten the set screw. Check and replace the stove with piezo ignition 1. Turn off all control devices 2. Open the door and remove the lower partition of the stove (see above). 3. Unscrew the igniter from its mounting on the bracket and inspect it for cracks or other defects. Replace it if it is damaged. 4. To replace a faulty igniter, locate the ignition control module, unscrew the cover and disconnect the module. Reinstall all parts and test. Replacing Door Base Gaskets 1. Unscrew the door hinges above the handles and remove the cover. 2. Remove inner panel edges and screws as necessary. You may have to carefully pry back the hinges and remove the cover. 3. Remove the screws holding the glass panel unit. 4. Remove the block glass by disconnecting the attached gaskets. 5. Remove the gasket between the glass unit and the inside of the panel door. 6. Install new gaskets in the reverse order (see above) or according to the manufacturer's instructions. Do-it-yourself gas stove repair, setup and adjustment are possible, but we repeat once again: be extremely careful!
Tips for choosing a hub for a walk-behind tractor
On the open market you can always find a large selection of hubs designed for installation on various models of walk-behind tractors.
In order not to make a mistake when choosing a part, farmers should adhere to a number of certain rules:
- when ordering a hub for a walk-behind tractor, you should indicate the class and model of the agricultural implement;
- in most cases, when selling a walk-behind tractor, one set of hubs is included in its kit. In this case, when using attachments, there is no need to rearrange the hubs. This, in particular, applies to the lugs used on the walk-behind tractor. This feature will save a lot of time when working in the garden;
- If the walk-behind tractor is equipped with pneumatic wheels, then its delivery set will necessarily include hubs.
By adhering to these simple rules, every novice farmer will be able to choose a walk-behind tractor equipped with hubs or choose the right parts, separately from the agricultural machine.
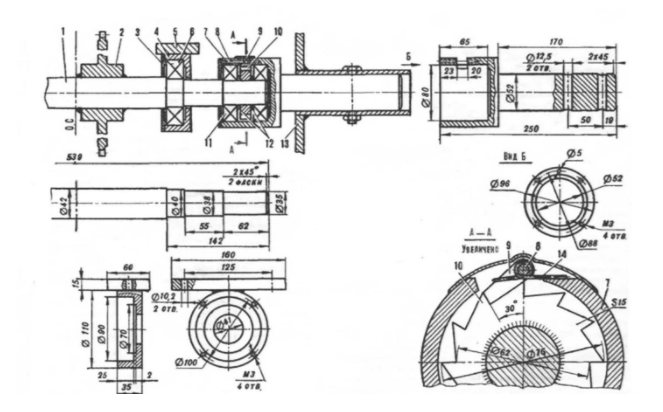
Making a hub - step-by-step algorithm
As in the case of a differential, to manufacture a hub for a walk-behind tractor, you will need to prepare drawings. A detailed diagram will make it possible to complete the work faster and avoid common mistakes.

The correct sequence of actions when making a hub is as follows:
- First you need to grind the workpiece. To do this, any metal part is taken and processed on a lathe;
- A fairly popular option is to make a flange and then weld it to a metal pipe or rod. When processing a part, you should be extremely careful and observe the dimensions indicated in the selected drawings;
- It should be remembered that during operation the hub will be subject to constant loads, which is why it is better to choose a reliable material for making it yourself - for example, hardened steel.
After manufacturing the hub, it can be installed on the walk-behind tractor and tested in operation. You should not place high loads on the part immediately after installing it on the unit - otherwise it may become deformed. It is best to walk with the walk-behind tractor several times on a flat surface in the yard, turning the car around several times. After this, the hub will finally fall into place, and the unit with it can be used for work in the garden.
A self-made differential or hub can be successfully used to equip Neva brand walk-behind tractors. The design of the units of this brand allows you to easily install the part, and, if necessary, remove it easily and quickly.
Attachments for Oka walk-behind tractors
The attachments produced by the plant significantly expand the capabilities of this type of motor vehicle. The following is an overview of all factory additional elements for the Oka walk-behind tractor, their characteristics and a description of the principle of operation.
All Kadvi attachments combined with the Oka walk-behind tractor are also suitable for the Ugra.
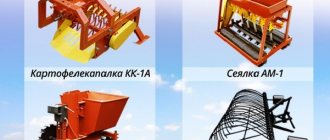
Potato planter
A potato planter is a device that is used to automate the process of planting potato tubers.
The planter embeds root crops into the ground, forming a soil ridge on the surface of the earth.
| Performance | 0.25 ha/hour |
| Weight | 34 kg |
| Planting hopper capacity | 33 l |
| Distance between tubers | from 30 cm to 50 cm |
| Track width | 0.7 m. |
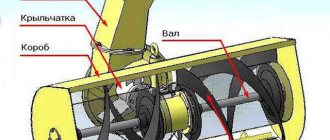
Cultivator cutter
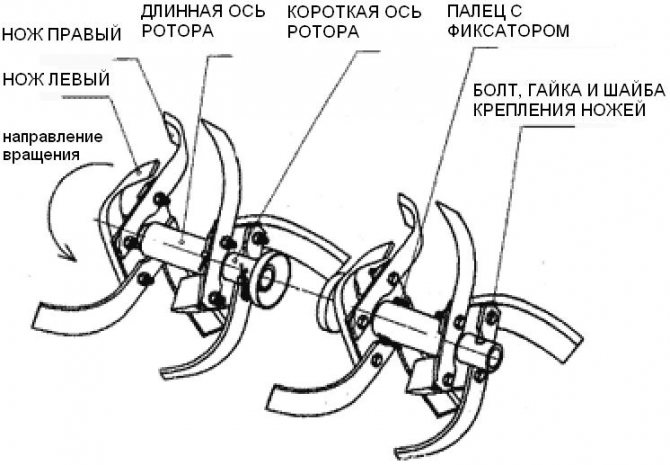
This equipment is designed to loosen the earth. The cutters crush the weeds, and when throwing fertilizers into the ground, they mix them thoroughly. Installation is carried out on the output shaft.
The cutters with a diameter of 34 cm produced by Kadvi are designed for a cultivation depth of up to 20 cm, and the gripping track width is 10.5 cm. The total weight of the two cutters is 17.2 kg.
Please note that the Ugra walk-behind tractor has hexagonal cutters without connecting pins - this prevents grass fibers from wrapping around the part during the cultivation process. Such equipment is additionally equipped with protective disks.
The diagram below shows the assembly diagram of the cutter for the Oka walk-behind tractor.
Plowing with cutters - video review:
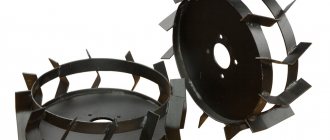
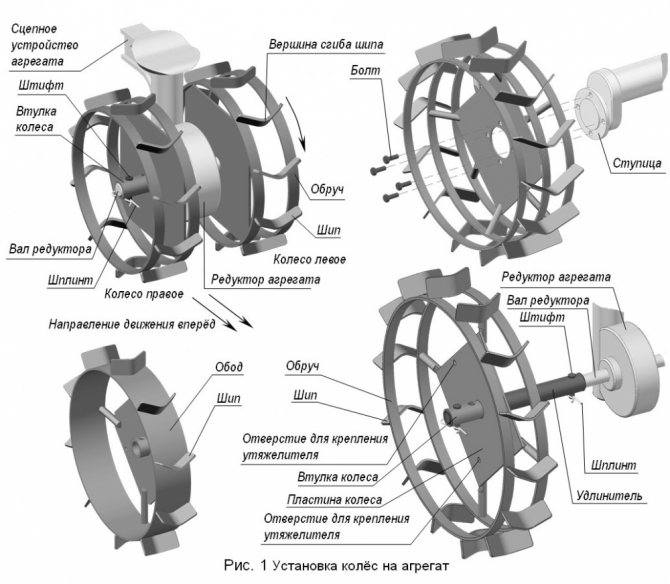
Lugs
The use of lugs gives the walk-behind tractor the opportunity to grip more with the top layer of soil, automatically stabilizing the unit and providing more powerful force for plowing or hilling.
Equipment of this type is attached to the location of the wheels or cutters. Some walk-behind tractors require additional long hubs for installation.
The diameter of factory lugs from Kadvi for Oka walk-behind tractors is 350-500 mm and depends on the modification of the motorcycle. Maximum weight - 18.8 kg.
The figure demonstrates the process of installing lugs on a walk-behind tractor.
Weighting weights
Oka walk-behind tractors are classified as heavy equipment; the name itself speaks for itself - a walk-behind tractor is always heavier than a cultivator. However, even when working with heavy equipment, additional weight may be required. It is for these purposes that weights are intended.
The weight of such cargo can reach 5-17 kg. Homemade attachments may weigh more than the factory standard.
The plow for "Oka" is suitable, like other types of attachments, for the "Ugra" walk-behind tractor. It is used for plowing and fertilizing the soil.
Some implement stores sell plows with or without a hitch. The plow is attached to the walk-behind tractor using a set of fasteners, a hitch and a wrench.
The dimensions of the factory product are 535x310x410 mm. The width of the layer of earth that the plow can capture reaches 21.5 cm. Weight - 7.8 kg.
Raspashnik, hiller
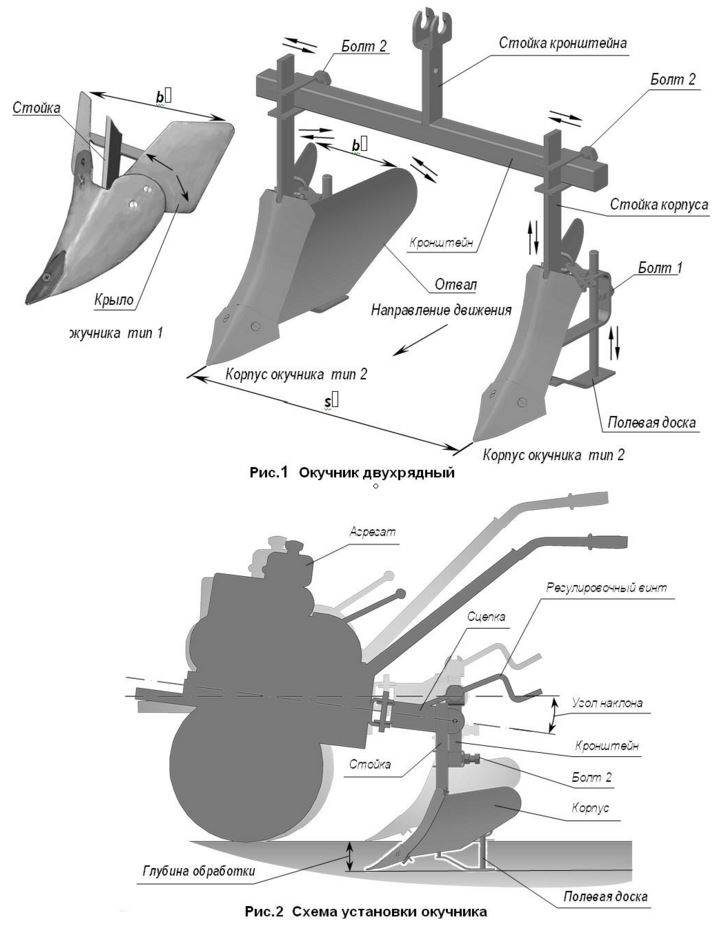
A hiller or tiller is an attachment that is used to add fresh soil to the beds, as well as loosen it.
The hiller can be single-row or double-row, disk, or propeller. The simplest and cheapest is single-row.
These devices are also divided by working width (fixed or adjustable).
The figure below shows a diagram of the installation of a two-row hiller on the Oka walk-behind tractor.
Standard differential
A differential is a device that performs several functions.
- The first task is to lock the rotary extension.
- The second is to reduce the radius of movement of the walk-behind tractor when turning.
- The third is to increase the maneuverability of equipment.
With the help of a differential, one wheel is locked, which is why the walk-behind tractor can turn a total of 240 degrees. The differential can be used as an independent part to lengthen the axles, for example, to hang cutters, or in combination with other attachments.
Harrow
The classic version of the harrow for the Oka walk-behind tractor, produced by the Kaluga Motor Vehicle Plant, is used for a whole range of actions on a plot of land: with its help you can level the surface of the earth after plowing, cultivate the soil between sowing rows, and also remove debris from the rows after harvesting.
Standard dimensions of the implement: width of the captured soil 80-90 cm, weight 12 kg.
Root digger
A simple digger is used to extract crops from the ground, for example, beets, potatoes. There are many devices of this nature, the simplest ones are aggregated with the Oka walk-behind tractor and mounted on the agricultural machine using simple fasteners. You can make this connection manually.
Larger diggers are more expensive, but the yield of root crops when using them will, of course, be higher.
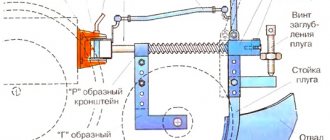
The working principle of the digger is shown in the figure below.
![]()
A short review of the converted potato digger for the OKA walk-behind tractor:
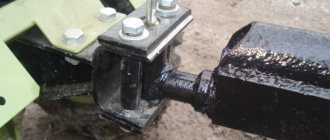
Hitch
Additional equipment, without which it would be impossible to attach many auxiliary units to the Oka walk-behind tractor. A coupling device is necessary to connect a mini-tractor with implements such as a potato digger, plow, hiller and others.
Product weight - 5.2 kg, dimensions 435x130x175mm.
Cargo trolleys
Trailed-type equipment necessary for transporting cargo, collecting garbage and other operations for moving something on a walk-behind tractor. A single-axle trolley can be loaded with a maximum of 300-350 kg.
Carts from many manufacturers are mounted with an Oka walk-behind tractor; when choosing such equipment, you should take into account the weight of the walk-behind tractor or cultivator, and also purchase an additional hitch.
Motoblock Oka with trolley TM 500:
Rotary snow blowers
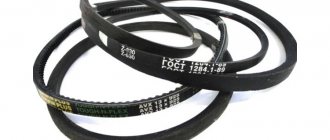
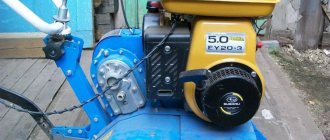
This is a device for “Oka”, also suitable for “Ugra”. With its help, you can clear the territory of your dacha, yard, or garden plot from snow. On the Oka walk-behind tractor, the drive is carried out by a V-belt drive, on the Ugra - by a power take-off shaft.
A rotary snow blower can throw snow 15 meters, and it is quite acceptable to work with it in a high layer of snow (up to 75 cm).
Motoblock shovel
Used either instead of or after a snow blower. Main purpose: leveling snow cover or a layer of dug up earth, etc.
Dimensions: 1000x280x370 mm, weight - 13 kg.
Adapters
The AMPK-500 all-wheel drive walk-behind tractor adapter can be used with heavy walk-behind tractors, including Ugra, and not just Oka. This model is equipped with rear wheel drive. The body can be easily removed.
Thanks to the use of such a device, the operator can transport loads weighing up to 500 kg.
Mower "Zarya"
Rotary mower with a productivity of 0.2 ha per hour. Works in combination with many heavy walk-behind tractors, including Oka, Ugra and others.
It mows the grass and at the same time folds it to the sides, as after using a simple scythe. It is put on a special pin at the front of the machine. It is equipped with two discs with four knives. Supplied complete with tension device.
| General characteristics | |
| Weight: | 24 kg. |
| Dimensions: | 810 mm/930 mm/780 mm. |
| Case material: | steel |
| Cutting width: | 800 mm. |
| Mulching: | No |
| Collecting in the grass catcher: | No |