Making a homemade plow for a walk-behind tractor
With the help of a walk-behind tractor, a wide variety of agricultural work is performed, such as: plowing, mowing, planting various crops, hilling, transporting goods, etc. But for each type of work you will need special attachments. In this material, we will talk about a plow, and the question arises of what to do: buy a plow, or make a plow for a walk-behind tractor with your own hands.
Plows are divided into several types, differing from each other in design. Today, single-body plows, reversible, and rotary plows are used for plowing with walk-behind tractors.
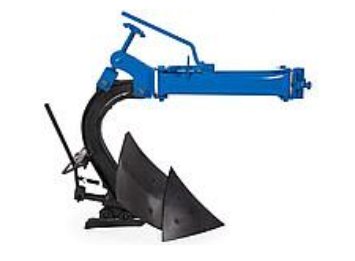
Single body plow
This plow is structurally very simple, and finding its drawings and diagrams is not a problem. Because of this simplicity, making such a plow yourself will be optimal, especially for those owners of walk-behind tractors who do not have special skills.
Making a homemade single-body plow for a walk-behind tractor will not be difficult. After all, almost everyone in their household has unnecessary pieces of metal and improvised tools.
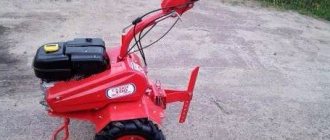
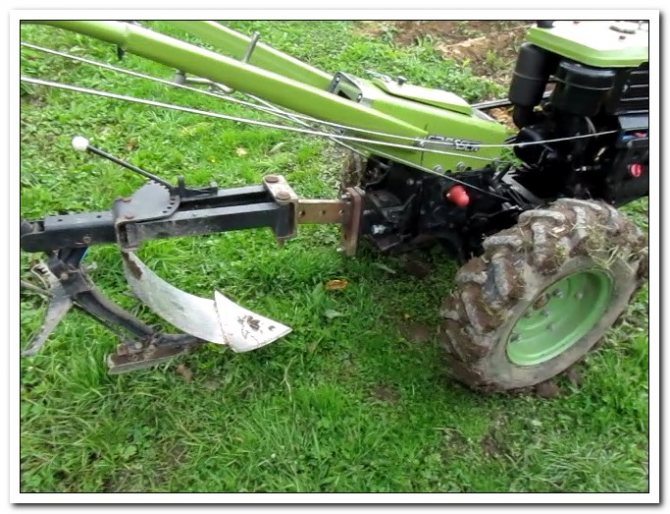
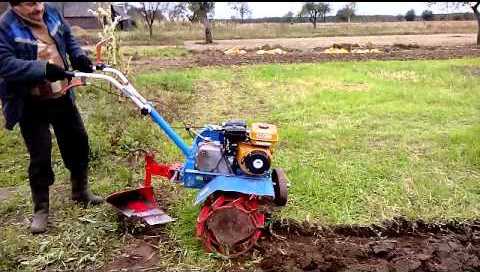
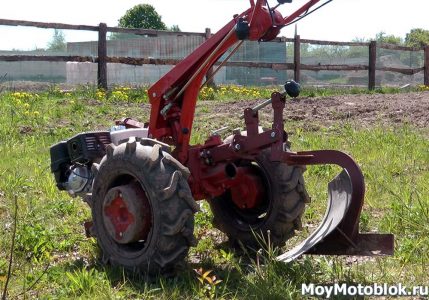
HOW A HOMEMADE PLOW PLOWS ITSELF WITH A NEVAL MOTOR-BLOCK.

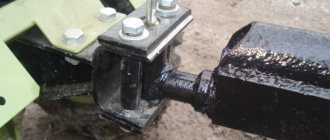
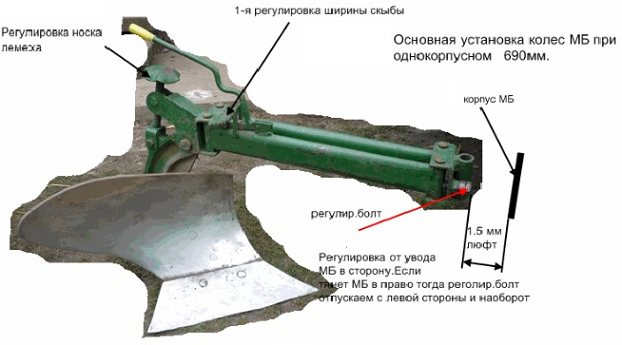
HOW A HOMEMADE DOUBLE-BODY PLOW PLOWS ITSELF WITH A NEVA MOTOR-BLOCK. Once again, the walk-behind tractor with a double-furrow plow plows itself again. Due to the correctly balanced weight on the nose of the walk-behind tractor, working with a two-furrow plow is easy, there is practically no load on the hands when turning, and it’s good that it is also possible to unlock the axle shafts. But what is the plowing depth? In many ways, the depth of plowing depends both on the weight of the walk-behind tractor and the engine power, as well as on the condition of the soil. In this case, in front of the walk-behind tractor, to counterbalance the plow, a load weighing 35 kg is installed on the nose. The weight of one wheel, together with the axle extension and the load located inside the disk, is 40 kg, so the total weight of the walk-behind tractor with the plow is about 200 kg. And given that the bottom layer of soil is still quite moist, the soil is viscous, even heavy, the plowing depth is still possible within 15 cm, with a width of 38 cm. Now about the benefits of sowing mustard at the end of last summer. And what we see is that there is practically nothing left of the huge green mass of mustard, except perhaps the remains of the root system. The top layer of soil has dried out slightly, but it is not very cracked, and at depth, due to the tubular structure of the mustard root system, the soil is so damp that periodically, mainly when turning, it is necessary to clean the ploughshare together with the blade, at least in order for the walk-behind tractor started with a cleaned plow. And this despite the fact that the ploughshare and blade are polished, almost to a mirror shine. What else I noticed is that if the speed is more than 5-7 km/h, then the soil practically does not stick to the ploughshare and the blade. As you can see, the plow with the walk-behind tractor moves on its own and is not pulled to the sides. In my case, the plow with the walk-behind tractor is fixed on a rigid coupling, and due to the spacer bolts, I make adjustments so that the walk-behind tractor always runs exactly along the furrow with the right wheel and does not go to one side or another, this method is proven. So, you can safely make a rigid coupling and adjust the straightness of the plow with the walk-behind tractor using spacer bolts on the coupling. If the walk-behind tractor pulls to the left, the plow tail needs to be moved to the right. And if the walk-behind tractor pulls to the right, we shift the tail section to the left. The principle of operation of the keel in a boat. And if there is a support wheel on the plow, in contrast to the field board, it is possible to adjust the plowing depth much more stable and with great accuracy. This will make it possible to set a plowing depth that is within the power of the walk-behind tractor so that it does not slip and does not have to be pushed. We must not forget about the working width of the plow, which is adjusted by moving the plow on the hitch to the right or left. And the working surfaces of the ploughshare and blade must be made of good steel, have correct working angles and must be polished. Good luck to everyone! Let's work while relaxing! 1. HOMEMADE PLOW FOR A MOTORBLOCK FOR TWO BODIES. Dimensions and production.
2. WHY DOES THE PLOW PLOW ITSELF? Features of adjustment and adjustment of the plow when plowing with a walk-behind tractor.
See you on the channel!!! My youtube channel: https://www.youtube.com/channel/UCTqRZ9Vw3RR5PCe4Yw7tFNQ/featured
Drawings of a plow for a walk-behind tractor
Using the experience of craftsmen who made a plow for a walk-behind tractor with their own hands and left drawings, the ploughshare should be made in such a way that it can be removed, this will make it easier to sharpen it before plowing.
Suitable steel grade 45, when hardened, brought to a hardness of HRC 50-55. If you only have ordinary steel on hand, say carbon St5ps, which is not subject to heat treatment, then by beating the cutting edge on an anvil and sharpening it, it is quite suitable for cultivating the soil.
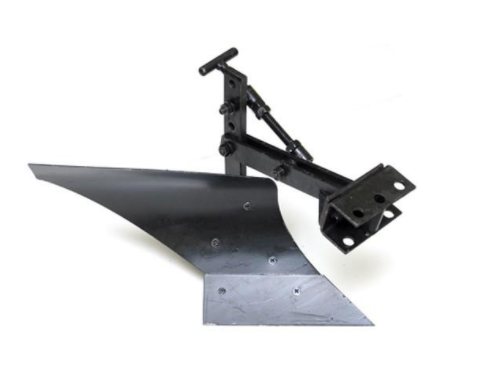
Plow blade for walk-behind tractor
The moldboard of the plow is the part that takes the earth to the side.
The first method of making a blade:
The working surface of the blade must be given a curved shape. If you have a metal bending machine or sheet bending rollers, then giving the workpiece the desired shape will not be difficult.
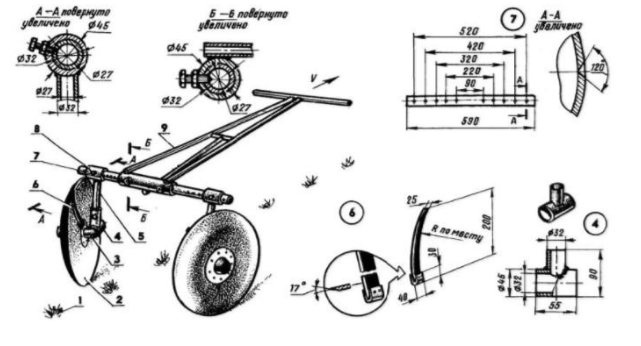
A metal blank with a thickness of 3-5 mm is required, the rollers are directed at an angle of 20-22 degrees, as shown in the drawing, and the desired bend is given.
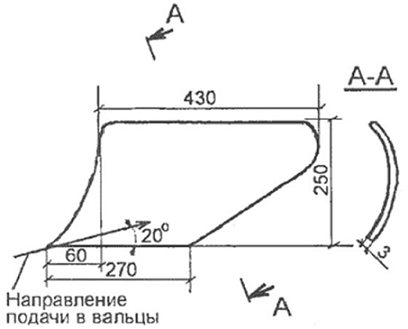
Here, prepared. A pipe with a diameter of 600-650 mm can serve (this is the diameter that will require less labor, since the bend of the pipe will maximally repeat the desired bend of the future dump) and a thickness of 3-5 mm. We make a template from cardboard and apply it to the pipe, not forgetting the angle of 20-22 degrees, as shown in the drawing below.
We outline the template with a pencil or chalk and cut it out using gas. welding, if necessary, grind the workpiece and bring it to the desired condition.
Probably the most difficult method of making a moldboard is when the workpiece is heated and, using a matrix, given the desired shape, which can be a moldboard from another plow.
The material of the plow body is steel sheet grade St3 - St10 with a thickness of 3 mm.
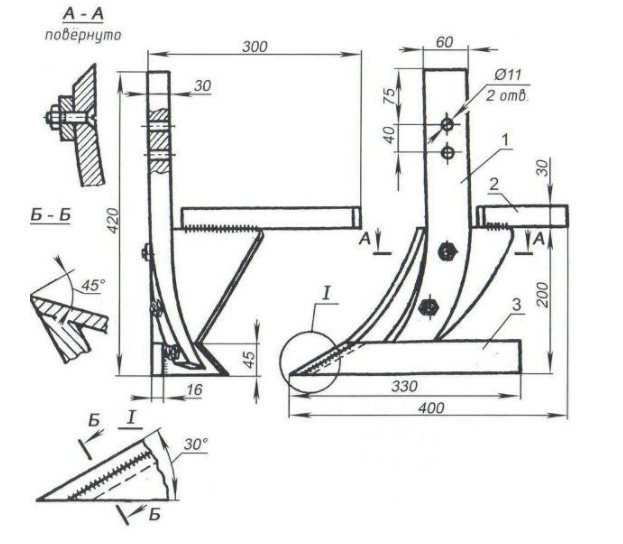
Drawing of plow parts for walk-behind tractor
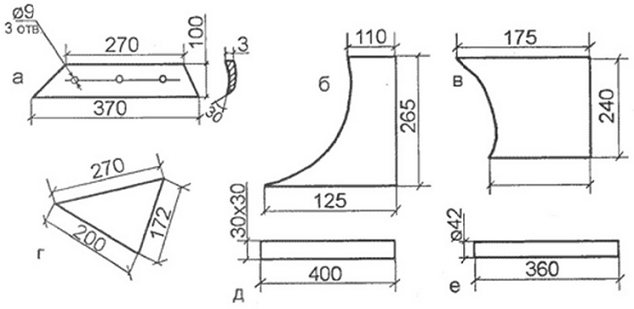
a – ploughshare made of alloy steel;
b – side shield of the rack, St3;
c – spacer plate, St3;
d – plow base plate, St3;
d – field board, corner 30x30 mm;
e – stand, pipe with a diameter of 42 mm
We advise you to first make the plow parts from cardboard and attach them to each other at the required angles. Thus, the values of the angle α on different parts of the plow body will be from 25° to 130°, the values of the angle γ - from 42° to 50°. If the homemade model of a cardboard plow suits you in all respects, you can move on to working with metal.
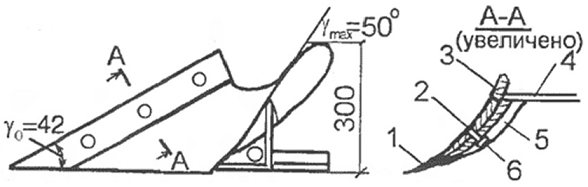
When the metal parts of the plow are ready, you need to find an additional sheet of steel 3 mm thick, 600x600 mm in size, it will be needed to assemble the plow, and a welding machine (preferably an inverter). On this sheet we retreat 40 mm from the edges and measure the angle γ0.
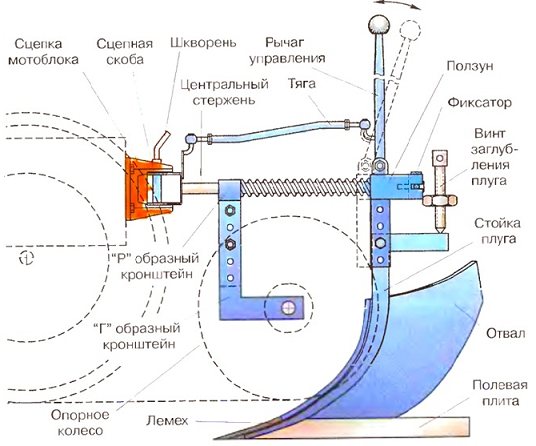
Plow assembly
2 – side shield of the rack;
3 – additional sheet 2-3 mm
Using wedges with an angle α0=25 degrees and an angle γ0=42 degrees, a ploughshare is installed on the additional sheet and tacked to the sheet by welding, pointwise on both sides.
The side shield of the rack is connected to the ploughshare vertically so that its edge extends beyond the ploughshare by 4-7 mm, while the raised shield should be higher than the blade of the ploughshare (that is, higher than the additional sheet) by 6-8 mm, so as not to interfere with the ploughshare, cut the ground. The shield is also attached to the ploughshare and to the additional sheet.
Next, the blade is attached to the ploughshare very tightly, without leaving a gap, so that their surfaces are one whole. The angle between the upper edge of the blade and the ploughshare blade is equal to (γmax − γ0) = 6-8°.
Mounting the plow share
– countersunk head screw M8;
– corner 30x30x90 mm;
If it is found that the corners and/or surfaces do not correspond, the blade is adjusted using a hammer. After fitting the blade to the ploughshare, it is welded from the back to the ploughshare and to the side shield. Then the side shield is welded to the spacer bar and the base plate; the thrust corners for the ploughshare are attached to the latter by welding.
Followed by. Inspect the finished plow again, and if everything is clearly welded completely. Add. the sheet is separated from the body with a chisel or LNA. All welds are ground.
How to make a plow for a walk-behind tractor yourself
Now we will answer a frequently asked question from owners who bought a walk-behind tractor: how to make a plow for a walk-behind tractor with your own hands. To make working elements, you need 3-5 mm steel. First you need to make a ploughshare (for example, a circular saw blade is suitable for it). The cutting part of the plowshare must be sharpened well and at an angle of 45 degrees.
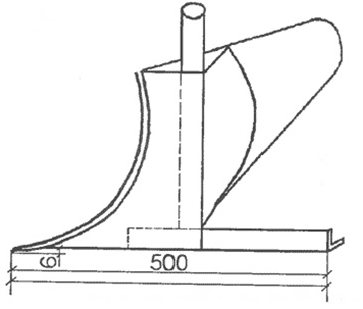
The next step will be making the blade. For it, you can take a pipe with a diameter of 0.5 m and a wall thickness of 5 mm. We cut out the blank for the blade with a cutter and polish it with a grinder.
Having finished making all the parts, you can begin to assemble the plow body. To do this, we take steel 2-3 mm thick and assemble the entire structure.
So there are several types of plows, let's look at some of their features. Plows are single-body, reversible and rotary.
Design of a single body plow
The simplest design is for a single-body plow (we discussed its production above). It is with such a plow that a beginner can start making it, and besides, there are a great many drawings of such a plow.
The reversible plow has a more complex design. This plow has a curved feather at the top of the body, which allows you to turn over the layer of earth during processing, which is especially optimal for hard soil.
To manufacture such a plow, considerable effort and much more knowledge will be required (due to a more complex drawing and a more careful selection of materials). It is also necessary to accurately follow all instructions when manufacturing such a unit.
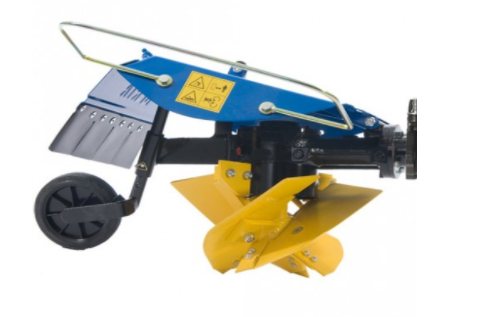
Rotary plow
The most difficult to manufacture is the rotary plow.
It has several plowshares mounted on one axis. When the soil is cultivated, the axis rotates, which allows the layer of earth to be turned over. This design allows you to use less physical force when cultivating soil up to 30 cm. It is also possible to cultivate the soil along various trajectories, and not just in a straight line.
If you are deciding whether to make a plow yourself, then we can safely assure you that it is worth it. Start with a simpler design and gradually achieve mastery in this matter. Another argument in favor of self-production is that factory-made analogues are quite expensive, so making a plow with your own hands makes economic sense.
A walk-behind tractor is like a piano – it can do anything. Some will play “Murka”, some will play Beethoven’s sonata. It depends on the person where his soul lies. Mowing the lawn means he is an esthete: white light decorates. And he accomplishes something important for the universe. For he longs for our world to be “very good,” as on the first day.
Mowing is a necessary thing. Who's arguing? But it’s also short-lived. Mow your hair while there is dew. So, hay is straw. Undisciplined business. If you want, you'll turn right, if you want, you'll turn left. The dew is gone - and the mowers have already fallen into the fresh haystack, giggling there.
But the plowman does not leave the land even in the midday heat. And then say: what will the weather be like tomorrow? When will they adapt to guessing? The plowman has no time to rest - and lunch is brought to him in the furrow. The breadwinner after all. And his work is not just important for the world - but essentially necessary. That is why, when choosing a plow for a walk-behind tractor, a farmer does not think like a child.
Since ancient times, it was believed that when a young man got up to plow the land, he became a grown man. How he went to war. And to choose the right tool: so that it doesn’t take up unnecessary strength, and you’re not ashamed to look back at what you’ve done in the twilight - this is the first thing.
How to install a plow on a walk-behind tractor
Before you begin setting up and installing the plow, you need to prepare the walk-behind tractor itself. The installation begins with the installation of the walk-behind tractor at the work site, the wheels are dismantled and the lugs are installed. (See Do-it-yourself lug lugs for a walk-behind tractor). The lugs give the walk-behind tractor better grip on the soil, eliminating slipping.
Next, we begin the installation; it is recommended not to tighten the nuts too much, for further adjustment if necessary. Then he fixes the hitch to the mounting system of the walk-behind tractor with two steel pins. After completing these manipulations, you can begin adjusting the plow.
Adjusting the plow on a walk-behind tractor
Adjustment of the plow on the walk-behind tractor is carried out with maximum adherence to the instructions, because the quality of further work depends on this. This is done in stages:
To balance, place the walk-behind tractor on wheels on a flat surface. Adjusting the stands determines the depth of penetration of the plow into the ground, so you need to plow frozen soil no deeper than 15-20 mm, and spring soil, 20-23 mm.
Next, the angle of attack of the plow is set with bolts so that its “sole” is parallel to the surface of the ground.
To check the correct adjustment of the plow, test plowing is carried out, measuring the depth of the furrows and the correctness of the soil dump to the side; if necessary, adjustments are made.
Video of plow adjustment on a walk-behind tractor
Tips for setting up your plow for use
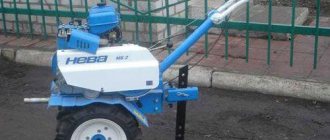
Types and features of plows on the Neva walk-behind tractor
Autumn and spring plowing of the soil is unthinkable without a walk-behind tractor and a mounted plow for it, which cuts and turns over the top layer of soil. Summer residents often seek to replace the plow with cheaper analogues, such as a milling cutter.
Motoblock cutters are effective when cultivating light and pre-plowed soil, for example, in the spring during pre-sowing preparation. To solve a wider range of tasks, we recommend giving preference to the universal plow on the Neva walk-behind tractor.
1 Types of plows
The plow for the Neva walk-behind tractor has a standard design and, thanks to universal fasteners, can be mounted with most models of motor-cultivators popular among summer residents. In fact, this is a trailed trolley attached to a walk-behind tractor, the working surface of which is equipped with submersible teeth and an adjustment lever that determines the depth of tillage. To cultivate light soil, snow blowers for the Neva MB2 walk-behind tractor are also used as an alternative to a plow.
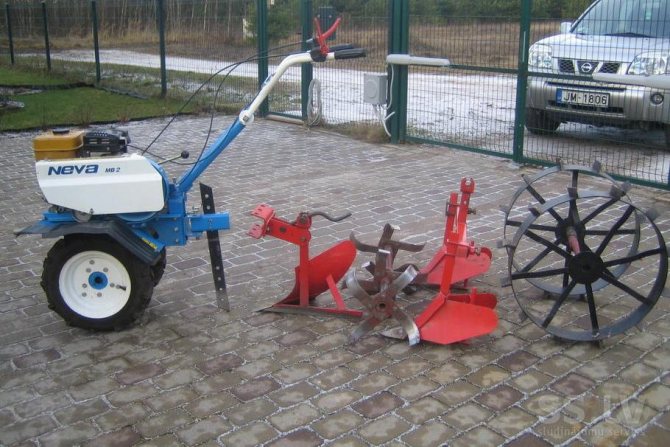
Attachments for the Neva walk-behind tractor
The snow removal unit of this brand has a similar design, each cutter in its configuration is wider than that of a classic soil cutter, and the cost of components for the MB walk-behind tractor is affordable. The snow blower is designed to work with large amounts of snow - the weight of the system is sufficient to also work with the top layer of soil.
There are 3 types of plows:
- single - simple single-hull models with simple shares, used for cultivating light, unclogged soil;
- reversible - the cutter in such products has a curved shape and helps to simultaneously turn over the top layer of soil;
- rotary - such plows are equipped with several blades, their productivity and efficiency are significantly higher.
1.1 Reversible plow
The reversible plow for a walk-behind tractor is predominantly collapsible. The components of this type of soil cutter are made of durable structural steel and are multi-directional. Thus, there is no need to return to the beginning of the row, as when using a simple single-body device. The shape of the ploughshare and its heel is universal; equipment of this type is suitable for cultivating soil of any degree of severity.
1.2 Rotary models
The design of a rotary plow includes several curved plowshares placed along one axis. During operation, the motorized cultivator pulls the plow behind itself; each cutter, when immersed, captures and turns over the top layer of soil, providing processing to a depth of up to 300 mm. The rotary model is also universal in that it allows you to work in areas of irregular geometric shape - it is easier to operate and requires a minimum of effort.
In addition to plows, the following types of attachments for Neva walk-behind tractors are also popular among farmers and summer residents, which can be purchased inexpensively today:
- snow blower for the Neva walk-behind tractor;
- trailers for Neva walk-behind tractors (the cart for the Neva walk-behind tractor can also be constructed from improvised means);
- weights and pulleys for Neva hammers.
2 Plow adjustment
The advantages of attachments for the Neva include additional weights that allow you to adjust the weight, and axle extensions.
Installation and adjustment of the plow on a walk-behind tractor is simple due to the versatility of the design. Coupling with the main equipment, as well as coupling with other aggregated elements, is carried out using a bracket. Before setting up the plow on the walk-behind tractor, you should replace the wheels with lugs for the Neva walk-behind tractor - the replacement process is easier when the cultivator is mounted on a stand. The lugs should be installed so that the narrowed side is directed in the direction of travel.
Plowing the land with a Neva walk-behind tractor
Setting up the plow before operation is carried out in two stages:
- combination (coupling) of the longitudinal axes of the cultivator and the plow;
- achieving a vertical position of the beam.
The equipment can be adjusted after the hitch is installed and secured using the adjusting screw. To do this, place the heel of the plow parallel to the ground line and secure it with the adjusting bolt. In this case, the steering wheel of the cultivator is located in the center relative to the adjusting screw.
The adjustment is made correctly if, when passing the first row, the plow blades are perpendicular to the furrow. It is easier to assess the position of the lugs at low plowing speeds.
2.1 Improvement of the plow for the Neva walk-behind tractor (video)
Video: do-it-yourself plow for a walk-behind tractor
The video talks about converting a plow into a walk-behind tractor.
A plow for a walk-behind tractor is a useful device that plows the soil efficiently, while saving effort and time. Simple recommendations and diagrams will allow you to independently install and adjust the plow, as well as make it from scrap materials.
Installing a plow on a walk-behind tractor
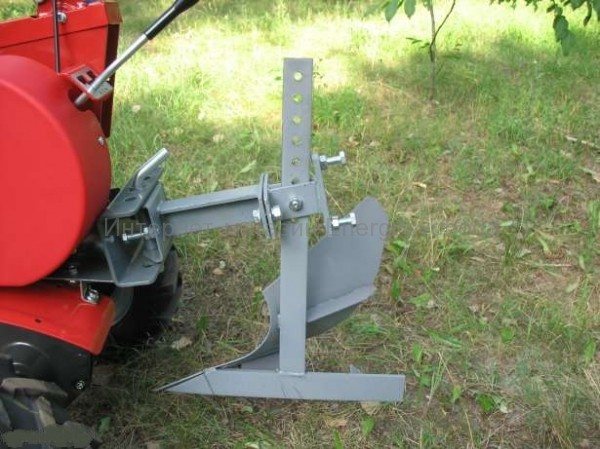
Regardless of the design features of the plow, its size and shape, it is attached to the walk-behind tractor with a special hitch. It can be universal or stationary. The first option is optimal due to the great possibilities for customizing the device.
The type of hitch does not affect the features of mounting the structure on motor vehicles.
You can attach a plow to a walk-behind tractor by following a simple diagram:
- The unit is installed on an elevated position. You can use bricks or logs;
- The plow hitch is attached to the towbar. Both holes on the devices must match completely;
- The clutch on the towbar must be secured with a bolt.
Do not forcefully tighten the bolt when attaching attachments. A connection that is too rigid will negatively affect the quality of plowing the soil. When creating resistance during operation of the plow, it will be thrown a little to the sides. To avoid this, it is necessary to leave a horizontal gap of approximately 50.
Installation and configuration of the plow
Before you start plowing the land, you should attach the plow to the walk-behind tractor. To do this, you need to connect them using a special hitch (usually it is not included in the package and is sold separately).
Here is a detailed video instruction on how to prepare a walk-behind tractor for plowing:
The plow should be connected to the walk-behind tractor only on a flat surface. Thanks to this, proper grip can be achieved. Otherwise, the overall structure will be assembled at an angle and the plow will not function properly.
How to properly adjust the plow on a walk-behind tractor?

It is important to configure the plow on the unit correctly, since this will directly affect the quality and ease of soil cultivation.
The canopy adjustment is carried out in three stages, which are accompanied by the following actions:
- Plowing depth is adjusted;
- The tilt level of the field board is adjustable;
- The blade angle is adjusted.
Plowing depth determines how much the plow will be buried in the ground. Often this figure is equal to the height of the spade bayonet. If the depth is insufficient, many weeds will not be uprooted. If the soil is plowed too deeply, the fertile layer will mix with the lower layer of soil. This will lead to loss of nutrients necessary for normal plant growth.
The depth of plowing is adjusted by three bolts that connect the lock to the plow stand. The immersion level is adjusted when the plow is lowered down or raised up.
The level of inclination of the plow board or “angle of attack” indicates how inclined the tillage plane is in relation to the soil being cultivated.
The adjustment is made using a screw handle according to the following principle:
- The walk-behind tractor is placed on a hill;
- The handles are turned until the field board is positioned on the ground;
- The handle is twisted in the other direction until the board is positioned at a height of two to three centimeters above the ground.
If the “attack level” is too high, the plow will cling to the soil, causing the unit to slip. If the parameter is small, the plow will not be able to process the required soil layer.
To adjust the blade angle, follow these steps:
- The walk-behind tractor is installed on the edge of the cultivated area and the first furrow is passed to determine the optimal plowing depth;
- You need to walk along the most even path possible. You can pre-tension the thread;
- The walk-behind tractor wheel is placed in the furrow, the plow must be positioned perpendicular to the surface being processed. A square will make the task much easier.
Thanks to these steps, you can quickly and competently configure the plow on the unit.
Plow design for walk-behind tractor
The ploughshare is of the correct geometric shape, and the heel design is perfect for plowing hard ground. The unit is made of durable material and has a dismountable design. The materials for the production of the unit are not chosen randomly, since during operation the part is subjected to heavy loads. After the work of the attachment, the soil is treated with a cultivator.
For each type of walk-behind tractor, for example, Cascade, Salyut, Neva or Favorite, the corresponding type of equipment is used. Today there are also universal models that are compatible with any type of equipment.
Plow settings on a walk-behind tractor, tips:
There are three types of plows for walk-behind tractors:
- Single-hull. Has only one ploughshare. They are mainly suitable for light soil.
- Reversible or reverse. The soil is turned over using plowshares curved to the top, in the shape of a feather. This device allows you to work on much harder soil. After such processing, the earth becomes more crumbly and its further processing is simplified. In addition, weeds practically do not grow in the future.
- Rotary. Equipped with several blades.
The most popular models:
When selecting a brand, it is necessary to take into account the characteristics of the soil on the site, as well as the power of the unit and model. Do not forget that a lot depends on the correct installation and configuration of the unit before work. Let's look at the most popular devices for plowing the land. Let's arrange the models in ascending order of their cost.
- Mole. The unit is single-hull type, weighing 8.59 kg. It can cultivate soil with a depth of 15-20 cm. Walk-behind tractors such as Neva, Agat, MB-2, Plowman, Cascade, Hitachi S169, MB-1 Oka, NMB-1 Ugra, etc. are suitable for work. The cost will be 1000-1200 rubles.
- P1-20/2. Single-hull model. Works the same soil depth as the previous device. Weighs 8.5 kg. Works on such devices as: Luch, MB-2 Neva, Mobile K G85, Hitachi S169, Agat, etc. The cost ranges from 1200 to 1300 rubles.
- P1-20/3. A reversible model, weighing 13 kg and a tillage depth of 20-25 cm. Motoblocks MTZ Belarus, Ghepard, Mobile K G85 and Agros are used for work. The price is 1300-1500 rubles.
- Firework. Single-body unit. Weighs 8 kg and plows up 15-20 cm of soil. The cost ranges from 1500-1600 rubles.
- Zykov's plow. Weighs 9 kg and cultivates soil with a depth of 20-25 cm. Designed for brands: Salyut, Neva, Favarit, Oka. The price is 1700-1800 rubles.
- Reverse for models: GS 81, GS 101, GS 12. Weight is 18 kg, and the depth of the cultivated soil is 20-25 cm. It is in the price category of 3300 -3500 rubles.
- Double turn. Weight – 15 kg. The depth of the cultivated soil is 15-20 cm. Cost is 4050-4150 rubles.
- Rotary. It consists of several blades, weighs 40 kg and cultivates the soil to a depth of 30 cm. It is compatible with almost any type of equipment. The cost can range from 70,000 to 78,000 rubles.
When comparing prices for equipment for plowing land in Russia, you will notice that the cost ranges from 1000 to 5000 rubles. Of course, without taking into account the rotary model, which is different from the rest. Having analyzed the cost of such goods, it is necessary to take a closer look at some of them, which have their own distinctive features.
Types of plows for walk-behind tractors
The following types of plows for tillage are distinguished:
- Single-hull . They are characterized by ease of operation, minimal weight and simple design;

- Reversible: reversible or rotary. The top of the structure has a curved feather that turns the ground when plowing it. This type of plow is best suited for cultivating heavy soils;
- Rotary. They are distinguished by the most complex structure. Manufacturers offer two-body and three-body models depending on the number of shares;
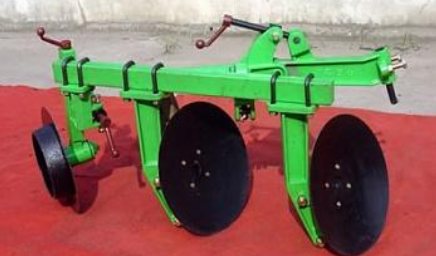
- Disk. They are most suitable for processing wet soil, but the depth of plowing of the soil is much less compared to other types of canopies of this type.
It is quite possible to make any plow yourself, taking into account its design features and following simple diagrams.
Types of plows for walk-behind tractors
Today there are the following types of plows on the market:
- Single-body - simple in design, consisting of a ploughshare, blade, stand and field board. The width can be up to 80 cm.
- Reversible or reversible - due to the presence of two bodies, the cambers and shares of which are located in different directions, ideal plowing of the field is ensured.
- Rotary - consist of one or more rotor elements rotated by the power take-off shaft of the power unit. Due to this, a greater depth of soil loosening and complete destruction of weeds is achieved.
This is one of the existing classification options. Others are also highlighted. Based on the presence of moldboards, moldboard and non-mouldboard plows are distinguished. Moldboard ones are the most popular, as they provide the smoothest and most uniform loosening.
Depending on the plowing method, devices are determined: furrow, smooth plowing and leaving furrows. And according to the design features: peeling, disk and lapel plowshares.
In the catalog of advertisements for the sale of Mascus equipment you can find a wide variety of product options. When choosing a plow, you should consider a number of important criteria, including:
- manufacturer - it is optimal that the manufacturer of the plow and walk-behind tractor is the same (this will reduce the risks of incorrect installation);
- soil type - single-hull ones are suitable exclusively for soft soils;
- compliance of power parameters;
- plowing depth;
- working width;
- type of shell.
You can make the design yourself. You can find many diagrams and instructions on the Internet. But only equipment from a trusted manufacturer has a quality guarantee and can help achieve an ideal result. If buying a new plow is expensive, then opt for a quality used one. This way you can save your budget and purchase good equipment for harvesting and sowing.
How to make a plow on a walk-behind tractor with your own hands?
Before you begin manufacturing attachments, you need to review the drawings. They indicate ways to attach the elements of the device to each other.
Scheme of steps for creating a plow with your own hands:
- Ploughshare. You will need a steel sheet of five millimeters thick, which is given the desired shape. The part for cutting needs to be beaten and sharpened (according to the principle of a hand scythe);

- Homemade dump. Take a pipe with a diameter of 50 centimeters and walls of 5 millimeters in thickness. The workpiece is cut with a cutter. To obtain the required shape, you should use an anvil and a sharpening machine;
- Collection of a single structure. You will need a steel sheet, its dimensions are 50*50 centimeters and a thickness of 3 millimeters. You need to step back 4 centimeters from the edges of the sheet and level it until you get a zero angle;
- A ploughshare is applied to the sheet, double-sided welding is done at an angle of 250;
- The upper part of the blade and the blade of the ploughshare are connected as tightly as possible at an angle of 80;

- The key elements of the ploughshare, side shield and rear part of the blade are welded together.
Read also: What kind of oil to pour into a walk-behind tractor in winter
You can learn more about the specifics of making a plow from the video instructions.
It is necessary to re-measure all angles of the structure before final welding of all plow parts. After the attachment has completely cooled down, the weld seams are cleaned.
Disc plow: algorithm of actions
A disc plow-hiller is used to prepare even furrows for planting vegetables. Using the drawings, you can control the progress of the assembly and avoid shortcomings.
The manufacture of a disc plow is carried out according to the described scheme:
- Support corner as a basis. It is made from a corner with equal sides, its shelves after cooling should converge at an angle of 700;
- The sock is welded to the corner. The heel is welded to the thrust bar;
- The cheeks are secured to the support corner with loops. The end sides of the cheeks should not rest against each other when opened;
- The rotating mechanism is welded to the stop angle at a right angle.
Finally, you need to adjust the plow cheeks. They are fixed with a vice and adjusted until they are directed in different directions.
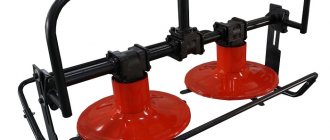
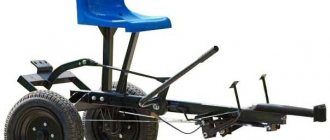
Rotary plow: algorithm of actions
A rotary plow for a walk-behind tractor with a support wheel is considered a complex type of canopy due to its design. It is necessary to work on it with special care so that mistakes do not negatively affect the quality of tillage.
The rotary plow is manufactured according to a certain algorithm:
- The cutter is a working part. For manufacturing, you need to prepare a steel tube and metal plates. The latter are welded to the pipe for subsequent grinding of the soil and throwing it to the side;
- Manufacturing the frame for the gearbox. It can be of any shape, the main nuance is that the frame must protect the gearbox from moisture, debris, and external damage;
- You will have to buy a gearbox. It is connected to the gearbox of the unit;
- The rotary plow is quite large in size, so you need to install wheels. Old motorcycle wheels will do just fine.
This design will last a long time. It is important to promptly change the oil that lubricates the gearbox to prevent breakdowns.
How to make a plow for a walk-behind tractor with your own hands from a horse-drawn one?
A horse plow, compared to other types of attachments, can be made entirely of wood. The only metal element can be the ploughshare.
Step-by-step instructions for making your own horse plow for plowing the land are given below:
- The handles are made of two wooden beams, the thickness of which is about 10 centimeters. The upper part of the handles is complemented by rubberized pads;
- The handles are connected at right angles, so it will be more convenient to hold them with both hands;
- The lower parts of the elements are connected with self-tapping screws;
- A beam 20 centimeters thick must be bent so that its ends are parallel;
- The lower end of the beam is attached to the ploughshare;
- At the upper end, the plow is attached to the walk-behind tractor. For manufacturing, you can use small wooden blocks;
- A double handle is installed in the middle of the mount.
The structure of a horse plow is very simple, but highly efficient. It cannot be used when processing wet soil, so as not to break the wooden parts.
The method of making a plow for a walk-behind tractor can be chosen to suit you. Each homemade canopy can be used with units of the popular brands Neva, MB-1 and MB-2, MTZ, Krot, Salyut.
When purchasing a mini-tractor for cultivating a small plot of land, the package often does not include all the elements of attachments, so they have to be purchased separately. And the retail price of any spare parts is much higher and depends on the manufacturer and quality.
Equipment that meets all the requirements of a business owner is not always available on the market. Therefore, the best option is to make a homemade plow, which will be much cheaper than factory equipment, sometimes of dubious quality.
Types and design of plows
To make a plow yourself, you need to know its design and the functions of its individual elements well. Typically, general-purpose arable attachments are used on private land. The design of such a plow can be divided into two main parts: working and auxiliary.
Operating equipment items include:
- A housing that includes a stand and field board. The blade and ploughshare are attached to the stand.
- The knife is the main cutting element of the tiller.
- The skimmer is an additional cutting element of the attachment designed to cut the top layer of soil (turf).
Auxiliary structural elements:
- The frame is the base on which all other parts of the plow are attached. Its design includes longitudinal bars, spacers, and stiffening beams.
- Support wheel (its mounting height can be adjusted).
- A hitch is a special device with which attachments can be attached to an MTZ tractor or motor cultivator.
Adjusting and tuning the plow on a walk-behind tractor
Any owner of his own garden knows what it is like to manually plow the beds and pull the weeds. To make plowing easier, a plow is used. But using animal power or a tractor for a small area is costly and unwise. For these purposes, walk-behind tractors are used - mainly Neva, MTZ, Oka, Farmer, Centaur. To put it simply, it is an engine with wheels onto which various attachments are mounted - from carts to plows. Our step-by-step instructions will tell you about the latter, or rather about how the plow is adjusted on a walk-behind tractor.
Plow with skimmer for walk-behind tractor
The skimmer is designed to remove the top layer of soil when plowing a plot of land. He turns over the layer of soil with weeds, places it at the very bottom of the furrow, made by a body equipped with special devices. He cuts and turns some of the soil on the side of the furrow. At the same time, the body with the equipment loosens the soil and distributes it evenly over the layer of weeds laid by the skimmer. To level the wall of the furrow, the plow is equipped with a special knife, which is mounted in front of the outer body of the attachment.
Read also: Countersink for metal photo
Types and structure of the case
Plows are divided depending on the number of bodies into single-, double-body and multi-body devices.
The housing design includes the following parts:
The type and quality of plowing of the land plot depends on the last two elements of the structure. The ploughshare cuts the soil layer, which then rises along it towards the dump, then turns over and crumbles. The angle of rotation of the earth layer depends on the design of the dump. A field board is mounted at the bottom of the body, which prevents the plow from moving in the direction of the plowed land.
If you are interested in how to make a plow with your own hands, you should select drawings of its design based on the type of soil being cultivated with this attachment for an MTZ tractor or motor cultivator.
Plow body options:
- Moldboard - designed for plowing the ground with full or partial reversal of the soil layer. Devices of this design simultaneously contribute to soil fertilization, since with their help the top soil layer with vegetation is cut off, which falls to the bottom of the furrow, is covered with soil and rots over time. Thanks to loosening, the soil is saturated with oxygen.
- Moldboard semi-screw - designed for processing virgin soil, plowing too turfy soil. Such a tool crushes the soil moderately, but wraps it well.
- Cultural - designed for plowing long-cultivated land. This device perfectly crumbles the soil and wraps it to a medium degree.
- Screw - designed for processing virgin soil, wraps the soil layer completely.
- Cut-out - designed for cultivating plots of land with a small arable horizon. When cultivating a plot of land with a plow with such a body, the lower part of the soil is loosened, but does not rise outward. In this case, the top layer of soil is cut off and thrown onto the previous furrow.
- Non-mouldboard - designed for cultivating land in regions with arid climatic conditions and the risk of wind erosion. The device helps retain moisture in the soil.
- With a subsoiler - most often used for cultivating infertile land plots. The tool loosens the podzolic layer, as a result of which the thickness of the fertile soil increases.
- With a retractable chisel - used for cultivating clay, loamy soil, and areas of land with an abundance of stones. The chisel, which is installed on the body stand in front of the plowshare, protects the cutting edge from damage.
- Disc - with the help of such a device, land that is oversaturated with moisture is cultivated. The tool has proven itself well when cultivating soils with an abundance of roots.
Important! If you plan to make a plow with a support wheel for a walk-behind tractor at home, it is recommended to select the body design depending on the type of soil.
The choice of housing depends on the type of crop being grown. Root crops need thoroughly loosened soil, for which none of the above listed options for agricultural attachments is suitable. In this case, it is recommended to use a combined design. The body is equipped with a shortened blade, a plowshare and a rotor, which further crushes the soil during the cultivation of the land.
Blade design
Dumps can be:
- Cultivated - intended for long-cultivated lands of a large area. The tool perfectly crushes the soil layer and completely turns it over.
- Cylindrical - used on light soils. It crushes the soil perfectly, but does not completely turn it over. Vegetation residues when cultivating the land are evenly mixed with the soil.
- Screw (half-screw) - the tool completely turns over the cut soil layer, but does not crush it well. During the plowing process, vegetation lies upside down. The field after treatment is distinguished by pronounced “waves”, and therefore requires additional plowing before sowing.
Important! When choosing a plow design, it is necessary to take into account a significant point: the ploughshare and blade must be almost the same thickness (1 mm is the permissible “step” value, no more than 0.5 mm is the gap between the blade and the ploughshare).
Share shape
To make a plow with your own hands, drawings of a plow for a mini tractor need to be selected according to the type of soil being cultivated and the complexity of the device itself. First you need to decide on the design of the ploughshare.
A ploughshare is a part of a plow that cuts a layer of soil. Along the ploughshare, the soil further rises to the dump. For the manufacture of this structural element of the plow, high-strength hardened steel is used. You can make such a structural element of a plow field at home from an ordinary steel pipe.
Shapes of ploughshare:
- Trapezoidal - easy to manufacture, helps to obtain a flat furrow bottom. But such a part wears out quite quickly, and difficulties arise when going deep into the ground. Therefore, plowshares with a trapezoidal ploughshare are most often used for cultivating long-used soils. A small supply of material is left on the reverse side of the part to compensate for its rapid wear.
- Toothed ploughshare and ploughshare with retractable chisel - designed for processing clayey, loamy soils, as well as land with a lot of stones.
- Chisel-shaped - designed for processing heavy soils. The structural element is equipped with a sharp protrusion. This device allows the tiller to go deeper into the ground faster, better, and walk more smoothly. The part also wears out quickly, so a small supply of material is created to compensate for wear.
Of the listed ploughshare options, the most popular is a chisel-shaped product for a reversible plow. They are considered the most stable during operation; the plow can be freely buried to the required depth.
Before you make a handmade plow for a walk-behind tractor, you need to choose the right design diagram for the attachment. If you have an old tool, you can make new parts based on it. If the old plow is missing, you can use Zykov’s drawings to make it. But it is imperative to take into account the parameters of agricultural machinery on which further use of independently manufactured attachments is planned.