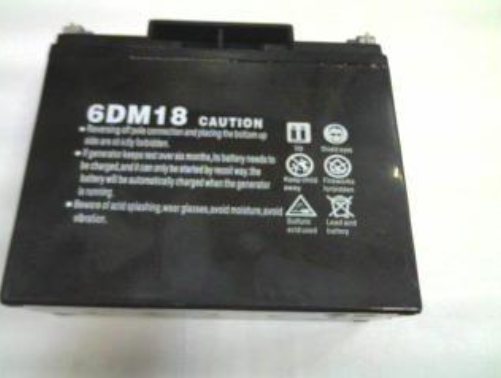
6DM18 batteries - battery features
Batteries marked 6DM18 are considered the most popular in the domestic market. Today they are actively used to complete walk-behind tractors produced by such well-known brands as Zubr, Cascade and Centaur.
The good characteristics of this type of battery allow them to be successfully used for both gasoline and diesel walk-behind tractors that are intensively used in regions with bad weather conditions. At the same time, the battery can withstand high loads, does not wear out for a long time and regularly supplies energy to all electrical appliances included in the walk-behind tractor.
The standard sizes of batteries of this type allow them to be installed on walk-behind tractors of any class. There is no need to use adapters or additional fasteners for this. These batteries can withstand a large number of charge/discharge cycles, which, together with high quality, durability and relatively low cost, makes them one of the most popular batteries among buyers in the domestic market.
Lighting options for walk-behind tractor
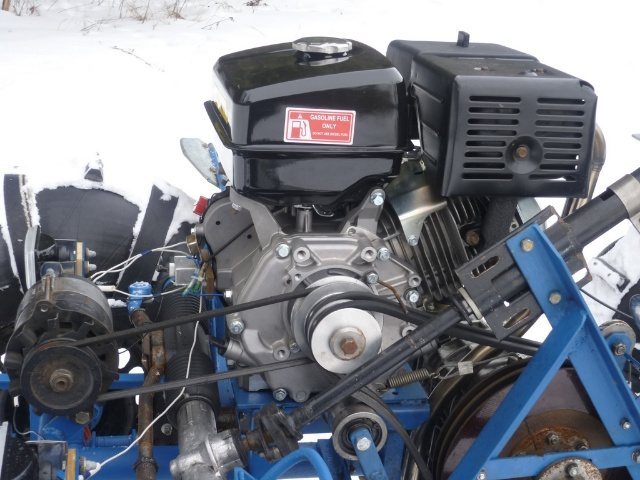
The choice here is small, it all depends on the model of your walk-behind tractor. Medium walk-behind tractors are usually equipped with a belt drive. There is a pulley on the motor shaft that transmits torque to the box using a belt. Lighting for such walk-behind tractors can be done by installing a generator and connecting a headlight to it.
Heavy walk-behind tractors, for example “Agro”, “Belarus”, “Ugra”, do not have a belt drive in their design. The engine of such walk-behind tractors is connected directly to the box, so installing a generator on heavy walk-behind tractors can be problematic. How to make a light on a walk-behind tractor that does not have pulleys in its design? In such cases, power to the headlight is taken from the battery.

Some walk-behind tractors, usually made in China, are already equipped with standard lighting and even an electric starter. But, as it turned out in fact, they are all equipped with low-quality generators. The light on such walk-behind tractors is very dim, flickering, and is not suitable for illuminating the road at night. If you don’t know how to make a light on a Chinese walk-behind tractor, an example will be given below.
Asynchronous motor as a generator | Topic author: Yura
While I was writing, another thought arose, now voltage stabilizers are widely used; I tested one sample that operates from 110 to 280 volts and the output is 230V….
You can even immediately from an asynchronous machine, feed everything it produces through the stabilizer into the outlet, charge the battery from the excess from the same outlet and through the inverter back into the outlet, I understand this is already a serious investment, but the power is also serious... But the question is why don’t they do it this way? They still sharpen the rotor and glue the magnets...
Igor (Cece) I would immediately rectify and install a switching power supply, they operate in the range from 85 to 250 volts, and have I already charged the battery from the pulse supply?
Boris (Juwanna) Still, the asynchronous motor and generator are designed slightly differently. Just taking the engine and turning it will produce very little electricity. But buying a generator is expensive. The rotor is machined and magnets are glued precisely in order to obtain a generator from the engine. Well, the speed of windmills is in a very wide range, unlike a gas generator, for example. Therefore, there are slightly different requirements. And it won’t work to immediately supply 230 volts to the socket - depending on the load and wind strength, it will go from 0 to how lucky you are, maybe over 1000 under certain conditions. Therefore, it is necessary to use special electronics, which prevent the windmill from spinning too much at low load (when all consumers are turned off and the batteries are charged) and stabilize the voltage at the consumers. And axial generators are easier and cheaper to make - you can do without a lathe altogether and you need to buy fewer magnets, however, if there are no special power requirements.
Igor (Cece) In addition to voltage, frequency is also important.
Andrey (Frederik) “And the second is a re-sharpened rotor and magnets glued to it, I’ve seen articles, but it’s not as widely used as axial generators, what’s the matter? "
This is a fairly well-known and frequently used approach that gives good and predictable results. A significant advantage over axials is the ready-made factory design and housing.
Yura (Berdine) For an asynchronous machine to become a generator, you just need to add capacitors! Everything is written on the link at the beginning! It's a good idea to rectify and feed it to a pulse source and then to the battery. It couldn’t be simpler, it seems to me!
Andrey (Frederik) »For an asynchronous machine to become a generator, you just need to add capacitors! "
The only question is at what speeds it will give something... and whether such speeds are suitable for a windmill. If everything were so simple, then no one would resharpen the rotors, and no one would glue neodymium.
Yura (Berdine) judging by the articles that I read about asynchronous generators, at different speeds you need different capacitance of the capacitor; the larger the capacitance, the more the generator will spend on itself. Let’s say that industrial generators were equipped with complex systems that, depending on the speed, changed the capacitance so that the voltage was suitable (I even found a patent). It looks like no one has such experience... it’s interesting to try, I’ll get out of town, there’s a couple of asynchronous ones in stock. In what ranges does the power supply from the computer work? to try with and without a load, and with an impulse load and some kind of ballast!
Andrey (Frederik) Read this topic: https://vkontakte.ru/topic-16776359_23414748 especially Nikolai’s answers (on the second page).
Yura (Berdine) Apparently my last message bothers someone if it is deleted for the second time in a row
Dmitry (Grazia) Read here https://snim.flybb.ru/topic8.html
Andrey (Frederik) “It looks like someone is bothered by my last message if it is deleted for the second time in a row”
I did not delete, and other participants do not have moderator rights. This is probably some kind of glitch. Maybe the contact's spam filter was triggered? Do I remember correctly that there were several links to something? I think I saw this message, but I vaguely remember it.
Yura (Berdine) Looks like a spam filter or someone marked it as spam... There was a link to an article in the DO IT YOURSELF magazine on how to make a 220 V generator set from a walk-behind tractor and an asynchronous machine
Sergey (Carolyn) I followed the anti-spam link that prohibited movement.
Yura (Berdine) Today I tried to turn on an asynchronous device with a capacitor. At low speeds the voltage is very low, until the speed reaches the nominal speed it does not rise above 10 - 20 volts... then there is a sharp jump to a little more than 200 volts and the engine noticeably rests. I plugged in the light bulb, it lights up at full intensity, goes out, and lights up again... it’s my powertrains that aren’t strong enough to turn the belt drive with such power. the gear ratio is 1k 10, that is, at 1.5 rpm the nominal speed is reached. In general, a very low-speed asynchronous motor has the right to become a generator that converts wind energy into electricity; however, the rule must be strictly observed. RPM SHOULD BE NO LESS THAN RATED... if you increase the load power above the permissible value, the capacitor is discharged, the magnetic field disappears and electricity is not generated, without any protections and other smart gadgets, if you remove the load or reduce it below the rated value, everything will work again on its own... here such a cool car.. this Asynchronous motor! So if anyone wants to make themselves a gas generator, go ahead! You won’t find a simpler design and better output characteristics!
Yura (Berdine) link to a DIY gas generator from a DIY magazine, copy and paste the link into your browser (the contact is marked as spam) https://imgdb.ru/view.php? i=bxf2q2yk_19612
Dmitry (Grazia) Nowadays, fewer and fewer consumers require AC current. Maybe a deep-well pump, a machine... That's it. Moreover, for a deep-well pump (“Malysh”, “Rucheek”, etc.) you can get by with a small inverter. Oh yes, also for the refrigerator. Hand tools, a modern washing machine, computer power supplies, chargers, a microwave oven, an inverter input (you need to cut off the bypass if it is a UPS) - all of this runs on direct current. Only for UKD (universal commutator motor of mixers, drills, etc.) and heaters (not so critical here) you need 220-240 V DC, and for devices with an input bridge (computer, energy-saving light bulb) you need 310 V. If you use diode lighting and laptops (100-240 V AC = 140-340 DC) can consume 230 V DC and save on a Large Inverter. After all, it is both a one-time investment and operating (its efficiency) costs. That is, the installation is 17 batteries 13.8 V 60 Ah (for example, a car or traction from an electric car). 13.8 kWh of buffer energy (lots of it). Pumping by the sun and/or wind directly or by a pulse converter with overcharge control.
Pros - cheap, cheerful, runs an iron, heater, microwave and electric kettle at the same time (the inverter is in shock). At the same time, it is economical in terms of efficiency and cost. Simplicity of design, ease of troubleshooting. Short circuit protection with one 16A circuit breaker (or several in several circuits). Electrical safety (direct current is less dangerous). No pulsations in lighting.
Cons - some consumers will require an inverter or modification. It is impossible to protect the RCD network. The efficiency of a deep-well pump will decrease when using a simple inverter. The cost of servicing or replacing such a luxurious battery.
Alexander (Wandusia) Hello everyone! The blood pressure is not excited under load, either active or inductive.... Has anyone tried to run it with a connected electrode boiler? I couldn't find anything on the net about this. Spun the AD 200 rpm (engine 4.5 kW 1400 rpm) 3 containers. 100 mf each) spun up without load, gave out 80 volts, hooked up 3 irons of 1 quat, for example. dropped to 60 volts but there is generation! the irons got hot... the voltage dropped most likely because the speed dropped, I was turning the EMotor at 400 watts... with a load even at 2800 rpm - zero.. I tried connecting 1 lamp. 25 watt is also not excited... with the transformer connected it is also zero... one of these days I’ll make the electrodes and check it myself. Installing the starter is unreliable. I don’t want to bother with electronics... otherwise it would be great to help with heating water...
Sergey (Carolyn) Yura, if you increase the load power above the permissible limit, the capacitor is discharged, the magnetic field disappears and electricity is not generated, without any protections and other smart gadgets,
I completely agree in technology this phenomenon is called “stallover” of an asynchronous generator
Sergey (Carolyn) Alexander, I have a question: what circuit were the capacitors connected to?
They can be connected in several ways: 1. star (motor) - star (capacitors) 2. triangle (d) - triangle (k) 3. star (d) - triangle (k) or others.
You can also hook up the capacitors in the same way as for operating the motor in single-phase mode
I tried it this way and it works great...
Tags: How to make light on a walk-behind tractor without a generator
Possible malfunctions and their elimination
Even if a high-quality generator is installed in the design of the walk-behind tractor, including one made by yourself, it periodically requires repair. If serious faults are detected, it is recommended to contact specialists, however, simple breakdowns can be repaired independently. Most often observed:
- element overheating;
- short circuit due to moisture ingress;
- voltage surges and other malfunctions.
If the product begins to heat up significantly, most likely the problem lies in a malfunction of the capacitor, which will need to be replaced with an analogue of a larger capacity to restore the device to working condition.
Short circuits due to moisture are a serious problem that will require careful troubleshooting and replacement of burnt-out elements after drying. Voltage fluctuations and malfunctions most often require replacing the brushes, after which the generator begins to function correctly.
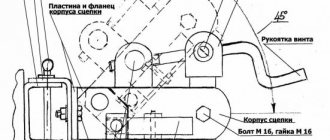
Disc plow: algorithm of actions
A disc plow-hiller is used to prepare even furrows for planting vegetables. Using the drawings, you can control the progress of the assembly and avoid shortcomings.
The manufacture of a disc plow is carried out according to the described scheme:
- Support corner as a basis. It is made from a corner with equal sides, its shelves after cooling should converge at an angle of 700;
- The sock is welded to the corner. The heel is welded to the thrust bar;
- The cheeks are secured to the support corner with loops. The end sides of the cheeks should not rest against each other when opened;
- The rotating mechanism is welded to the stop angle at a right angle.
Finally, you need to adjust the plow cheeks. They are fixed with a vice and adjusted until they are directed in different directions.
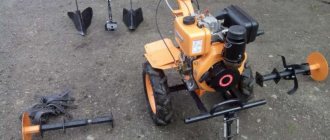
MOTOR-BLOCKS and motor-cultivators (cultivators)

The best models of walk-behind tractors and walk-behind cultivators are on sale in our store wholesale and retail, as well as on credit at low prices. There are many tasks on a personal plot for which it is better to use a walk-behind tractor rather than primitive garden tools. This small device is otherwise called a mini-tractor, has manual control, and can be equipped with a gasoline or diesel engine with a power of kW. There are also light walk-behind tractors with an electric motor, which are used only for cultivating the soil. The walk-behind tractor is a universal tool that can be used to loosen the soil, control weeds and even transport small loads.
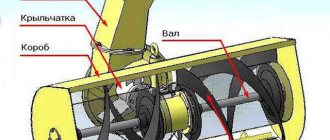
The generator for the walk-behind tractor is an important part of the unit. It converts mechanical energy into electrical energy.
How to choose the right lighting coil
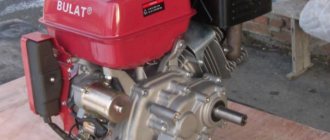
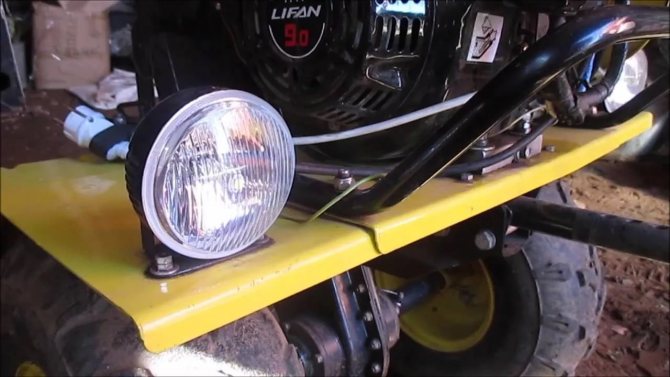
Often, when using Lifan engines in technology and households, it becomes necessary to connect various electrical appliances. Many craftsmen are trying to use additionally installed generators. But this is expensive and not always convenient. We have to come up with complex designs, adapt pulley and belt systems. This greatly complicates the entire mechanism, and most importantly, the reliability of the entire system is lost. An excellent way out of this situation is a generator built into the engine (flywheel with magnets plus a lighting coil). The Lifan company offers its customers several options for such generators.
The standard coil for Lifan is a 0.6 Ampere (12V) coil for a standard single-cylinder engine and a 3 Ampere (12V) coil for a standard two-cylinder engine. Due to the fact that their power is too low to connect third-party consumers, such coils are only sufficient to start the engine and operate it.
If you want to connect additional useful consumers to the engine (for example, lighting lamps, battery charge, receiver, navigator, etc.), then more powerful coils must be used for these purposes.
In this case, the minimum power for a single-cylinder engine will be a 3 Ampere coil; through it you can connect a lamp up to 40 W. Further, if you need more powerful consumers, then the coil will be 5 Ampere or 7 Ampere. You can also directly connect lamps, for example halogen ones, to them, since the current is not too high, and in this case the relay regulator is not necessary in the circuit. The total power of connected devices when using a 5 Ampere coil increases to 60 Watt, and a 7 Ampere coil increases to 84 Watt. (Everyone probably remembers well from the school physics course how to find the power “P” with the current strength “I” and voltage “U” known to us. We simply find the product of the current strength and voltage P = IxU). All of the above coils produce alternating voltage (AC). Thus, it is clear that lamps and devices need to be selected accordingly.
However, if there is a need to charge the battery installed on the equipment, then you will need constant voltage (DC) at the output. The above coils alone will no longer be enough. Then you will additionally need to install a relay regulator (or rectifier) in the electrical circuit. The same is the case if you already use more powerful coils of 18 Amperes or 20 Amps, and they are usually installed on 188F (13 hp) or 190F (15 hp) single-cylinder engines, or two-cylinder 2V77 (17 hp), 2V78 (21 hp), then for stable operation of the devices you will need, in addition to the coil, to use a voltage regulator relay. In the case of coils more powerful than 7 Amps - always. For this purpose, the Lifan company produces, for example, this relay-regulator (18 Amperes), or this relay-regulator (20 Amperes). However, such powerful coils and corresponding flywheels (plus a relay-regulator) are supplied as spare parts in very limited quantities. Lifan does this deliberately. The main reason for this is that customer modifications (do-it-yourself) are not covered by the manufacturer's warranty. On our website we offer our clients such “pumped up” engines of exclusively original factory assembly and design. All of them are assembled at the Lifan plant, specifically according to the requests of the Russian consumer. And they are fully covered by the entire factory warranty.
Reliable circuits
A modern walk-behind tractor is a complex unit consisting of many important elements. One of them is a generator, the function of which is to power the electric battery or lighting devices of an agricultural machine. Let's look at the features of choosing a generator for a walk-behind tractor, installing it and making it yourself. It can be quite difficult for a novice farmer to choose the right generator for a walk-behind tractor. However, not everything is as complicated as it might seem at first glance
The single most important factor you need to pay attention to is the power of the device. Whatever generator you choose for an agricultural machine, its power must necessarily exceed the total power of the loads under which the walk-behind tractor operates
This will allow the device to operate properly under Volt voltage without the risk of surges in the electrical network, and to power all electrical appliances on the walk-behind tractor. Often, owners of walk-behind tractors who have no experience purchase and equip their equipment with generators designed for installation on cars.
How to make a headlight for a walk-behind tractor?
Many owners of special equipment install headlights of domestic and foreign cars as lighting on the walk-behind tractor. This option is expensive and unreliable. The light coming out is not enough and the system itself will not last more than a few months. As an alternative, they develop a headlight for a walk-behind tractor with their own hands, which allows you to obtain the necessary lighting and power of the equipment.
Step-by-step instructions for manufacturing:
- Buy an old, inexpensive headlight. Equipment from Soviet cars is suitable.
- Remove the glass protection and other elements secured with plastic fasteners from the device.
- Using plaster, pour a dummy headlight, for which the finished material is poured into the device and left until completely dry. After this, you can remove the cast, maintaining its integrity.
- Glass fiber is applied to the resulting template in three layers, each time treating the material with epoxy resin. After processing, the future headlight must dry under vacuum conditions. Many owners install headlights of domestic cars as lighting on a walk-behind tractor.
- Then they start making their own glass. This will require an oven, special slats and fiberglass. It is necessary to make a platform from the slats, which is placed in a preheated oven to 180-200 C°, where fiberglass is placed without a protective film.
- When the material begins to deform, it can be taken out for application to the processed workpiece. After pouring the mold, you need to place the future headlight in a vacuum.
- After complete cooling, the product is sanded using sandpaper.
- The final stage is the installation of electrical equipment and lamp installation.
Electrical diagram
The headlight connection diagram is quite simple and consists of only three main elements:
- power source, including ignition, generator or battery;
- power switch - a simple button that breaks and turns on the electrical power circuit for the lamp;
- a lamp socket to which wires from the power source are connected through a switch.
A fairly simple diagram for connecting a headlight to a walk-behind tractor. For greater reliability, all wires are placed in a special corrugation. The material protects electrical wiring from damage and allows you to secure the equipment so that it does not interfere with the use of the walk-behind tractor.
Necessary tools for work
Before starting work, it is necessary to prepare all materials, including wiring, headlights, corrugation, and also assemble a set of tools:
- soldering iron;
- screwdrivers and wrenches;
- wire cutters and stationery knife;
- electrical tape and heat shrink tube;
- electric drill and mounting materials.
Without electric generator
Another method of connecting lighting is also widespread among operators. Here you can do without using a generator. You will need a 12 volt battery and an LED strip.
In addition to the sources, you must think in advance where this device will be mounted. If you are the owner of a large vehicle, then the ideal solution would be to install the battery between the gearbox and the engine.
Step by step steps:
- Using welding and an iron corner, you need to make a stand for your gel battery. It is mounted on the frame of a mini tractor.
- A battery is installed inside, which is clamped with a pair of bolts and a metal insert.
- Wires are laid from the battery to the power button. All joints must be soldered and insulated with heat-shrinkable tape.
This lighting will be very bright. However, this method of installing headlights has one negative side: a full battery charge will only last for a couple of hours of operation, after which it will need to be recharged again. This is a very significant disadvantage for those who work intensively with a mini tractor.
DIY headlight installation options
After making the headlights and preparing the tools, they proceed to installing the light on the walk-behind tractor.
Choosing a source of electricity is one of the main tasks when installing a headlight yourself
Step-by-step instructions for execution:
- Conduct wiring from the power source to the headlight, check the operation of the system and the brightness of the light.
- Install the switch in a place convenient for use, and then integrate it into the headlight power circuit. There is only one wire going from the button to the lighting.
- At the final stage, turn off the power supply and proceed to the installation of protective elements, corrugations, as well as securing all parts to the equipment. Without heat shrink and additional means, the lighting may be damaged or fail.
One of the main tasks when installing a headlight yourself is choosing a source of electricity. Usually a generator, battery or ignition is used.
From generator
Most manufacturers make walk-behind tractors with electric generators with sufficient power for normal operation of equipment and connection of lighting. If the equipment is weak, you can replace the generator with a more suitable type.
Without a generator or battery, you can connect the lighting yourself
Step-by-step installation instructions:
- connect wires to the contacts of the generator, and one of them must be connected via a button;
- conduct wiring from the generator and switch to the lighting fixture and check the operation of the system;
- fix the headlight on the frame and use protective elements to prevent moisture and damage.
You can connect the lighting yourself without a generator and battery, but this will require a headlight with an independent power source.
From ignition
An alternative option for lighting a walk-behind tractor with your own hands without a generator is connecting to the ignition contacts. Each time after the engine starts, power will appear and the installed headlight will light up. The main disadvantage is the inability to turn off the equipment until the walk-behind tractor stalls.
When considering options for how to install a headlight on a walk-behind tractor, they think about the ease of use of lighting. It is necessary to consider additional elements that will allow you to turn off the lights when parking, regardless of the state of the equipment.

Connection to the ignition contacts - an alternative version of the light for the walk-behind tractor
How to make light from a generator
The easiest way to make lighting for a walk-behind tractor is to use its “native” electric generator. Some manufacturers of motorcycles provide for this possibility and therefore install devices for generating electrical energy with a certain power reserve. It is enough to ensure stable operation of the main electrical devices of the motor unit and power additional electrical equipment, such as direction indicators, headlights, and sound signals.
Connecting light from a standard electric generator is quite simple:
- The power generating device is connected by a wire to a switch mounted on the steering column;
- Wiring is routed from the switch to electrical equipment (in our case, a headlight);
- The wires are placed in a corrugation, which will protect them from mechanical stress and prevent them from dangling and interfering with you while working on the walk-behind tractor.
When the generator has enough power, the headlight shines brightly and steadily; if there is not enough power, the light fades out at low speeds. In this case, the generator is replaced with a tractor one (for example, taken from a MTZ tractor) or a car one.
An electricity generating device from Zaporozhets is perfect for this purpose. The equipment is compact and therefore easily fits in the space between the engine and gearbox. You will first need to make fasteners for the generator. Weld additional metal slats onto the frame and attach a clamp to them - it will fasten the device and securely fix it to the frame.
You can see how to connect an electric generator to your motor unit in the diagram below:
A car electric generator, new or old, has sufficient power reserve and will be enough to provide stable lighting on your walk-behind tractor or snow blower. With its help, you can also solve a number of other problems related to connecting electrical equipment.
How to make a light on a Neva walk-behind tractor - Special equipment
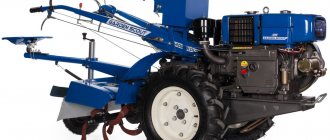
Motoblocks should be distinguished into certain classes:
- lightweight electric/gasoline engine, the device of which is from 10 to 60 kg;
- medium gasoline engine weighing from 60 to 100 kg;
- heavy class - gasoline/diesel engine with air or liquid cooling, power over 9 hp.
Lightweight walk-behind tractors are used for processing small areas (for example, dachas). The middle class is used in a fairly wide range - from cultivating land to pumping water using mounted and trailed equipment. The heavy class is suitable for developing virgin soil, cultivating areas, and transporting heavy loads in rural areas. In any operating conditions, you have to think about how to make light for the walk-behind tractor.
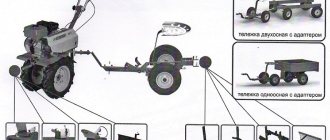
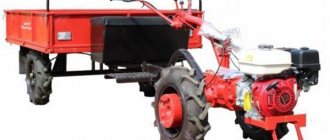
The walk-behind tractor can be used not only for plowing the land, but is also well suited for transporting goods. A trailer cart is used for this. The cart can be equipped with additional headlights. All that remains is to read the instructions on how to connect the headlight.
The easiest way to make a light for a walk-behind tractor with your own hands is from a “native” electric generator. If the manufacturer provides such a possibility, then the installed generator has a certain power reserve. It will be sufficient for the normal functioning of the key electrical appliances of the walk-behind tractor and powering additionally installed electrical equipment (turn signals, headlights, sound signal).
The algorithm for connecting light from an installed electric generator is not complicated:
- Connect the power generating device to the switch on the steering column using a wire;
- From the switch, route a system of wires to electrical equipment (on a walk-behind tractor this is a headlight);
- Place the wires in a corrugation to protect them from mechanical damage. This way they will not hang out and interfere with work on the unit.
If the generator has a high enough power level, the lighting will be good. When the light goes out at low speeds, it is necessary to change the installed electric generator to a device from a tractor or machine.
You can install a generator from Zaporozhets. The device is small in size, so it can easily fit in the area between the motor and gearbox. Installation is easy. Fasteners are first made to fasten the electric generator and fix it to the frame: strong metal slats are welded to the frame, then a clamp is attached.
The presented diagram will help you figure out how to properly attach the device to the walk-behind tractor.
An electric generator from an old or new car can provide normal lighting for a walk-behind tractor. It is also possible to solve other problems with connecting various electrical equipment.
There are a large number of walk-behind tractors of various types on the agricultural machinery market. But not all models have standard lighting. This problem can be solved with the help of simple modernization manipulations.
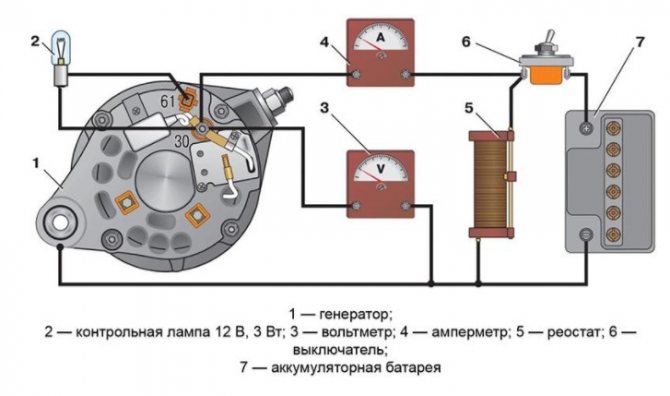
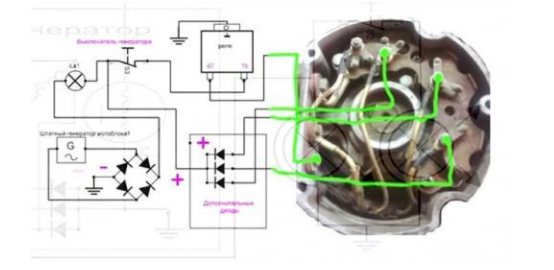
Generator electrical connection diagram
When installing and connecting the generator, you must remember that incorrect connection of the electrical circuit will cause a short circuit in the generator winding. To prevent this, you must connect the device strictly according to the instructions in the algorithm below:
- Connect the generator to the electronic unit of the agricultural implement using two wires. The unit itself is equipped with 4 wires, 2 of which are blue - connect the energy converter to them;
- After this you will be left with a black and a red wire. Connect the first of them to the ground of the walk-behind tractor engine;
- The red wire is responsible for the output of the converted voltage, which is required to provide power to all electrical devices of the walk-behind tractor without a battery - headlights and sound signal. If the generator is installed on a walk-behind tractor with a battery, then the converted energy is supplied to the battery and the electric starter of the unit. The video will tell you more about connecting a generator to a walk-behind tractor.
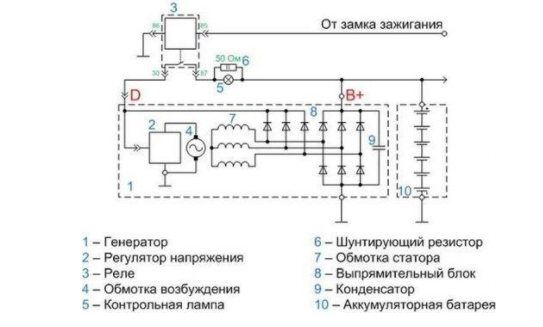
The generator connected in this way operates according to a fairly simple scheme:
The generator installed on the walk-behind tractor generates electrical energy, after which it is supplied to the rectifier present in the electrical unit. The block contains a current regulator and a voltage equalizer, designed to protect the electrical system from voltage surges and control the amount of energy generated.
When starting a walk-behind tractor, its engine transmits torque to the rotor via a belt. During this, the generator begins to generate the required amount of energy and supply it to the electrical unit. Due to the fact that a certain amount of battery energy was spent when starting the engine, all electrical appliances on the walk-behind tractor will receive energy from the unit. As soon as the battery of the unit is charged, it will again become the main source of power for the electrical appliances of the walk-behind tractor. If the battery is discharged again, power will come from the electrical unit. This process is repeated continuously as long as the walk-behind tractor is running.
How to install a generator on a walk-behind tractor without outside help?
It is easiest to install an existing generator by first watching the corresponding videos.
If this is not possible, you should use the scheme below.
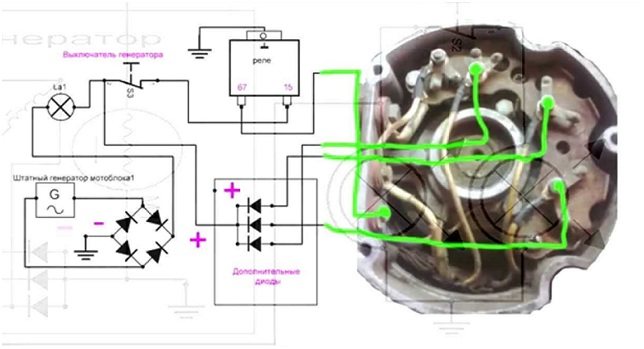
This electrical diagram suggests connecting the generator to the walk-behind tractor using two blue wires (there will be four in total on the block, but only the indicated colors are suitable for the current source). The remaining red wire is responsible for outputting the converted voltage - it goes to the headlights and signal, and also charges the battery. And connect the black wire to the ground of the motor. The installation of the generator on the walk-behind tractor with your own hands is completed by checking with testing equipment (multimeters, testers or avometers) first the circuit, and then the equipment as a whole in different operating modes.
How to make a headlight for a walk-behind tractor with your own hands
Not all walk-behind tractors Neva, Zubr, Centaur and others include a headlight. Therefore, owners who want to make light on them decide for themselves what to do: buy a factory kit with a ready-made lighting system, use a flashlight from faulty equipment, for example, a moped, a light motorcycle, or make a budget option with your own hands or make a homemade light.
If you decide that your unit will have a headlight made with your own hands, then the housing from a burnt “housekeeper” will be quite suitable for this purpose. You will also need to stock up on a small piece of electrical wire, a toggle switch (switch) or a simple switch.
Connecting the headlight to the agricultural implement is very simple:
- First, the toggle switch (switch) is fixed. It is placed in the most convenient and fairly reliable place, for example, on the steering rod of a walk-behind tractor next to the gear shift lever.
- Then the headlight is fixed. This can be done in a specially designated place provided by the manufacturer (usually this “place” is located in front of the engine) or on the steering column. When a stationary headlight is placed in front of the engine, it quickly becomes dirty, and the light from it spreads only along the bottom. For this option, it is better to use a lamp that is movable in several planes, then you can direct the light in the desired direction yourself.
- Next the wire is pulled. It is more convenient to do this from the nearest power source, for example, a 12-volt oil pressure warning lamp located on the steering column of the walk-behind tractor.
- A wire drawn from the power source is connected to the switch, and a cord is pulled from it to the place where the headlight is located. All wires are carefully wound to the steering rod with insulating tape or secured using special clamps.
You can use halogen lamps to illuminate your agricultural machinery, but they quickly heat up and fail. It is better to make lighting using 5 W LED light sources with a small scattering angle, which will save energy and shine brightly and far.
As you can see, making a headlight for a walk-behind tractor with your own hands is absolutely not difficult. And it will be able to work no worse than a “car market” and light your way when you return home along a dark road.
Tools
If the unit is equipped with its own generator, then resolving the issue of lighting arrangement is greatly simplified. You just need to install the flashlight and supply power to it.
To do this you will need the following tools and devices:
- electric drill;
- soldering iron;
- Screwdriver Set;
- spanners;
- wire cutters;
- stationery knife;
- electrical cable;
- heat-shrink tubing;
- headlight, side and turning lights.
Installing a headlight on a walk-behind tractor using a standard generator is carried out in the following sequence:
- The bases of the lighting fixtures are screwed to the unit body. It is advisable to place the headlight on the walk-behind tractor on a separate bracket located on the front part with an elevation above the ground of 100-120 cm.
- We install buttons for turning on the flashlight, turning and side lights on the steering column. You should choose devices of increased strength and moisture-proof design. Fixation is carried out with clamps or metal screws.
- The electrical cable is pulled into a corrugated tube. This must be done to ensure that the wiring is protected from moisture, mechanical damage and rodents. The corrugated tube is pulled to the steering column and frame so that there is no sagging.
- The wires are connected to the generator and electrical equipment terminals. The engine is started and the functionality of the lighting system is checked. After this, all twists and joints are isolated.
See » Powerful universal walk-behind tractor Volgar
When idling and at low speeds, the light dims. To ensure constant lighting, you need to use a voltage stabilizer or install a powerful generator.
Electric generators from MTZ tractors and ZAZ cars have proven themselves well.
These devices are compact and can easily find a place on the body of a motor cultivator. To connect a non-standard generator to a walk-behind tractor, you will need to make an additional bracket. It is assembled from a steel angle on the frame of the car.
You can make light on a walk-behind tractor without a generator by installing a 12 V battery. The battery from a motorcycle, moped or boat is used as a power source. Don't give up on your car battery.
If you put a heavy power source on the cultivator, you can solve several related problems - equip the unit with an electric starter and significantly make its body heavier. In addition, it would be useful to be able to illuminate the area at night without the engine running.
READ MORE: Ficus benjamina planting and care description of varieties propagation and pruning
This function can be useful on a picnic or night fishing.
Installing the headlight on a walk-behind tractor using a battery is carried out in the following sequence:
- Arrangement of the frame for the power source. It is best to use a steel corner for this. The frame should be attached directly to the frame of the motor-cultivator body. After lowering the battery into the niche, it is firmly secured in it using steel straps.
- Attaching a lantern and auxiliary lights. The headlight is placed on the walk-behind tractor so that it illuminates the widest possible sector without blinding the operator or oncoming vehicles. It is better to choose devices with an adjustable beam angle.
- Location of the electrical cable in the corrugation along the body of the unit. Installation and connection of control devices. Tester checking the correct assembly of the electrical system.
- Connecting the wire to the battery terminals, leading the wire into the junction box. Connecting wires to the switch, insulating joints, joints and twists.
Do-it-yourself ignition light on a walk-behind tractor

This should be done approximately according to the following algorithm:
- Selecting the right headlight for the walk-behind tractor. You can buy a new one on the market, or you can find a completely tolerable old headlight from a moped, car, tractor or other equipment. It goes without saying that the new equipment will shine better, last longer, and you can choose a variety of types, sizes and colors. But if it’s far from the car market, then using an old headlight won’t do any harm.
- Purchase of a toggle switch and wires.
- Install headlights. The best option is the steering bar crossbar. Here the headlight will provide an optimal angle of illumination when working and driving, and will also become less dirty.
- Installation of a toggle switch. It should be secured in an easily accessible place. It's best to mount the switch on the steering wheel, somewhere close to the gearbox.
- Wiring. If the design of the walk-behind tractor provides a place for connecting a headlight, we power the wires here. If not, then the most convenient way to do this is with a 12W oil control lamp. The body of the walk-behind tractor will serve when powered by mass.
- We connect the wires to the toggle switch and the headlight. We secure the wires securely with special clamps and/or electrical tape.
How to make a light on a walk-behind tractor: without a generator, headlight, do it yourself, connect - Special Equipment Info
A walk-behind tractor is an indispensable thing on a personal plot.
Their happy owners have long forgotten what a shovel is. The walk-behind tractor allows you to do almost all operations. Plowing, cultivating, hilling and digging up potatoes - all this is within the capabilities of the iron assistant. It is even possible to transport small loads if you attach a trolley. There is just one thing that is not provided for: driving a walk-behind tractor at night, because not all of them have lighting.
What should those who have no light do? Only one! Read this article to the end and find out how to make a light on a walk-behind tractor.
The choice here is small, it all depends on the model of your walk-behind tractor. Medium walk-behind tractors are usually equipped with a belt drive. There is a pulley on the motor shaft that transmits torque to the box using a belt. Lighting for such walk-behind tractors can be done by installing a generator and connecting a headlight to it.
Heavy walk-behind tractors, for example “Agro”, “Belarus”, “Ugra”, do not have a belt drive in their design. The engine of such walk-behind tractors is connected directly to the box, so installing a generator on heavy walk-behind tractors can be problematic. How to make a light on a walk-behind tractor that does not have pulleys in its design? In such cases, power to the headlight is taken from the battery.
Some walk-behind tractors, usually made in China, are already equipped with standard lighting and even an electric starter. But, as it turned out in fact, they are all equipped with low-quality generators. The light on such walk-behind tractors is very dim, flickering, and is not suitable for illuminating the road at night. If you don’t know how to make a light on a Chinese walk-behind tractor, an example will be given below.
In both options, you may need the following tools:
- hammer,
- pliers,
- Bulgarian,
- drill,
- a set of keys,
- welding machine,
- Workbench,
- vice.
As mentioned above, for such walk-behind tractors the best option would be to install a generator. Let's tell you with an example how to make a light on a Neva walk-behind tractor. Using it, you can make light on similar units. It's not that difficult. The most important thing is to have plumbing tools and spare parts available, which can be removed either from an old car or tractor, or bought at a salvage yard. You will also need ingenuity and hard working hands.
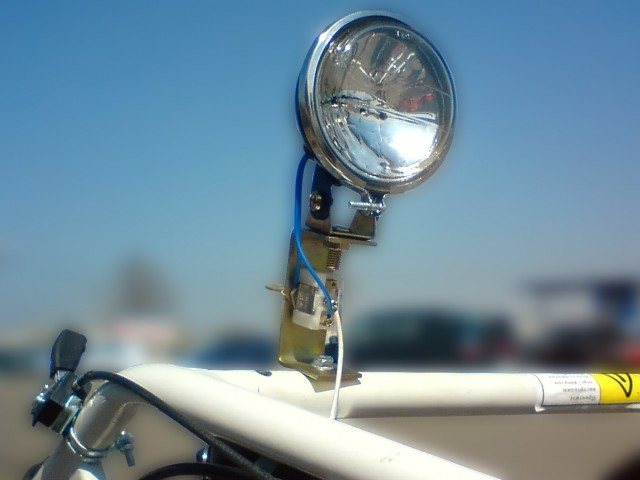
First of all, we need an energy source - a generator. Almost any car or tractor will do. Some craftsmen even adapt a bicycle one.
The only condition is to replace the generator pulley with one that is suitable for the width of the walk-behind tractor belt. Finding a headlight for a walk-behind tractor is also not a problem. Suitable for car or motorcycle. You can install an LED flashlight from the car's running lights.
All that remains is to find a toggle switch to turn it on and wires to connect it all to the circuit.
The walk-behind generator is mounted on the front of the walk-behind tractor. To do this you need to make a bracket. The bracket is made from a profile pipe of a suitable cross-section or an iron angle. We calculate the required length and width and cut the profile with a grinder. Then we weld the quadrangular frame. We make a mount for the generator and to the body of the walk-behind tractor.
Generator lighting has both advantages and disadvantages. The advantage is that you always have light as long as the engine is running. The same applies to disadvantages. If the engine is turned off, then there is no light. In addition, such lighting is very dependent on the generator speed. The bright light will only appear at high engine speeds. At low levels the headlight will only flicker dimly. Of course, this is not always convenient.
As previously written, heavy walk-behind tractors do not have a belt drive. This means that installing a generator will be very problematic.
How to make light on a walk-behind tractor without a generator? In such cases, batteries are used as a power source. Motorcycle batteries are best.
Having small dimensions, they take up less space and are easier to attach to the walk-behind tractor. Walk-behind tractors do not have a battery mount. Therefore, you will have to make it yourself.
It is also made from a profile pipe or from a corner. We cut it and weld it into a box according to the size of the battery. It is better to line the inside of the box with soft plastic so that the battery does not hit the iron walls. Otherwise, you may damage the battery and spill electrolyte. The box must be securely fastened to the body of the walk-behind tractor and the battery must be placed in it. Now all that remains is to connect the wires from the battery to the toggle switch and the headlight.
Rechargeable lighting has a number of advantages. The light from such a source is always smooth and stable. It does not depend on engine speed, as is the case with generator lighting.
And if you use LED lamps in the headlights, then one battery charge can last for a long time. Another advantage: you will always have a light on, regardless of whether the engine is running or not. But there are also disadvantages.
If there is no generator in the circuit, then the battery will have to be charged from time to time. This means that you need to buy a special charger.
Chinese walk-behind tractors
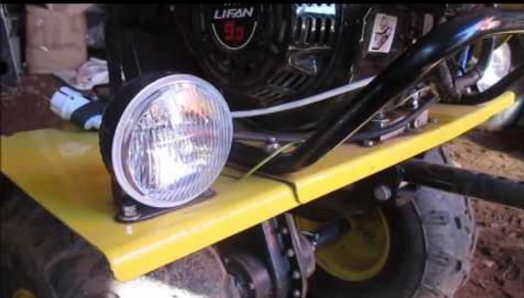
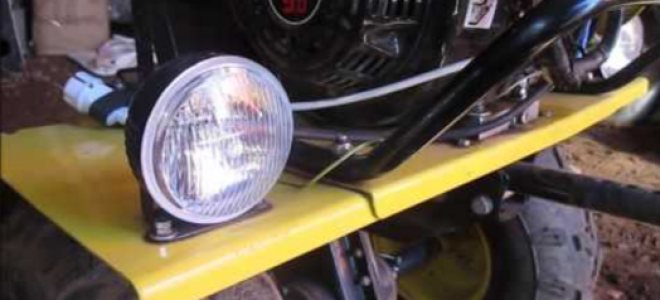
Some Chinese walk-behind tractors are already sold with standard lighting. But, as mentioned above, this is very unreliable. How to fix the situation? How to make a light on a Chinese-made walk-behind tractor or fix the standard lighting? There may also be several options here. Chinese walk-behind tractors are equipped with weak generators. Sometimes it turns out that the current is not enough even to charge the battery, not to mention the lighting.
Knowledgeable people simply replace the standard generator with a more powerful one from the same car. If you do not have another generator, then you can do it differently: simply turn off the generator and use one battery. In this case, you need to replace the incandescent lamp in the headlight with an LED one for longer battery life.
There is another interesting option. You won't need a generator or a battery. You can use a bicycle flashlight. It is a headlight with a built-in power source. As a rule, these are either regular batteries or lithium-ion batteries. You can buy two flashlights and attach them to opposite sides of the walk-behind tractor. It will turn out very simply and inexpensively, since a walk-behind tractor with a trailer is not used so often at night.
Conclusion
As can be seen from the examples, almost any walk-behind tractor, and even a motor-cultivator, can be equipped with lighting. By following these recommendations, you will find the answer to the question of how to make a light on a walk-behind tractor. A walk-behind tractor equipped with lighting turns into a truly universal machine.
Thanks to this modification, you will be able not only to transport cargo in the dark, but also to perform plowing and cultivation. And if you live in a village and keep livestock, you can mow hay at night or in the morning, before it gets hot outside.
READ MORE: Tiger begonia care at home
And you will never regret the time spent on this alteration.
Unfortunately, the design of many walk-behind tractor models does not include lighting equipment. But often a headlight on a walk-behind tractor is simply necessary, because it is not always possible to finish work in the field before dark. And when using a walk-behind tractor as a vehicle on the roads, you absolutely cannot do without a headlight.
Some manufacturers specifically sell ready-made kits of headlights, toggle switches and wires separately, thereby providing you with hassle and additional profit for yourself. But you don’t have to spend extra money on purchasing “special” lighting equipment, because connecting the light to a walk-behind tractor with your own hands is easier than it seems at first glance.
First you need to understand the structure of your walk-behind tractor. Typically, the headlight is powered by battery energy, which is charged from a generator and whose power is not always enough for high-quality lighting.
To connect lighting to a walk-behind tractor with a single-cylinder engine, you need a lighting coil of at least 3 amperes. It will be able to power a headlight with a power of up to 40 W.
Before installing the headlight on the walk-behind tractor, you need to assemble a single electrical circuit to connect the lighting system to the generator. The drawing below shows in detail all the elements of this circuit.
This should be done approximately according to the following algorithm:
- Selecting the right headlight for the walk-behind tractor. You can buy a new one on the market, or you can find a completely tolerable old headlight from a moped, car, tractor or other equipment. It goes without saying that the new equipment will shine better, last longer, and you can choose a variety of types, sizes and colors. But if it’s far from the car market, then using an old headlight won’t do any harm.
- Purchase of a toggle switch and wires.
- Install headlights. The best option is the steering bar crossbar. Here the headlight will provide an optimal angle of illumination when working and driving, and will also become less dirty.
- Installation of a toggle switch. It should be secured in an easily accessible place. It's best to mount the switch on the steering wheel, somewhere close to the gearbox.
- Wiring. If the design of the walk-behind tractor provides a place for connecting a headlight, we power the wires here. If not, then the most convenient way to do this is with a 12W oil control lamp. The body of the walk-behind tractor will serve when powered by mass.
- We connect the wires to the toggle switch and the headlight. We secure the wires securely with special clamps and/or electrical tape.
The question of how to make light on a walk-behind tractor must be decided by everyone who purchased this unit without a standard headlight. Today, most models of domestic and foreign production are designed to work only during daylight hours. And those that have a built-in flashlight do not always provide high-quality lighting. The factory headlight illuminates a narrow sector in front of the car and quickly becomes dirty.
Headlights on a walk-behind tractor can be built-in or homemade. Manufacturers offer good headlights - all that remains is to figure out how to install them on one or another model of the device.