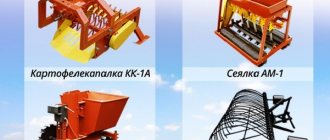
Cultivator cutters. Potato digger. Weeder, flat cutters. Hitch, towing device.
Harrow rake. Blade shovel. Results Archive of surveys. Which walk-behind tractor or its components do you want to assemble? Have you already assembled it? Intermediate shaft. Gearbox for walk-behind tractor. Wheels and lugs. Steering. Motoblock from a motorcycle, moped, scooter. A walk-behind tractor made from a chainsaw. From the car. From a tractor. Engine conversion. The frame of a conventional walk-behind tractor. Articulated walk-behind tractor frame. PTO power take-off shaft. Drive shaft wheel axle.
Articulated walk-behind tractor. Step-by-step photos and instructions for making walk-behind tractors and attachments.
Adapter for walk-behind tractor: drawings and diagrams [6]. Homemade hillers for walk-behind tractor [3].
Drawing of a disk hiller: description of the device
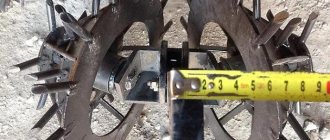
Schemes and drawings of trailers and carts [8]. Do-it-yourself mower: drawings with dimensions [3]. Step-by-step instructions for making cutters [2]. Drawings and patterns of homemade plows [6].
How to make a potato planter and digger [6]. Schemes of snow blowers [5]. Kinematic diagram of a rotary mower to a walk-behind tractor. Advantages of a two-story hitch for a walk-behind tractor. Adapter for hillers with your own hands. Adjusting and setting up a hiller on a walk-behind tractor. The best engine for a homemade walk-behind tractor. Diagram of a walk-behind tractor coupling. Do-it-yourself potato digger for a walk-behind tractor. Homemade walk-behind tractor from a chainsaw. Friendship. What does the bevel gear of a walk-behind tractor consist of? Drawing of a reduction gearbox for a walk-behind tractor How to make a steering wheel for a walk-behind tractor with an adapter How to make a rotary cutter with your own hands Drive of a conveyor potato digger Diesel engine of a walk-behind tractor: fuel system Trailed trolley for a walk-behind tractor Hitch for a homemade walk-behind tractor How to make a bandage with lugs Do-it-yourself caterpillars for a walk-behind tractor.
Adjusting the spread of the “ears” of a homemade two-blade hiller is carried out by changing the selection of mounting holes on the spacer stops and the mounting console of the hiller for the Eared Hiller walk-behind tractor with your own hands.
Adjusting the spread of the “ears” of a homemade two-blade hiller is carried out by changing the selection of mounting holes on the spacer stops and the mounting console of the hiller for the walk-behind tractor. Kinematic diagram of a rotary mower to a walk-behind tractor. Advantages of a two-story hitch for a walk-behind tractor.
Be the first - leave your comment! Login: Submit. Photos of homemade walk-behind tractors. Homemade disk hiller for potatoes Adapter with a mechanism for fixing the plow lift Rotary snow blower for the Centaur walk-behind tractor Single-body plow with a support wheel Chain gear for a four-wheel walk-behind tractor Single-wheel adapter for a walk-behind tractor Homemade segmented mower for a walk-behind tractor Design of a screen-type potato digger Diesel engine of a walk-behind tractor: fuel system Drawing of the drive unit ala: homemade gearbox How to make a rotary cutter with your own hands Drawing of a single-body plow for a walk-behind tractor.
Trailer Adapter trolley for walk-behind tractor Hiller disk, eared Plow share, moldboard, skimmers Mills cultivator Potato planter Potato digger Weeder, flat cutters Mower Hitch, tow hitch Seeder Snow blower Harrow rake Blade shovel Other Results Poll archive Total answers: Which walk-behind tractor or its components do you want to assemble already collected?
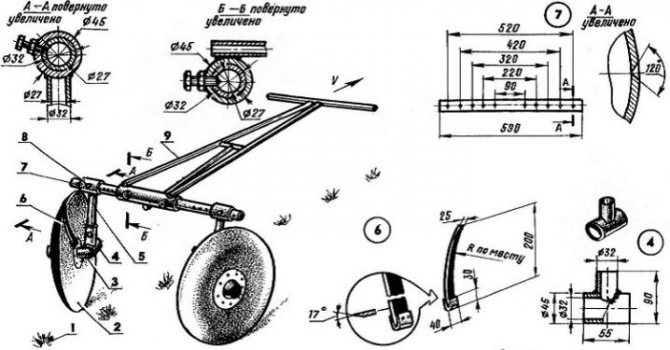
Drawing of a hiller for a walk-behind tractor with dimensions. The drawing shows the device of a homemade “eared” adjustable hiller, indicating the main dimensions for making a hiller for a walk-behind tractor. Picture on the topic “How to make an adjustable hiller with your own hands.” Rating: 4.
Intermediate shaft Gearbox for walk-behind tractor Wheels and lugs Steering control Walk-behind tractor from a motorcycle moped, scooter Walk-behind tractor from a chainsaw From a car From a tractor Engine conversion Frame of a conventional walk-behind tractor Articulated frame of a walk-behind tractor PTO shaft Drive shaft wheel axle Clutch Articulated walk-behind tractor Results Archive of surveys Total answers: Online total: 1 Guests: 1 Users: 0.
Hiller disk, eared.
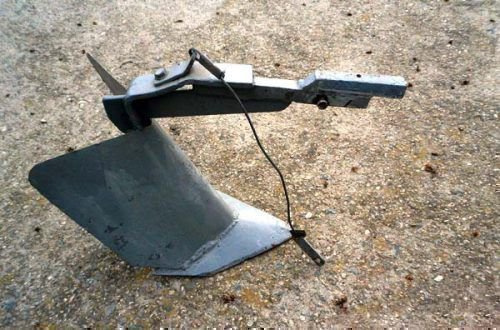
Do-it-yourself eared hiller
Plow share, moldboard, skimmers. Cultivator cutters. Potato digger. Weeder, flat cutters.
Hiller drawing for walk-behind tractor with dimensions
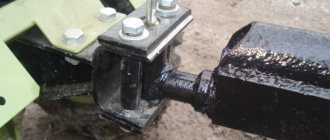
Articulated walk-behind tractor frame. PTO power take-off shaft.
Drive shaft wheel axle. Articulated walk-behind tractor.
DIY hiller drawings
Do-it-yourself eared hiller Open photo Drawing of a hiller for a walk-behind tractor with large dimensions. Picture on the topic » How to make an adjustable hiller with your own hands » Rating: 4. Design of a disk hiller for a walk-behind tractor Open photo Drawing of a disk hiller: description of the device in large size. Picture on the topic » Manufacturing a disk hiller for a walk-behind tractor: various layouts and design devices » Rating: 3.
Double-row lister unregulated hiller Open photo Do-it-yourself hiller for a walk-behind tractor: large-size drawing.
Do-it-yourself hillers for a walk-behind tractor
Vertical stand
Multifunctionality is a mandatory feature of any device, and therefore you need to pay attention to adjusting the device. The height can be adjusted using the telescopic device of the central part
The pipe needs to be inserted into a tube that is smaller in cross-section than the other, it goes into the rear link. If you use this method, you can easily adjust the hiller to the gardener’s height level
The height can be adjusted using the telescopic device of the central part. The pipe needs to be inserted into a tube that is smaller in cross-section than the other, it goes into the rear link. If you use this method, you can easily adjust the hiller to the gardener’s height level.
Adjustment
Adjustment of the angle of inclination is carried out using a lanyard
The tool bed must be movable. To fulfill this condition, the front link is attached to the main post with a hinge; adjustment is made using a lanyard, which allows you to change the angle of inclination. In the case where there is no lanyard, a metal plate is used, it is fixed in the desired position and secured with bolts.
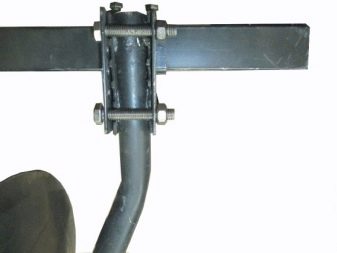
Welding
The rear link and blades need to be welded to the rack, then the front link is attached. The rear link width is 0.5 meters. Handles - 0.2 meters. A pipe 0.3 meters long is welded to the center of the fork; with this end the structure is inserted into the cavity of the vertical rod.
To adjust the height of the rack, you need to drill out the openings that are located at its upper end. Exactly the same manipulations must be done with a vertical fork. The front and rear links should be identical in width.
Manufacturing of a double moldboard plow
To make a double moldboard plow, you will need plates, each two millimeters thick. They need to be given semicircular bends. Then the process of welding the two halves to the stand is carried out.
Two important aspects of the work: the seam in the place where the parts are joined must be smooth, the plates must be sanded using a grinder.
Double shaft plow
Making a scoring knife
To make a pruning knife, you need to get steel with a high carbon concentration.
Then you should cut out a knife, which should be shaped like an arrowhead, and sharpen it carefully (the angle between the surface and the knife should be 45 degrees)
Why 45? If you grind a knife at this angle, it will not lose its sharpness for a long time. Next, you need to weld the trimming knife to the bottom of the post and grind it.
Advantages and features of different types of hillers
Depending on the model, hillers can be divided into the following categories:
- Lister model, the peculiarity of which is ease of manufacture, the presence of thin racks that prevent the walk-behind tractor from overloading when buried in dense layers of soil.
- Disk option. The advantage of such a tool is the effective combination of the design with the main unit. Reducing the speed of the cultivator increases its power, which improves the quality of cultivation. In addition, such designs are easy to use and are versatile in use.
- Samples with a grip of variable width are used in double-row processing, with tool adjustment for a specific row spacing. Despite their popularity, such models are quite energy-intensive, since the sliding blades push part of the soil to the side and then fall back, which puts a large load on the person operating the walk-behind tractor.
- Propeller-type hillers are used to equip units with a pair of frontal gears. This allows you to not only loosen the soil at higher speeds, but also throw it into the furrows from the row spacing.
Variable width hiller consumes a large amount of fuel
Hilling potatoes with a walk-behind tractor
Hilling potatoes is one of the most labor-intensive processes, especially when it comes to large areas. Manipulation can be done either manually (using hoes, hoes, etc.) or automatically (using a cultivator or walk-behind tractor). In this article we will talk about how to properly hill potatoes with a walk-behind tractor . Before we begin the story, let’s look at the hilling process itself.
How to properly hill potatoes?
Hilling potatoes is a mandatory action.
Its essence is to sprinkle the stems of the bush with loosened soil. This is done so that more oxygen reaches the root crops. In addition, hilling allows you to get rid of weeds to some extent, protect the plant from sudden frosts and accelerate its development. During the season it may be necessary to carry out three hillings. Let's talk about each in more detail:
- The first hilling of potatoes should begin when the plant reaches a height of 15 cm. Usually this period occurs in the second or third ten days of May.
During the first hilling, it is necessary to remember that the layer of sprinkled soil should not exceed 10 cm. If this rule is not followed, it will be very difficult for the shoots to develop.
- The second hilling of potatoes should be done when the bushes reach a height of 20-25 cm. As a rule, this moment occurs 1-2 weeks after the first hilling.
- Not all gardeners carry out the third and final hilling, but we recommend not skipping this stage. The essence of the process is the same, however, this time the stems need to be sprinkled with soil as high as possible.
During hilling, you need to pay attention to the condition of the soil. It should not be too dry or wet. The ideal option is moderately moist soil.
Hilling potatoes using a walk-behind tractor
The walk-behind tractor greatly simplifies the process of hilling potatoes.
For example, a field of several tens of acres can be manually hilled in a day at best. If you resort to using a walk-behind tractor, you can complete this work in just a few hours. So, let's look at how to properly hill potatoes with a walk-behind tractor. Before we start talking about the process of hilling potatoes, let's talk about the special structures that loosen the soil. If anyone has ever seen a walk-behind tractor, he or she has already guessed that we are now talking about rippers and hillers.
The elements are quite primitive; some experienced gardeners even manage to make potato hillers with their own hands. In total, it is customary to distinguish two types of hillers: plow-shaped and disk. Each one differs from each other in certain characteristics. We will tell you about them now.
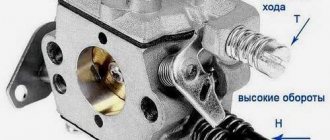
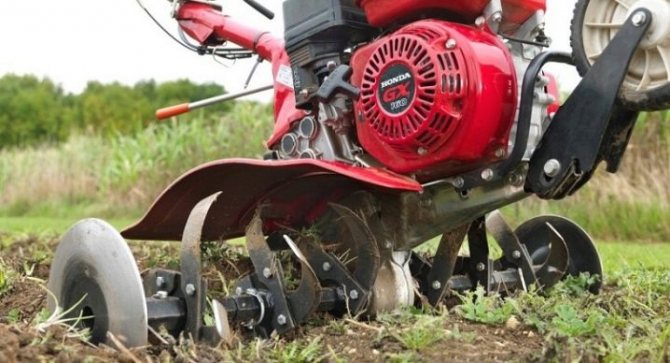
Hilling potatoes using a walk-behind tractor with a plow-shaped hiller
To work with a plow-shaped hiller, care should be taken to adjust the angle of attack and the depth to which the dive will occur.
When this is done, you can start working. To do this, the hiller needs to be pushed a little deeper into the ground. It should remain in this position throughout the entire hilling. If the structure is above the ground during potato processing, it must be lowered. To do this, the stand leans back. If the opposite phenomenon occurs, the hiller is deeply immersed in the ground, then the stand must be tilted forward.
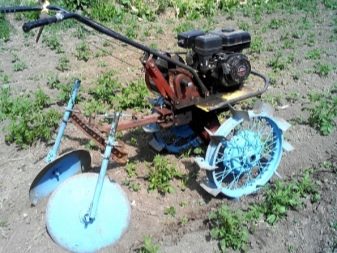
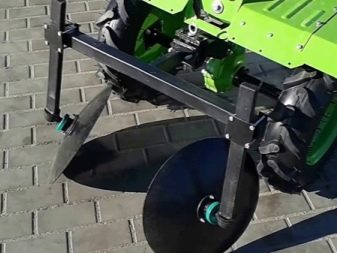
Hilling potatoes using a walk-behind tractor with a disk hiller
To work with the disk variety of hiller, you will need to set two parameters.
We are talking primarily about the distance between the disks. It directly depends on the type of potato and is generally 40-70 cm. Then you need to remember to adjust the angle of attack (rotation). It should be the same for both hiller discs.
Hilling process: how it happens
So, it’s time to hill the potatoes with a walk-behind tractor.
The first thing to do is place some rippers at the front of the structure. At the back there will be a hiller, which was discussed above. When all the necessary manipulations have been completed, you can begin processing. To do this, the walk-behind tractor is placed strictly in the center between the rows of potatoes and the minimum speed is turned on. The process has started. The potatoes are hilled up to the end of the ridge, then the walk-behind tractor is carefully unfolded and the next row spacing is processed in the same order. According to many experts in the field of gardening, you can hill up potatoes with a walk-behind tractor only once. During the second treatment of the bushes, there is a high probability that the tubers themselves will be damaged. If you decide to hill up potatoes with a walk-behind tractor, then you need to take care of the “correct” planting of the seed in advance. Processing with this technique is only possible if the distance between the rows of plants is approximately 65-70 cm.
As you can see, hilling potatoes with a walk-behind tractor is very simple. If you master the principle of operation and begin to apply it in practice, the time saved can be spent on solving other important matters.
Hilling potatoes with a walk-behind tractor - video
glav-dacha.ru
In order to get a good potato harvest, you need to pay due attention to caring for it. The hilling procedure, which is carried out several times during the growth of the plant, along with watering, is the main component of such care. Its essence is to roll the soil onto the plant.
How to do it yourself?
It is easier to manufacture any equipment if there is a corresponding drawing with given dimensions. The tool manufacturing algorithm is required first:
- draw drawings on paper;
- make a template in full size, according to which steel parts will then be cut out;
- bend the disk blanks according to the level until parallel radius lines are reached;
- organize welding work using a machine with the appropriate power for the metal used;
- Sand the welding edges with sandpaper;
- fasten the racks and turnbuckles with bolts;
- weld structural elements;
- Adjust the location of the disks.
The required steel thickness for discs is 2-3 mm. The distance between elements can vary from 35 to 70 cm. Racks and brackets are made from ordinary water pipes with a diameter of up to 20 mm, steel about 2 mm thick.
Required materials and tools
It is allowed to use ordinary lids from kitchen utensils with a diameter of 40 to 60 cm as disks. These parameters are selected experimentally and are related to the power traction of the walk-behind tractor. If the device is too heavy, the unit may simply not be able to pull it. The connector elements will be replaced by a hollow pipe with a diameter of at least an inch, with a meter in size.
The purpose of the traction force will be provided by a hollow pipe with a cross-section of 3⁄4 inches. For the leash, you need to choose T-shaped steel products. Adjustable adapters are useful for coupling the disc elements. The role of fastening elements will be played by bolts. The elements are fastened with welds, bent with a turbo bender or using a gas lamp. If the structure is made for a walk-behind tractor, a bracket should be provided. Hand tools need comfortable handles.
Manufacturing
You can make a hiller for the popular walk-behind tractors “Ugra”, “Belarus 09N-02”, “Motor Sich” using the same principle. The main axles on which the disks are mounted are adjusted to the parameters of the walk-behind tractor. The parts are connected to each other by welding. The main condition for disks is a symmetrical arrangement. Both elements are mounted at an angle, and the best connection option would be an adjustable one using an adapter. The holder elements are bent using a turbo bender and then attached to the axle by welding. The reliability of the fastenings must be checked, and the edges of the weld must be cleaned.
The elements are attached to the axis using the letter T. The assembled structure is installed on the walk-behind tractor using a bracket. The stopper can be inserted inside the profile pipe and pressed tightly. The hiller is completed before planting the potatoes. This will allow you to eliminate defects in a timely manner and not spoil the harvest.
During operation, you will be able to set the optimal speed, which will correspond to the power of your walk-behind tractor. Do-it-yourself mechanisms allow you not only to save on attachments for a walk-behind tractor, but also to facilitate manual labor. Even if there is no unit with a power device on the farm. A homemade manual disk hiller will be a good helper, and will also save money on the purchase of equipment.
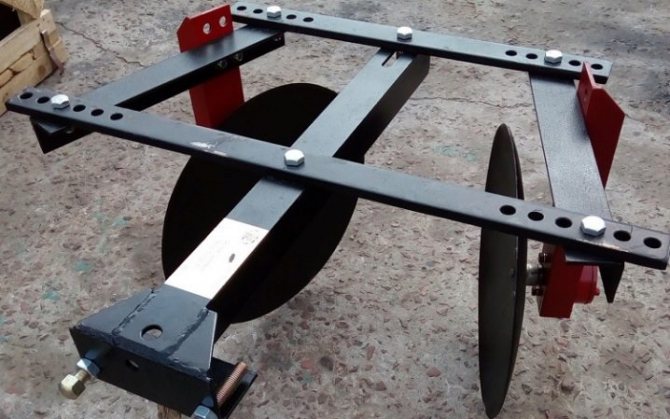
Assembly
The basic elements of a manual disc hiller remain the same. Assembly of the product is simpler, since the two discs of the hiller are connected to each other by a regular bushing or by welding through a pipe, which will act as a jumper. Manual models do not require adjustment of the connection angle, so working with them is possible along row spacing with a standard distance. The free rotation of the disks around the axis will be facilitated by the hubs. Due to rotation, the tool will easily enter even heavy, dense soil.
Elements with disks are connected to a beam, for connecting which a welding machine is useful. You can choose anchor bolts as connectors. Such fasteners make it easy to disassemble garden tools.
A handle is useful to operate the device. For which you can choose a steering wheel from an old bicycle or other similar equipment. It is fixed to the beam and aligned with the height of the person who will operate the hiller.
By the way, you can also adapt wheels from an old bicycle to a manual hiller. If they are attached to the frame at the front, this will significantly reduce the load on the operator. Some craftsmen also use a bicycle frame in the assembly, installing hiller discs instead of pedals. The design retains the steering wheel and one wheel.