Payment for goods and downloading of the book in electronic form (PDF format) is made on the website.
To do this, you need to find the book you are interested in and click on the “Buy” button. The price of the book is indicated on the button.
For convenience, the price on the website for residents of Russia, Belarus and Kazakhstan is presented in rubles.
For residents of Ukraine in hryvnias, and for all other countries - dollars.
After clicking on the “BUY” button, a payment window will open where you can select a payment system with which you can pay for the selected book using any bank card (Visa, MasterCard, MIR, etc.)
When you click on the “Pay by bank card” button, the Portmone payment system will open, which is the easiest way to make a payment.
In addition, the website offers four payment systems for payment:
- Yandex (payment from any bank cards, Yandex Money account, QIWI Wallet, terminals, etc.);
- Portmone (payment from any bank cards, Portmone account);
- PayPal (payment from any bank cards, PayPal account);
- WebMoney (payment from any bank cards, payment from WebMoney wallets).
Payment via Yandex Cashier
After selecting payment via Yandex, the Yandex Cashier payment system will launch, where you need to select a convenient payment method (bank card, QIWI, Yandex Money account, etc.)
After specifying payment details and confirming payment, payment for the goods will occur.
If you have a bank card in a currency other than the ruble, then the money will be debited from the card at the rate of the Central Bank of Russia at the time of the purchase.
This payment method is optimal for residents of Russia, Kazakhstan and Belarus.
Official website of the Yandex Kassa payment system https://kassa.yandex.ru
Payment via Portmone
After selecting payment through Portmone, the payment system will launch, where you need to select the payment method: bank card or Portmone account.
The price in the Portmone payment system is converted into dollars at the exchange rate of the Central Bank of the country where you are located.
If you have a bank card in a currency other than the dollar, then the money will be debited from the card at the rate of the Central Bank of your country at the time of the purchase.
After specifying payment details and confirming payment, payment for the goods will occur.
Official website of the Portmone payment system https://www.portmone.com
Payment via PayPal
After selecting payment via PayPal, the PayPal payment system will launch, where you need to select the payment method: bank card or PayPal account.
If you already have a PayPal account, then you need to log into it and make a payment.
If you do not have a PayPal account and you want to pay using a bank card via PayPal, you need to click on the “Create an Account” button - shown with an arrow in the picture.
PayPal will then prompt you to select your country and provide your credit card information.
After specifying the information required to make the payment, you must click on the “Pay Now” button.
Official website of the PayPal payment system https://www.paypal.com
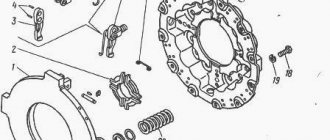
Description of indicators on the KAMAZ instrument panel (65115, 43118 and 5320): combination and repair
In the driver's cabin you can find many incomprehensible devices, the purpose of which must be explained for the correct operation of the vehicle.
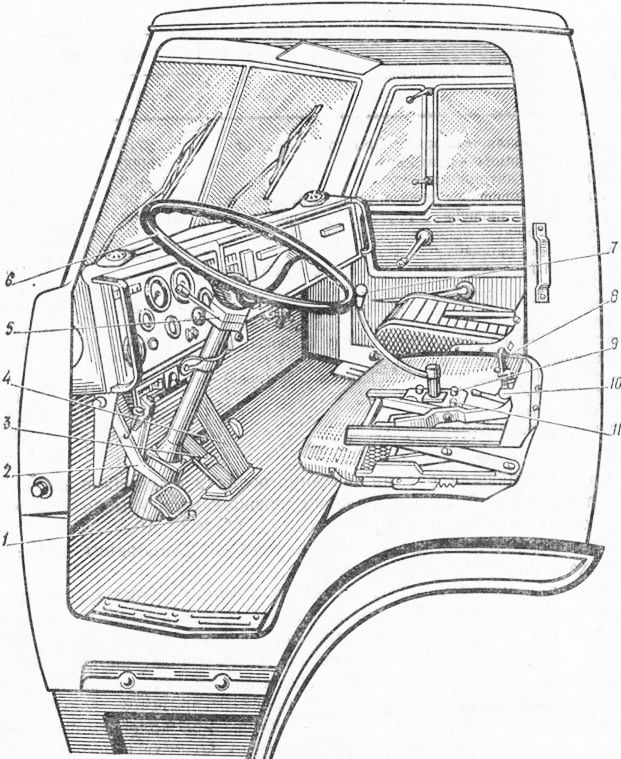
Each of these devices is located on a special panel, which folds back and is located on the left side of the panel. The first device where the eye falls is the steering wheel. It is located in the picture below at number 6 and makes it convenient to monitor the readings that are displayed on the measuring instruments in the cockpit. Thanks to the figure below, you can find out the purpose of each button, pedal and lever that are located in the driver’s cab.
Purpose of instruments in the driver's cabin
- Auxiliary (direct) brake control button.
- The pedal is responsible for the clutch.
- A pedal responsible for controlling the brake valve.
- A pedal that controls the start of fuel.
- Air pressure distributor.
- Steering wheel.
- Windshield cleaning device.
- Window lift system lever.
- Gearbox control knob.
- Handle for closing the door.
- Handle for longitudinal movement of the passenger seat.
- Lever for adjusting the backrest of the passenger seat.
- Driver's seat suspension stiffness control lever.
- Engine cable.
- Valve handle for parking and emergency brakes.
- A device that fixes the adjustment of the backrest angle of the driver's seat.
- Fuel supply thanks to manual control.
- The handle responsible for the function of longitudinal movement of the driver's seat.
- Cabin fairing.
Instrument cluster
Below is how to diagnose problems in advance, as well as the most common breakdowns, including those due to improper use of the cigarette lighter.
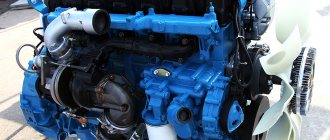
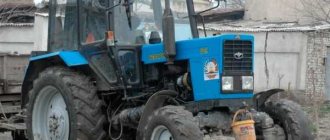
KAMAZ blue
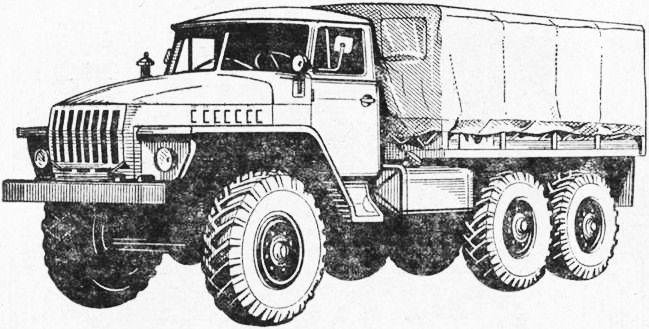
This review from the author of TheVostok98 is dedicated to the KAMAZ 5320 model.
CONTROLS, CAB EQUIPMENT AND INSTRUMENTS
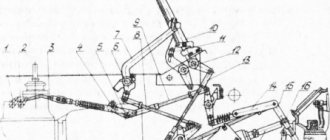
The location of the controls is shown in Fig. 1.
— auxiliary brake button; — clutch pedal;
— pedal of the service brake system;
— fuel pedal;
— gear shift lever. The gear divider control switch is built into the lever handle. The switch can be used to select a higher or lower gear in the divider;
- instrument and starter switch with anti-theft device.
O - everything is turned off;
I - circuits of control and measuring instruments are turned on;
II - the circuits of instrumentation and starter are turned on, the position is not fixed;
In some vehicle configurations, an instrument switch with an anti-theft device is installed on the steering column. A description of the switch for devices with an anti-theft device is given in the Anti-theft device section.
— Combined light switch (see Fig. 2);
— manual fuel supply control handle;
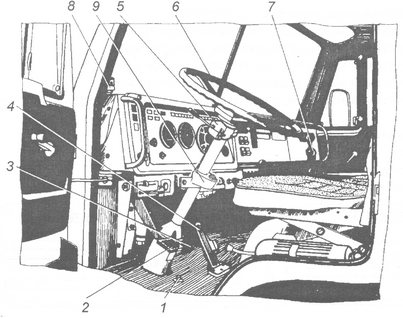
- engine stop handle.
The handle is recessed - the engine is ready to start; To stop the engine, pull out the handle;
— control valve for parking and spare brakes.
Read more: CVT on the Nissan X-Trail: owner reviews of operation
The crane handle has two fixed positions: vertical—the parking brake is on, horizontal—the parking brake is off. In intermediate positions, the tractor and trailer are braked with a spare brake.
I — right turn indicator is on; 0 - everything is turned off; II — right turn indicator is on (non-fixed); A - first windshield wiper speed; III — left turn indicator is on (non-fixed); B - second windshield wiper speed; IV - left turn indicator is on; C - intermittent operation of the windshield wiper; V - high beam flashing; D — windshield washer switched on (non-fixed); VI — high beam is on.
Dashboard
- a switch panel on which key switches and switches, an ashtray, a radio receiver and a ground switch are located. When you pull the panel towards you, access to the fuses of electrical equipment opens;
— radiator shutter control handle. When the handle is pulled out, the blinds are closed.
— control lever for locking the center differential. The lock is engaged in the SLIPPERY ROAD position.
— control levers for the heater and cabin ventilation.
Use the upper lever to turn on and regulate the heating of the air coming from the heater, and use the lower lever to control the distribution of this air in the cabin. In the extreme right position of the lower arms, air is supplied only to the windows; in the CABIN position, air is supplied to the windows and the feet of the driver and passenger. Intermediate positions allow you to change the heating efficiency.
Turning on the air supply is a key switch on the fuse panel when the key is in position I and II in the instrument and starter switch lock.
In the case of delivery of vehicles with heater 15.8106, a control panel for the heater 15.8106 is installed above the instrument panel, see Figure 4. The control panel displays the operating status of the heater.
Rice. 3. Instrument panel
Rice. 4. Heater control panel 15.8106
Dashboard
— engine oil pressure indicator with a built-in warning lamp, which lights up when the pressure in the lubrication system drops to 39.78 kPa (0.4.0.8 kgf/cm2). The oil pressure in a warm engine should be 392.3. 539.4 kPa (4.0 - 5.5 kgf/cm 2 ) at the rated engine speed and not less than 98.1 kPa (1.0 kgf/cm 2 ) at the minimum speed;
— fuel level indicator in tanks with a built-in warning lamp, which lights up when the fuel in the tank decreases to 30 liters;
— liquid temperature indicator in the cooling system with a built-in warning lamp, which lights up when the coolant temperature rises above 98 ° C; normal coolant temperature is 80..98°C.
Read more: Car oka gearbox
— speedometer with total mileage counter of the car. Has a blue lamp that lights up when the high beam headlights are turned on;
— tachometer. When the car is moving, the tachometer needle should be on the right side of the green field. When the engine loses power, fuel consumption increases - the arrow is in the black field. The needle should not enter the red fields - these are dangerous modes for the engine!
- pressure gauge. The upper arrow shows the air pressure in circuit I, the lower arrow in circuit II of the pneumatic brake drive; nominal air pressure in the pneumatic drive (6.5. 8.0 kgf/cm 2 );
— instrument panel lighting switch. Turns on and regulates the level of illumination of devices;
- hazard warning switch. When you press the button, all direction indicators light up intermittently, as well as the warning light built into the handle;
— electric torch device (EFD) switch button. When you hold the button pressed for some time, the lamp in the control lamp block should light up, indicating that the ECU is ready to start the engine;
- remote power switch button;
— blocks of warning lamps;
Rice. 5. Instrument panel
— button for checking the serviceability of the warning lamps;
— control signal that the ECU is ready for operation, red;
— control signal for the vehicle’s direction indicators, green, intermittent;
— control signal for the trailer direction indicators, green, intermittent;
— control signal for turning on the cross-axle differential lock, red;
— warning signal about a clogged air filter, red;
— oil filter clogged warning signal, red;
— warning signals about a drop in pressure in the cylinders of circuits 1, 2, 3 of the pneumatic brake drive, red, a buzzer sounds when turned on;
— control signal for turning on the parking brake, red, intermittent.
Switches and key switches are shown in Figures 3 and 5.
— heater electric motor switch;
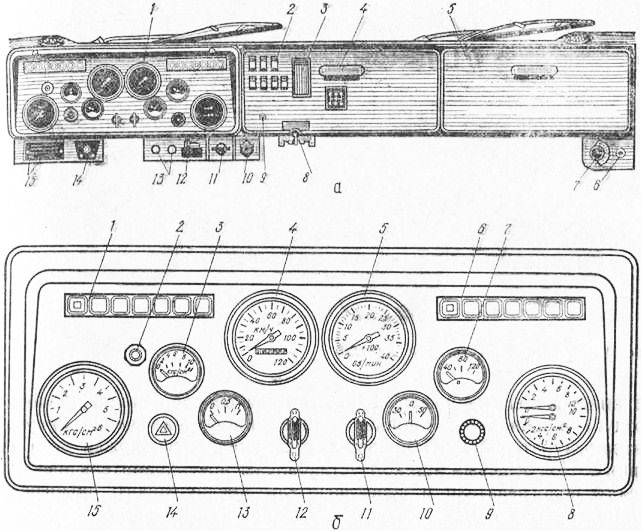
— rear fog lamp switch;
— fog light switch;
— platform lift/lower switch;
— mirror heating switch;
— wheel lock switch;
The order of switches and switches may be changed depending on the specific vehicle configuration.
Rice. 6. Warning lamp block
The KAMAZ instrument panel is often unclear and extensive. The purpose of each button and, in general, all the parts located on the instrument panel is important for each driver of the vehicle to know. Read more about this below in the article.
Content
[ To uncover]
[Hide]
Overview of the interior and controls of KAMAZ 65221)))
Cabin structure of KamAZ 43114
Steering of Kamaz 4310 and Kamaz 5320 vehicles
Gearbox on a Kamaz car (switching diagram) for subscribers
KAMAZ 43101 CONTROL-INSTRUMENTS
How to properly use a divider on a Kamaz
Read more: How to remove the instrument panel of a VAZ 2107, make the instrument lighting, why the tachometer does not work
Everyday life of KAMAZ drivers: Lifting the body and the sound of the v8 engine
Review of KAMAZ 5320 (watch to the end)
Testers: KamAZ-6520
KAMAZ instrument panel assembly
Flatbed cab KAMAZ 5320, orange
KAMAZ Euro-3 instrument panel assembled.
How to untie KAMAZ.
KAMAZ dashboard
Cabin of KAMAZ concrete mixer truck, gray
KAMAZ 65115
Cabin KAMAZ 4310, KHAKI color
Test drive KAMAZ
Kamaz 5320 reviewer
Payment via WebMoney
After selecting payment via WebMoney, the payment system will launch, where you need to select the payment method: bank card or WebMoney wallet.
If you already have a WebMoney wallet, then you need to log into it and make a payment.
If you do not have a WebMoney wallet and you want to pay in another way, you need to select any of the methods that WebMoney offers and make the payment
After specifying payment details and confirming payment, payment for the goods will occur.
Official website of the WebMoney payment system https://www.webmoney.ru/
Downloading a book
After successfully completing the payment (by any method) and returning to the KrutilVertel store from the payment system website, you will be taken to the successful payment page:
On this page you need to indicate your e-mail, where access to download the book will be sent.
If you are already registered on our website, then simply follow the link to your personal account.
The book you purchased will be in your personal account, from where you can always download it.
Please note that after making the payment, you need to return back from the payment system website to the KrutilVertel website.
If for some reason you did not return back to the site and closed the payment system tab with a message about the successful completion of the payment, please let us know - we will send you a letter indicating access to download the book.
Need for documentation
Practical
Note! Owners not only need the electrical circuit itself, but also accurate information about where exactly the KAMAZ 5320 electrical wiring is laid, as well as factory instructions, visual diagrams and photos in order to service it themselves.
After all, the scope of application of this car is very wide:
- From cities and towns of the European part of Russia;
- Regions of the Far North and the Arctic;
- Hot climate of Central Asia;
- To the tropics and subtropics of other countries and continents.
Factory layout of wiring relative to the supporting frame of KamAZ 5320
Accordingly, operating conditions have a direct impact on the durability of the insulation and contacts of electrical wires and connections, therefore the wiring diagram of the KAMAZ 5320 and its location relative to the body elements is very important when servicing yourself.
Location of electrical wires inside the KamAZ 5320 cabin
In the same way, you may need a useful and necessary wiring diagram for KAMAZ 5511, the most popular dump truck, which you can also find in the corresponding section dedicated to vehicles of this brand.
Historical
In addition to operators, there is a separate category of truck consumers who also need factory documentation.
- restoration workshops;
- exhibition halls;
- museums.
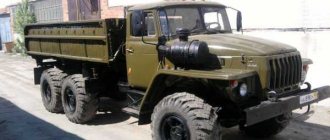
The very “first” KamAZ 5320 - restored and exhibited in the factory museum
Automobile Manufacturer Museums
For reference: the KamAZ 5320 truck with chassis number No. 0000001, according to the order, went straight from the factory assembly line to work in one of the vehicle fleets of Bashkortostan back in 1976.
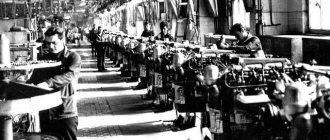
When the plant in Naberezhnye Chelny increased its volumes several years after the launch of mass production, the question arose about preserving commemorative copies of the produced models. As a result of this decision, a museum was organized, which began searching for and returning particularly valuable exhibits.
Problems when paying with bank cards
Sometimes difficulties may arise when paying with Visa/MasterCard bank cards. The most common of them:
- There is a restriction on the card for paying for online purchases
- A plastic card is not intended for making payments online.
- The plastic card is not activated for making payments online.
- There are not enough funds on the plastic card.
In order to solve these problems, you need to call or write to the technical support of the bank where you are served. Bank specialists will help you resolve them and make payments.
That's basically it. The entire process of paying for a book in PDF format on car repair on our website takes 1-2 minutes.
If you still have any questions, you can ask them using the feedback form, or write us an email at [email protected]
The cost of repairing Kamaz vehicles
| NAME OF WORKS | Cost from, rub. | |
| 5320 | 4308 | |
| Maintenance (to the extent specified in the operating manual) | ||
| TO-1 | 5304 | 5304 |
| TO-2 | 22620 | 22620 |
| Injection of all grease nipples | 734 | 734 |
| Engine repair | ||
| Adjusting valve clearance with cylinder head broach | 2808 | 1560 |
| Adjusting the valve clearance with cylinder head broaching (with the valve cover removed) | 1560 | 1248 |
| 156 | 312 | |
| Removing/installing valve cover 2 pcs. and more | 1248 | — |
| Replacing (draining/filling) engine oil with replacing filters (flushing the centrifuge) | 1092 | 1092 |
| Removing the engine | 6162 | |
| Engine Installation | 9937 | |
| Removal/installation of internal combustion engine | 16099 | 13010 |
| Engine repair (ICE removed) | 68406 | 57876 |
| Engine repair | 84505 | 70886 |
| Replacing the head (gasket) of a block on a vehicle | 1248 | |
| Replacing two heads (gaskets) on a vehicle | 9984 | |
| Replacing the front crankshaft oil seal | ||
| Replacing the oil seal packing or rear crankshaft oil seal | 16209 | |
| Removing/installing exhaust manifold | 2215 | |
| Removing/installing exhaust manifold (2 sides) | 4430 | |
| Removing/installing the intake manifold (without bleeding the cooling system) | 1248/ 2496 | |
| Replacing engine belts | 343 | 343 |
| Coolant replacement | 296 | 296 |
| Bleeding the engine cooling system | 819 | 819 |
| Replacing the pan gasket | 1326 | 1326 |
| Power system repair | ||
| Adjusting the fuel injection advance angle | 655 | |
| Replacing the fuel pump | — | — |
| Removing/installing fuel injection pump | 1981 | 4009 |
| Disassembly/assembly of injection pump | 6848 | 13416 |
| Adjusting the injection pump | 2730 | 3588 |
| Removing/installing valve cover | — | 312 |
| Removing/installing the exhaust valve rocker arm and adjustment (1 cylinder) (with the valve cover removed) | — | 468 |
| Removing/installing an injector | 702 | `+1248 |
| Removing/installing injectors (all) | 5616 | `+4992/7488 |
| Disassembling/assembling the nozzle | 390 | 1092 |
| Disassembly/assembly of injector (all) | 3120 | 4368/6552 |
| Nozzle adjustment | 234 | 1482 |
| Nozzle adjustment (all) | 1872 | 5928/8892 |
| Removal/installation of the high pressure pipeline from the injection pump to the injector | 468 | 468 |
| Removing/installing carburetor | — | — |
| Disassembly/assembly of carburetor | — | — |
| Carburetor repair (all included) | — | — |
| Replacing the fine fuel filter | 312 | 281 |
| Replacing the air filter element | 296 | 296 |
| Replacing the fuel coarse filter | 468 | 468 |
| Replacing the accelerator pedal | 624 | |
| Removing/installing the fuel tank | 1248 | 1248 |
| Replacing the fuel receiver | 980 | 980 |
| Replacement of TKR | 2200 | 3962 |
| Repair of gas exhaust system | ||
| Muffler replacement | 2153 | 2153 |
| Replacing the exhaust muffler pipe gasket | 889 | 889 |
| Replacing the exhaust muffler pipe | 1872 | 1872 |
| Replacing a metal hose | 1872 | 1872 |
| Replacing the rear exhaust pipe | 640 | 1872 |
| Replacing the front exhaust pipe | 1872 | |
| Replacing the exhaust manifold gasket | 2215 | |
| Replacing the exhaust manifold gasket (left) | — | — |
| Replacing the exhaust manifold gasket (right) | — | — |
| Replacing the muffler mounting clamp | 265 | 265 |
| Replacing the TKR pipe clamp | — | 265 |
| Cooling system repair | ||
| Removing/installing an internal combustion engine cooling radiator (on vehicles without an intercooler) | 2496 | — |
| Removing/installing an internal combustion engine cooling radiator (with the intercooler radiator removed) | 2496 | 2496 |
| Removing/installing an intercooler radiator (with the engine cooling radiator removed) | 936 | 936 |
| Replacing the water pump (with the engine cooling radiator removed) | 1154 | 1154 |
| Replacing the water pump (with the engine cooling radiator and belts removed) | — | — |
| Replacing the water pump (with the engine belts removed) | — | — |
| Replacing the water pump PZD | 699 | 699 |
| Soldering the engine cooling radiator | 5616 | 5616 |
| Replacing the thermostat | 421 | 421 |
| Clutch repair | ||
| Clutch replacement | 13712 | 10747 |
| Replacing the clutch (with the gearbox removed) | 1357 | 1357 |
| Replacing the release bearing (with the gearbox removed) | 150 | 150 |
| Replacing the release bearing lubrication hose (with the gearbox removed) | 234 | 234 |
| Replacing the front gearbox primary shaft bearing (with the clutch removed) | 546 | 546 |
| Removing/installing the flywheel (with the clutch removed) | 858 | 858 |
| Flywheel groove | 702 | 702 |
| Replacing the main clutch cylinder (MCC) | 998 | 998 |
| Replacing the working clutch cylinder (PGU) | 967 | 967 |
| Bleeding the clutch | 240 | 240 |
| Clutch adjustment (with gearbox removed) | 967 | 312 |
| Replacing the clutch release spring | 156 | 156 |
| Replacing the clutch cylinder reservoir | ||
| Gearbox repair | ||
| Removing/installing gearbox | 11310 | 9000 |
| Transmission repair | 19796 | 17486 |
| Gearbox repair (gearbox removed) | 8252 | 8252 |
| Replacing the secondary gearbox shaft seal | 1560 | 1560 |
| Replacing the primary gearbox shaft seal (with the gearbox removed) | 1560 | 780 |
| Replacing (draining/topping up) oil in the gearbox housing | 624 | 624 |
| Cardan transmission repair | ||
| Replacing the driveshaft | 858 | 858 |
| Replacing the cardan shaft crosspiece (with the cardan shaft removed) | 1123 | 1123 |
| Replacing the support for the intermediate driveshaft (with the driveshaft removed) | 655 | 655 |
| Replacing cardan bolts | ||
| Rear axle repair | ||
| Removing/installing rear suspension assembly | 5148 | — |
| Replacing the rear axle gearbox gasket | 3510 | 3510 |
| Replacing the rear axle gearbox gasket (with the platform and cylinders removed) | 3150 | — |
| Replacing the rear axle gearbox gasket (with the rear suspension removed) | 3510 | — |
| Removing/installing rear axle axle shaft | 624 | 624 |
| Replacing the middle axle gearbox gasket (with the rear suspension removed) | 6084 | — |
| Replacing the middle axle gearbox gasket (with the platform and cylinders removed) | 6084 | — |
| Suspension repair | ||
| Replacing the front axle spring | 1888 | 1888 |
| Replacing front axle springs (2 pcs.) | 3775 | 3775 |
| Replacing the rear axle spring | 1654 | 1654 |
| Replacing rear axle springs (2 pcs.) | 3307 | 3307 |
| Front axle repair | ||
| Replacing king pins | 9213 | 11013 |
| Removing/installing the front axle (with the wheels removed) | 5710 | 5710 |
| Dismantling/assembling the front axle with steering rods and brake assemblies | 12761 | |
| Wheel and hub repair | ||
| 1154 | — | |
| Removing/installing the front axle wheel (1 side) | 577 | 577 |
| Removing/installing the front wheel hub (with the wheel removed) | 624 | — |
| Removing/installing the front wheel hub | 1201 | — |
| Removing/installing the front axle hub (with the axle shaft removed) | — | — |
| Removing/installing the front axle hub | — | — |
| Removing/installing the front axle hub (with the bracket removed) | — | 1154 |
| Removing/installing the front axle hub (with bracket, disc brake) | — | 2901 |
| Removing/installing the front axle hub (for off-road vehicles) | 2714 | — |
| Replacing the front axle hub oil seal (with the hub removed) | 203 | 203 |
| Replacing the front axle hub bearing (with the hub removed) | 203 | 203 |
| Replacing the front axle hub stud (with the wheel removed) | — | 42 |
| Replacing the front axle hub stud (with the brake drum removed) | 34 | — |
| Removing/installing a wheel (for off-road vehicles) | 1154 | — |
| Removing/installing the outer rear axle wheel (1 side) | 624 | 624 |
| Removing/installing the wheel of the outer and inner rear axle (1 side) | 1248 | 1248 |
| Removing/installing a spare wheel | 257 | 257 |
| Removing/installing the rear axle hub (with the axle shaft removed) | 1061 | — |
| 2933 | — | |
| Removing/installing the rear axle hub (with the wheel removed) | — | — |
| Removing/installing the rear axle hub | — | — |
| Removing/installing the rear axle hub (with the bracket and axle shaft removed) | — | 1061 |
| Removing/installing rear axle hub (disc brakes) | — | 4103 |
| Removing/installing the rear axle hub (for off-road vehicles) | 3432 | — |
| Replacing the rear axle hub oil seal (with the hub removed) | 265 | 265 |
| Replacing the rear axle hub bearing (with the hub removed) | 265 | 265 |
| Replacing the rear axle hub stud (with the hub removed) | 47 | — |
| Replacing the rear axle hub stud (with the brake drum removed) | — | — |
| Replacing the rear axle hub stud (with the wheel removed) | — | 58 |
| Steering repair | ||
| Toe-in of wheels of dependent suspension | 967 | 967 |
| Removing/installing steering tie rod | 1388 | 1388 |
| Disassembly/assembly of steering tie rod | 842 | 842 |
| Removing/installing steering linkage | 749 | 749 |
| Disassembly/assembly of the longitudinal steering rod | 546 | 546 |
| Replacing the power steering pump | 1014 | 1014 |
| Replacing the power steering high pressure hose | 312 | 312 |
| Replacing the power steering low pressure hose | 312 | 312 |
| Removing/installing the steering mechanism | 1919 | 1919 |
| Power steering repair (removed) | 4493 | 4727 |
| Replacing (draining/topping up) oil in the power steering pump reservoir | 234 | 234 |
| Bleeding the power steering system | 349 | 349 |
| Replacing the power steering pump element | 234 | 234 |
| Replacing the power steering cylinder | — | — |
| Replacing the propeller shaft | 577 | 577 |
| Replacing the steering wheel | 343 | 343 |
| Brake system repair | ||
| Brake system diagnostics | 250 | 250 |
| Replacing brake pads on the front axle (with the hub removed) (1 side) | 437 | — |
| Replacing the brake pads of the front axle (with the hub removed) (1 axle) | 874 | — |
| 1638 | — | |
| 3276 | — | |
| Replacing brake pads on the front axle (disc brake with the wheel removed) (1 side) | — | 429 |
| Replacing the brake pads of the front axle (disc brake with the wheel removed) (1 axle) | — | 858 |
| Replacing brake pads on the front axle (1 side) | — | 1006 |
| Replacing brake pads on the front axle (1 axle) | — | 3012 |
| 4305 | — | |
| 8612 | — | |
| Replacing the brake pads of the middle axle (with the hub removed) (1 side) | 437 | — |
| Replacing the brake pads of the middle axle (with the hub removed) (1 axle) | 874 | — |
| Replacing brake pads on the middle axle (1 side) | 3370 | — |
| Replacing the brake pads of the middle axle (1 axle) | 6740 | — |
| Replacing brake pads on the front axle (for off-road vehicles) (1 side) | 5054 | — |
| Replacing brake pads on the front axle (for off-road vehicles) (1 axle) | 10109 | — |
| Replacing brake pads on the rear axle (with the hub removed) (1 side) | 437 | — |
| Replacing brake pads on the rear axle (with the hub removed) (1 axle) | 874 | — |
| Replacing the brake pads of the rear axle (with the brake drum removed) (1 side) | — | — |
| Replacing the brake pads of the rear axle (with the brake drum removed) (1 axle) | — | — |
| 3370 | — | |
| 6740 | — | |
| Replacement of rear axle brake pads (for off-road vehicles) (1 side) | 5054 | — |
| Replacing brake pads on the rear axle (for off-road vehicles) (1 axle) | 10109 | — |
| Replacing brake pads on the rear axle (disc brake with the wheel removed) (1 side) | — | 429 |
| Replacing brake pads on the rear axle (disc brake with the wheel removed) (1 axle) | — | 858 |
| Replacement of rear axle brake pads (1 side) | — | 1677 |
| Replacing brake pads on the rear axle (1 axle) | — | 3354 |
| Adjusting the brake system | 109 | 109 |
| Removing/installing the front axle brake drum (with the hub removed) | 343 | — |
| Removing/installing the brake drum of the middle axle (with the hub removed) | 468 | — |
| Removing/installing the rear axle brake drum (with the hub removed) | 468 | — |
| Front axle brake drum boring | 1248 | — |
| Drum boring of the middle axle brake | 1435 | — |
| Rear axle brake drum boring | 1435 | — |
| Bleeding the brakes | — | — |
| Replacing the brake cylinder (with the brake pads removed) | — | — |
| Replacing the brake master cylinder | — | — |
| Compressor replacement | 1529 | 1872 |
| Replacing the main brake valve | 920 | 920 |
| Replacing the parking brake valve | 733 | 733 |
| Replacing the air pressure regulator | 546 | 546 |
| Replacing the moisture-oil separator | 530 | 530 |
| Replacing the dryer filter cartridge | 735 | 735 |
| Replacing the brake hose | 265 | 265 |
| Removing/installing the front axle brake adjustment lever | 421 | |
| Removing/installing the brake adjusting middle axle lever | 468 | |
| Removing/installing the rear axle brake adjustment lever | 468 | |
| Removing/installing the front axle expansion cam (with the hub removed) | 515 | — |
| Removing/installing the middle expansion cam (with the hub removed) | — | — |
| Removing/installing the rear expansion knuckle (with the hub removed) | 546 | — |
| Washing removed brake pads and cleaning the pad linings (1 wheel) | 156 | 156 |
| Replacing the front axle brake disc (with the hub removed) (1 side) | — | 1404 |
| Replacing the brake disc of the front axle (with the hub removed) (1 axle) | — | 2808 |
| Replacing the rear axle brake disc (with the hub removed) (1 side) | — | 1404 |
| Replacement of the rear axle brake disc (with the hub removed) (1 axle) | — | 2808 |
| Front axle brake disc boring | — | 702 |
| Rear axle brake disc boring | — | 702 |
| Removing/installing the front axle disc brake bracket (with the wheel removed) (1 wheel) | — | 1170 |
| Removing/installing the front axle disc brake bracket (with the wheel removed) (1 axle) | — | 2340 |
| Replacing the rear axle disc brake caliper (with the wheel removed) (1 wheel) | — | 1170 |
| Replacing the rear axle disc brake caliper (with the wheel removed) (1 axle) | — | 2340 |